I’ve been running Portainer for a long time and it’s served me well, but I came across Dockhand the other day when I was researching a new project for security scanning docker images. It positions itself as a modern alternative with a heavier focus on security — built-in CVE scanning, a safe-pull strategy for auto-updates, and OIDC/SSO support out of the box. It’s free and source-available for homelab use, which checks all the boxes for me.
Dockhand gives you a clean web interface to manage containers, Compose stacks, images, volumes, and networks from one place. It also ships with browser-based terminals, real-time log streaming with color support, visual Compose file editing, and live CPU and memory metrics per container. For anyone already using Trivy for vulnerability scanning, it’s worth knowing Dockhand integrates both Grype and Trivy natively as part of its update workflow — it pulls new images to a temporary tag and only deploys if the vulnerability count doesn’t increase.
This post walks through deploying Dockhand with Docker Compose, getting through the initial setup, and covering a few of the features that make it stand out.
Prerequisites
- Install Ubuntu Server 26.04 LTS — A base Ubuntu Server installation is required
- Things I Do After Installing Ubuntu Server — Post-install configuration should be complete before adding services
- Install Docker and Docker Compose on Linux — Docker and Compose must be installed and running
Deployment
Dockhand uses SQLite by default with no database setup required, so the compose file is straightforward. Create a directory for it, add the compose file and a .env file, and you’re ready to go.
services:
  app:
    image: fnsys/dockhand:latest
    container_name: dockhand
    ports:
      - "${DOCKHAND_PORT}:3000"
    volumes:
      - /var/run/docker.sock:/var/run/docker.sock
      - dockhand_data:/app/data
    environment:
      - PUID=${DOCKHAND_PUID}
      - PGID=${DOCKHAND_PGID}
      - TZ=${DOCKHAND_TZ}
    deploy:
      resources:
        limits:
          memory: 512m
    healthcheck:
      test: ["CMD-SHELL", "curl -f http://localhost:${PORT:-3000}/ || exit 1"]
      interval: 30s
      timeout: 10s
      retries: 3
      start_period: 5s
    restart: unless-stopped

volumes:
  dockhand_data:
Create a .env file in the same directory with the following values:
# Main interface port for accessing the application
DOCKHAND_PORT="3000"

# User ID the container process runs as (run `id -u` on the host to get this)
DOCKHAND_PUID="1000"

# Group ID the container process runs as (run `id -g` on the host to get this)
DOCKHAND_PGID="1000"

# Time Zone where the application is operating
DOCKHAND_TZ="America/Los_Angeles"
A few things to note:
/var/run/docker.sock— mounts the Docker socket so Dockhand can manage containers on the hostdockhand_data— a named volume that persists Dockhand’s SQLite database, settings, and credentials across restartsDOCKHAND_PORT— the host port Dockhand will be available on; change this if3000is already in useDOCKHAND_PUID/DOCKHAND_PGID— set to the UID and GID of the user running Docker on your host; runidto checkDOCKHAND_TZ— set this to your local timezone so timestamps display correctly
If you’re on a NAS device and the dashboard feels slow, add SKIP_DF_COLLECTION: "true" to the environment block — it disables disk usage collection which can be sluggish on certain storage setups.
Bring it up with:
docker compose up -d
Initial Setup
Once the container is running, open a browser and navigate to:
http://{your server IP}:{DOCKHAND_PORT}
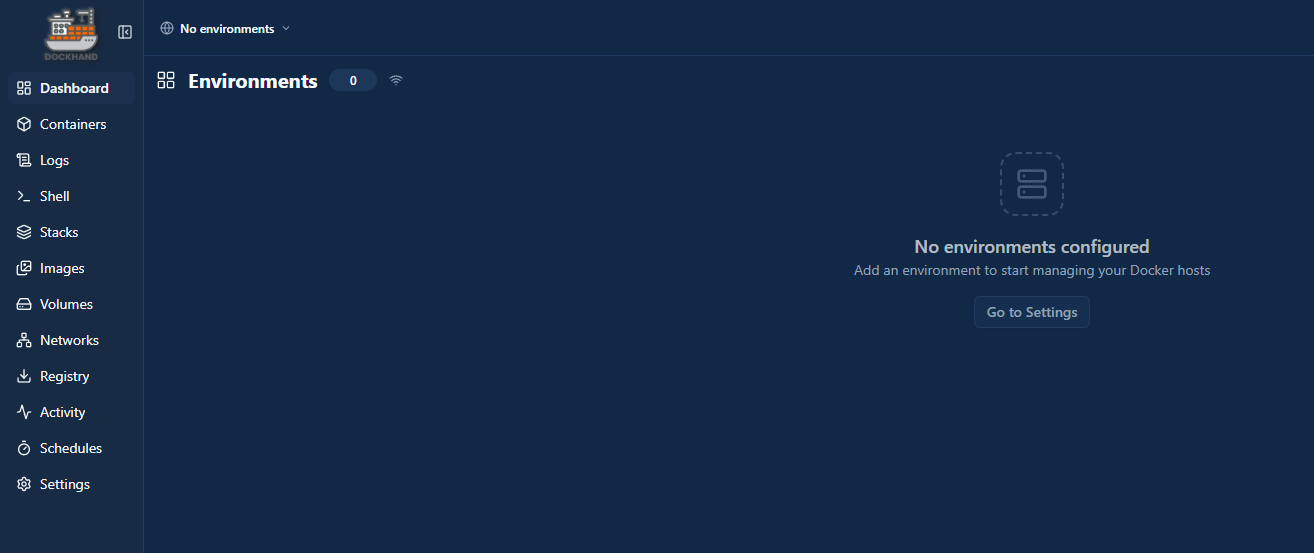
The first time you load the page, you’ll get a what’s new screen summarizing recent changes. Close it to continue.
You’ll land on the main dashboard showing No environments. Dockhand doesn’t auto-connect to the local Docker host — you add it manually. Click Go to Settings in the middle of the page.
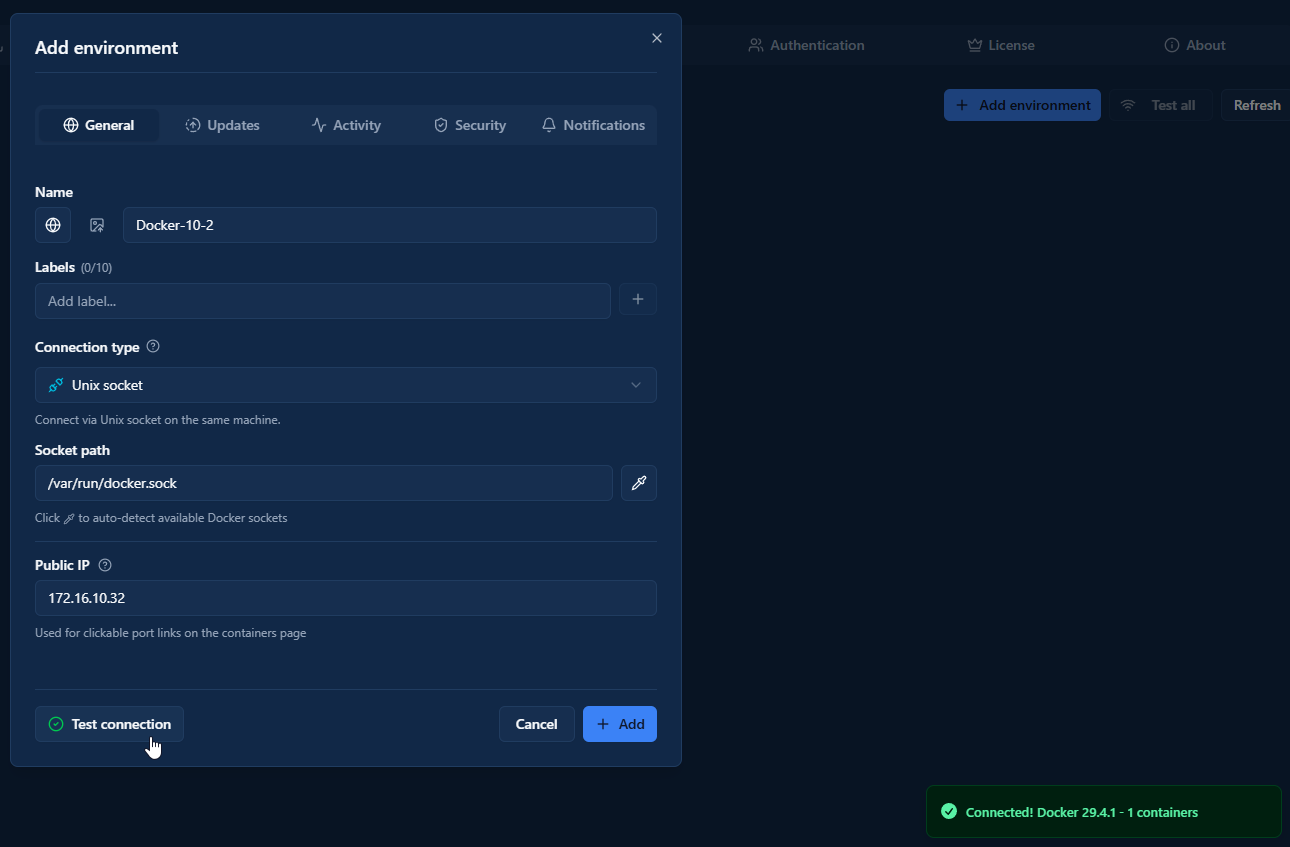
In the Add environment modal, fill in:
- Name — whatever you want to call this host
- Connection type — leave as Unix socket for the local host
- Socket path — defaults to
/var/run/docker.sock; click the auto-detect button to confirm - Public IP — optional, used for clickable port links on the containers page
Click Test connection to verify, then Add. Dockhand will connect and confirm with your Docker version and container count.
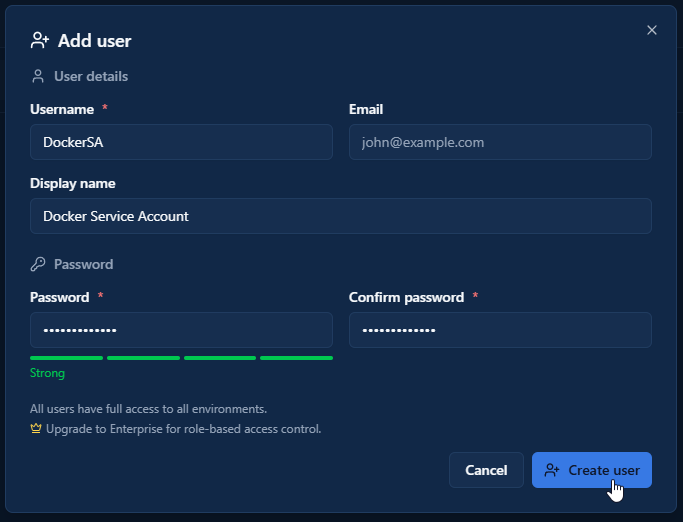
There’s no admin account creation on first launch — authentication is disabled by default and the dashboard is open access. To lock it down, go to Settings → Authentication, click the Users tab, then Add user.
Fill in your username and password (both required), plus an optional email and display name, then click Create user. Once your user is created, go back to the Authentication General tab and click the OFF toggle at the top of the Authentication section to enable it. After that, you just need to refresh the page and it should prompt you for username and password.
SSO/OIDC and LDAP/AD are also available as auth options, but those require an Enterprise license.
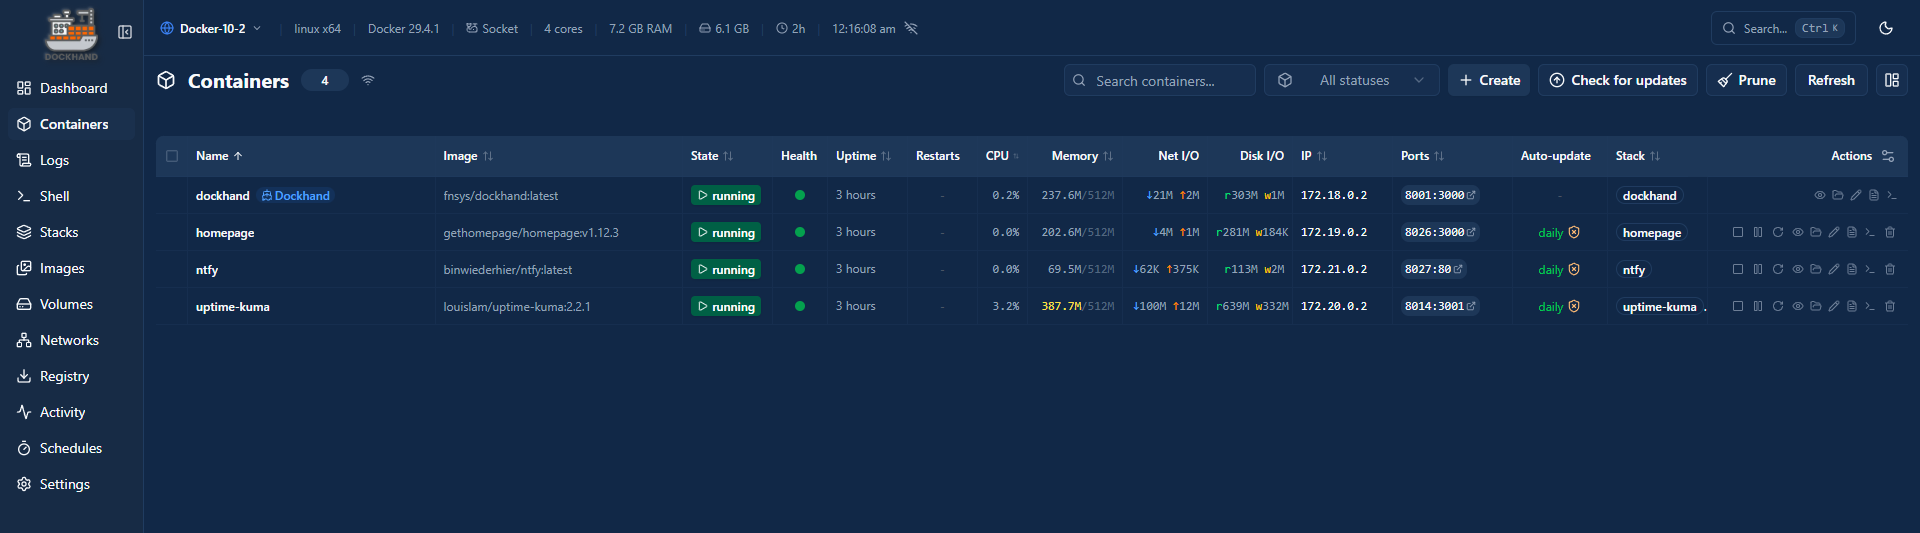
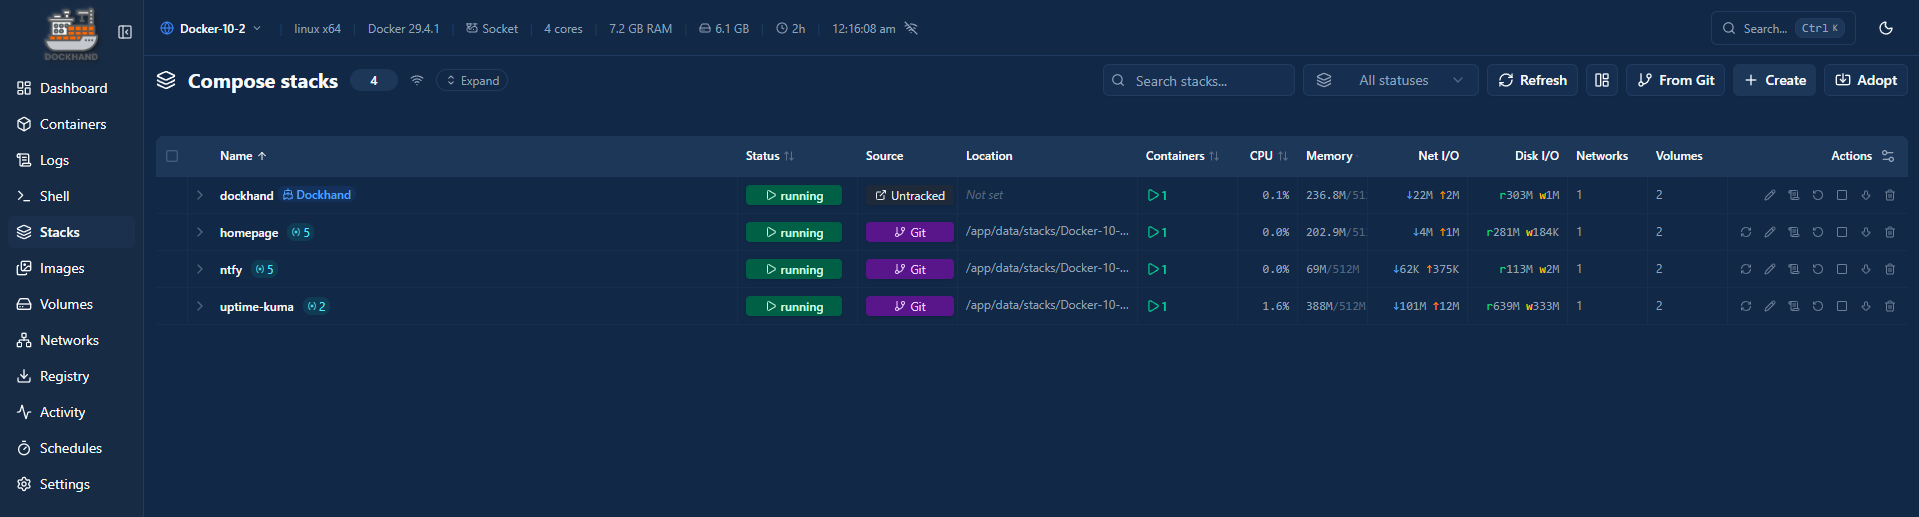
Managing Containers and Stacks
From the Containers view you can start, stop, restart, and remove containers. Clicking into a container gives you access to real-time logs with color support, a live stats view showing CPU and memory usage, and a browser-based terminal — no SSH needed for quick inspections or one-off commands.
The Stacks view handles Compose-based deployments. You can create new stacks by pasting in a Compose file directly, edit existing ones using the visual editor, and deploy or redeploy with a single click. The visual dependency graph editor is a nice touch if you have stacks with multiple services and want to see how they relate to each other.
Vulnerability Scanning
One of the features that separates Dockhand from most other Docker dashboards is the built-in CVE scanning. When auto-updates are enabled, Dockhand uses a safe-pull strategy — it pulls the new image to a temporary tag, scans it with Grype and Trivy against current vulnerability databases, and only promotes it to replace the running container if the vulnerability count hasn’t increased.
Enabling Scanning
Scanning is configured per environment. Go to Settings → Environments, click the edit icon on your environment, and open the Security tab.
Toggle Enable scanning on, then choose your scanner — Grype, Trivy, or Both. If the tools aren’t installed yet, they’ll appear without a version. Install each one using the button next to it; Dockhand handles the download and shows the installed version once complete.
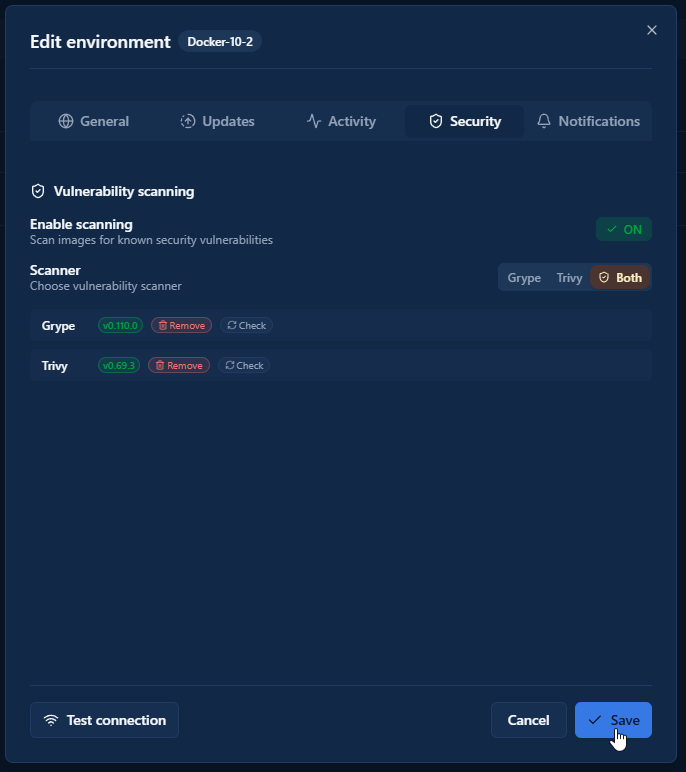
Save the environment when done.
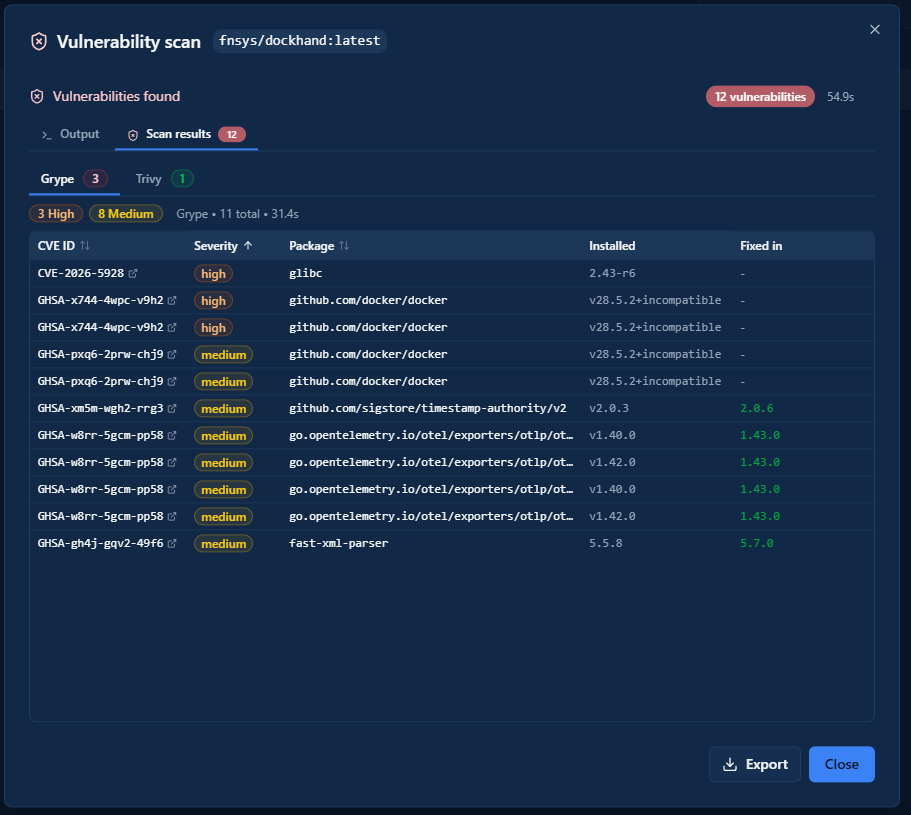
Running Scans
You can also trigger a manual scan on any image from the Images view. Dockhand will show you a breakdown of vulnerabilities by severity alongside the CVE identifiers so you can look them up if needed.
Remote Host Management
If you’re running multiple Docker hosts, Dockhand can manage them all from a single dashboard using Hawser — a lightweight open-source agent you deploy on each remote host. Hawser supports two operating modes depending on your network setup:
- Standard mode — the agent listens for incoming connections from Dockhand. Use this when both hosts are on the same LAN or can reach each other directly.
- Edge mode — the agent initiates an outbound WebSocket connection to Dockhand. Use this when the remote host is behind NAT, on a VPS, or has a dynamic IP.
Standard Mode
Deploy the Hawser agent on the remote host. Create a directory for it and use this compose file:
services:
  hawser:
    image: ghcr.io/finsys/hawser:latest
    container_name: hawser
    ports:
      - "${HAWSER_PORT}:2376"
    volumes:
      - /home/${HAWSER_USERNAME}/hawser/stacks:/data/stacks
      - /var/run/docker.sock:/var/run/docker.sock
    environment:
      - TOKEN=${HAWSER_Token}
      - PORT=2376
    healthcheck:
      test: ["CMD-SHELL", "if [ -n \"$$TLS_CERT\" ]; then wget -q --spider --no-check-certificate https://localhost:$$PORT/_hawser/health; else wget -q --spider http://localhost:$$PORT/_hawser/health; fi || exit 1"]
      interval: 30s
      timeout: 5s
      retries: 3
      start_period: 5s
    deploy:
      resources:
        limits:
          memory: 512m
    restart: unless-stopped
Create a .env file in the same directory with the following values:
# Host port to expose the Hawser API on
HAWSER_PORT=2376

# Linux username whose home directory holds the stacks volume
HAWSER_USERNAME=

# Authentication token for the Hawser API
HAWSER_Token=
A few things to note:
HAWSER_PORT— the host port Hawser will listen on;2376is the default, change it if already in useHAWSER_USERNAME— the Linux username whose home directory holds the stacks volume (e.g.dockersa)HAWSER_Token— a strong random string used to authenticate Dockhand to the agent; generate one withopenssl rand -hex 32
Bring it up:
docker compose up -d
Back in Dockhand, go to Settings → Environments → Add Environment. Set the connection type to Agent, enter the remote host’s IP and port 2376, and paste in your token. Click Test connection, then Add.
Edge Mode
Edge mode reverses the connection direction — the agent calls out to Dockhand rather than waiting for Dockhand to call in. This works through NAT without any port forwarding on the remote side.
First, in Dockhand go to Settings → Environments → Add Environment and select Edge Agent as the connection type. Dockhand will generate a token and display the WebSocket URL for the agent to connect to — copy both.
On the remote host, create the compose file using the values Dockhand gave you:
services:
  hawser:
    image: ghcr.io/finsys/hawser:latest
    container_name: hawser
    volumes:
      - /home/${HAWSER_USERNAME}/hawser/stacks:/data/stacks
      - /var/run/docker.sock:/var/run/docker.sock
    environment:
      - TOKEN=${HAWSER_Token}
      - DOCKHAND_SERVER_URL=wss://${DOCKHAND_ADDRESS}:${DOCKHAND_PORT}
      - PORT=2376
    healthcheck:
      test: ["CMD-SHELL", "if [ -n \"$$TLS_CERT\" ]; then wget -q --spider --no-check-certificate https://localhost:$$PORT/_hawser/health; else wget -q --spider http://localhost:$$PORT/_hawser/health; fi || exit 1"]
      interval: 30s
      timeout: 5s
      retries: 3
      start_period: 5s
    deploy:
      resources:
        limits:
          memory: 512m
    restart: unless-stopped
Create a .env file in the same directory with the following values:
# Hawser Edge

# Linux username whose home directory holds the stacks volume
HAWSER_USERNAME=

# Authentication token for the Hawser API
HAWSER_Token=

# Dockhand server address (hostname or IP)
DOCKHAND_ADDRESS=

# Dockhand server WebSocket port
DOCKHAND_PORT=3000
A few things to note:
HAWSER_USERNAME— the Linux username whose home directory holds the stacks volume (e.g.dockersa)HAWSER_Token— paste in the token Dockhand generated when you created the Edge Agent environmentDOCKHAND_ADDRESS— the hostname or IP of your Dockhand hostDOCKHAND_PORT— the port Dockhand is running on;3000is the default
Setting DOCKHAND_ADDRESS is what switches Hawser into Edge mode — the agent detects it automatically and connects outbound, so no ports need to be exposed on the remote host.
Bring it up:
docker compose up -d
The environment in Dockhand will flip from pending to connected once the agent establishes the WebSocket session. If it doesn’t connect within a minute, check that the agent can reach your Dockhand host on port 3000 (or whichever port you’re running it on).
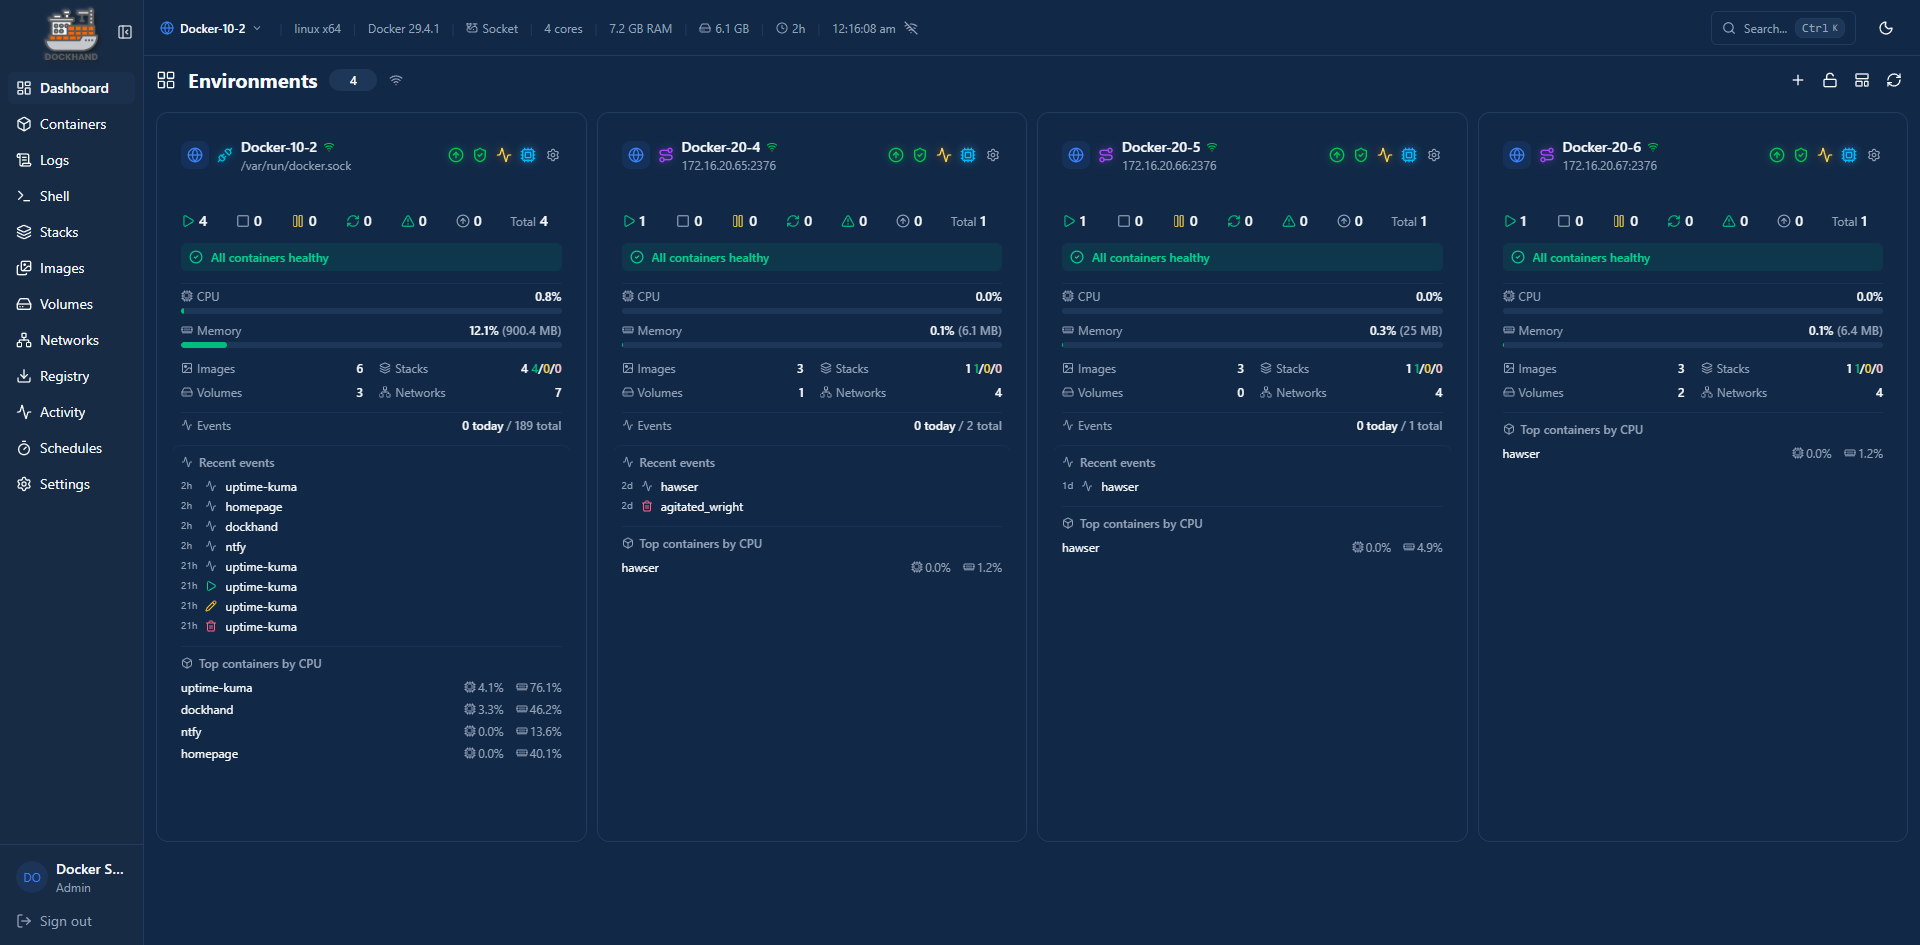
Managing Remote Hosts
Once connected, switching between hosts is a single click in the environment selector at the top of the Dockhand UI — the same containers, stacks, images, and terminal access you get on the local host. Hawser automatically reconnects with exponential backoff if the connection drops, so remote hosts stay managed without manual intervention.
GitOps Integration
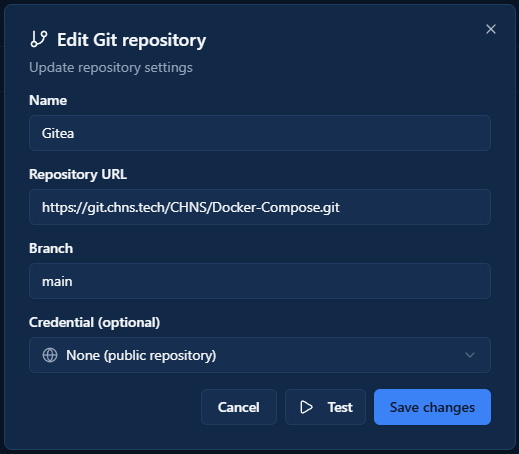
For anyone managing Compose files in a Git repository, Dockhand supports automated syncing via webhooks. Under Settings → Git Integration, you can point Dockhand at a repository and it will watch for changes and redeploy affected stacks automatically. This is the same workflow tools like Watchtower handle for image updates, but at the stack level and driven by your Git history rather than image tags.
Setup requires a webhook URL that you configure in your Git provider — Dockhand generates this for you once you connect the repo. If you’re looking for a starting point, I keep all of my Docker Compose files in my CHNS/Docker-Compose repo on Gitea — feel free to use them as a reference or fork them for your own setup.
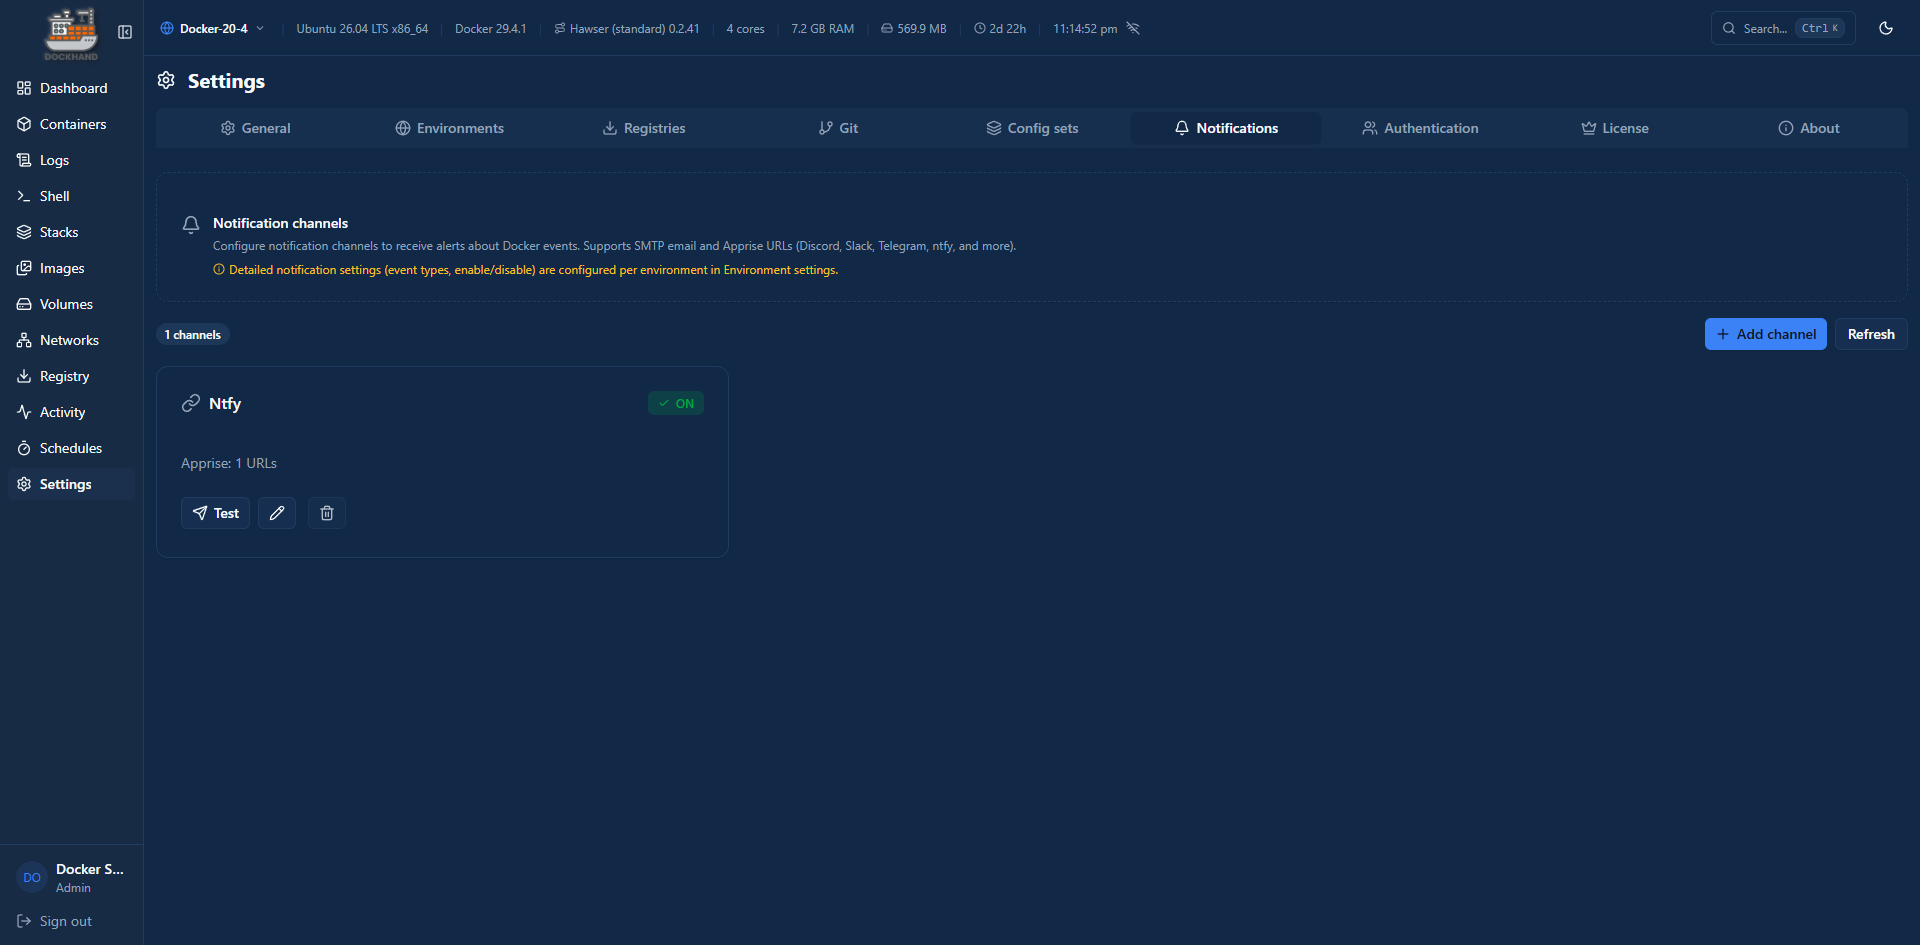
Notifications
Dockhand can send alerts for container events, auto-update results, and system activity. There are two notification methods: SMTP for email, and Apprise for everything else — Apprise is a notification abstraction layer that supports 80+ services including ntfy, Discord, Slack, Telegram, Gotify, and Pushover, all configured via a single URL format.
To set up notifications, go to Settings → Notifications.
Events
Dockhand can notify you on any combination of the following events:
| Category | Events |
|---|---|
| Container | started, stopped, restarted, created, removed, healthy, unhealthy |
| Auto-update | success, failed, blocked |
| Git sync | success, failed, skipped |
| System | error, warning, backup completed, cleanup completed |
You can configure notifications globally or override them per environment — useful if you want different alert channels for different hosts.
ntfy Example
ntfy is a self-hosted push notification service that works well here. Dockhand uses Apprise’s ntfy URL format, so no extra setup is needed beyond entering the URL.
In the Apprise URL field, enter:
ntfys://your-ntfy-host.com/topic
- Use
ntfy://for plain HTTP (local network),ntfys://for HTTPS - Replace
your-ntfy-host.comwith your ntfy server’s hostname - Replace
topicwith the ntfy topic you want notifications sent to
If your ntfy server requires authentication, use username and password:
ntfys://username:[email protected]/topic
Or use an access token (preferred — generated under your ntfy account settings):
ntfys://[email protected]/topic
Apprise detects the token automatically when no password is present. You can also be explicit by appending ?auth=token to the URL.
Save the settings and use the Test button to confirm a notification comes through before relying on it.
Wrapping Up
Dockhand is a genuinely impressive project, especially given that it’s free for homelab use. The built-in CVE scanning and safe-pull update strategy are features I’d normally need separate tools for, and having them integrated directly into the container management dashboard makes the whole workflow cleaner. The GitOps integration and outbound-only remote agent are also well thought out compared to how other tools handle the same problems.
If you’re coming from Portainer, the transition is smooth — the concepts map over cleanly and the UI is intuitive. Whether it fully replaces Portainer in my setup long-term remains to be seen, but it’s worth deploying alongside it to evaluate.