I have been using Draw.io for a while now at work to build Flowcharts and Network Diagrams. For being a free to use tool in an online web application it works really well. Couple that with all the Shapes that are built-in makes it a great alternative to Visio.
You can launch the application by simply going to the website but recently I discovered they have a self hosted Docker setup anyone can deploy on their own network. There really isn’t a ton of advantages as you get access to everything that is in the online platform however since I run all kinds of other containers, might as well add this one to the list.
I believe the only real advantage to running it at home would be loading your own Shapes into the application to have them always accessible without having to upload every time you do a project. For a company that might have a lot of brand marketing or custom Shapes for different equipment, this would be really useful however I just use the built in packs.
There is also integrations with Google Drive and OneDrive you could setup for your home deployment, however since I only use local storage on my system or make it directly linked/embed in a website (I’ll cover in this article), having those integrations doesn’t matter to me. I might integrate it with GitLab once I build out that system in my home lab but for now, I just use local storage.
In this article, I’ll cover the Docker Compose setup I am using to deploy the container and then cover accessing the application interface, using the starting menus and some cool settings.
Prerequisites
I will be setting this up on Portainer utilizing Docker Containers running on Ubuntu 24.04. Here are my setup guides for all of those pieces of software:
- Install Ubuntu Server 24.04 LTS
- Things to do after installing Ubuntu Server
- Install and Configure Docker, Docker Compose, and Portainer on Ubuntu Server
Deployment
Copy this code to a new Stack on your Portainer. You can also copy this directly into a Docker Compose yaml file. Update the information for your deployment and deploy the Stack.
services:
    drawio:
        container_name: drawio
        image: jgraph/drawio:latest
        ports:
          - {port number}:8080
        restart: always
Stuff to change for your deployment:
- Image – You can do “latest” for this value and allow something like watchtower to update the image for you or hard set a version and manually update it.
- Port Number – You will want to update this to a port that works well inside your environment. It will be the port that you connect to the web interface of the container.
- Restart – You will want to set this to the way you want docker to handle the restarting of the container. Here is a link to the Restart Policies to choose from. I prefer “always” so if it crashes or the server restarts, it will automatically restart the container.
Once you have all the configuration into your Stack and setup the way you want, Deploy the Stack and hopefully you get the Green notification popup and container deployment.
Web Interface
Now that your Draw.io container is deployed, let’s connect to the web interface and start using it.
Open your web browser and navigate to “http://{server name or IP}:{port you configured in the stack}”.
You should first see a screen that looks like this as the application interface loads:

Give it a few seconds but if you just started the container, you may have to refresh for it to fully load.
Next you should be prompted to pick a “Save diagrams to:” location. If you have your Google Drive and OneDrive integrations setup, this is where you can select and setup those. I will be using Local Storage so this is the one selection for me:

Then you can select to “Create New Diagram” or “Open Existing Diagram”. If this is your first time using Draw.io, select “Create New Diagram” to get started.

Next, you will be prompted to select the Template you wish to use. Take some time to go through these and see all of your options. You might be wanting to build something that already has a layout available for you making the work of creating your diagram way easier.
At the top, you will see “Filename:”. Enter a file name to save this diagram as.
Once you found your Template, click “Create” at the bottom. For the sake of this article, I’m going to just select a Networking connection diagram.

You should then get a File Explorer popup box asking you to select a folder location to save the file. This will save the file locally with a “.drawio” file extension.
Navigating the Application
Some things to understand for using the application:
At the top of the page, you will find all the standard application controls you would expect from an applications like this. Zoom, Undo, Redo, Layer Control, Color and Waypoints.

On the left side panel, you will find all your Shapes that are loaded and available on the system. Based on the Template you selected at the start, different categories will be loaded. If you need more options or want to search the whole library, click on the “+ More Shapes” button at the bottom. There are thousands of available Shapes, ranging from company logos to electrical circuit logic gates.

On the right panel, you will see all the setting contextually available for the object you currently have selected. If you aren’t selecting anything, it will display the settings and style for the overall canvas.

Embedding and Publishing
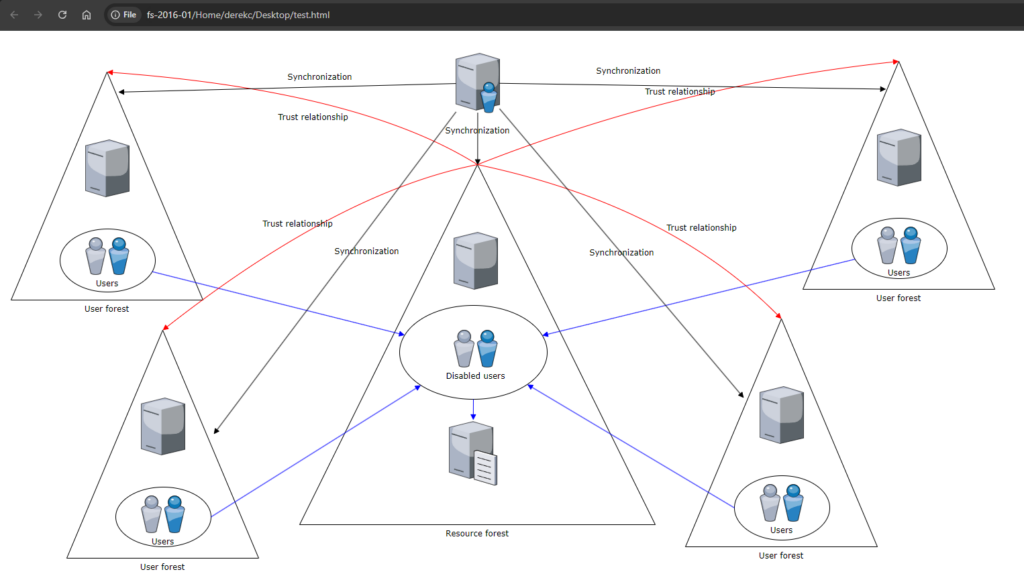
One really cool feature they give you is the ability to embed your diagrams as HTML or iFrames. This allows you to take any diagram and directly insert it into a company website or content management system (CMS). The cool thing about doing it this way over embedding a picture of your diagram is it gives you the ability to manipulate the diagram and if the user wants, they can “edit” it, which take them to the Draw.io web version where they can make their own changes. This doesn’t save back to the original embedded code but they can save it to a system of their choosing.

Here I just copied the HTML code and pasted it into an .html file on my desktop.

The other thing you can do, along these same lines, is get a “Link” to the diagram.

By doing this, the browser uses the online version of the application to display all the information in the diagram. You can send this link to whoever you want and they can view and again launch the document for themselves and make changes. You can then send these links back and forth to each other, collaborating on the “same” document without any third party collaboration software.
I really like this application and it has helped me visually explain process flows to coworkers and document systems. Crazy that its open source for everyone to use when I remember not that long ago paying a lot of money for access to Visio.
This does also work well through a Reverse Proxy, like Nginx. Just point the proxy at the port you setup for the container, no other configuration is required.
Hopefully this helped you with your deployment or at least brought attention to the project. If you want to just use the online application to build diagrams, its fully available on their site linked below.
If you have any questions, comments or things you would change about this article, let me know in the comment section below.


