Not long after I started using Docker, I realized moving files from one Linux system to another wasn’t going to be as easy as copying a folder like on Windows. I tried using backup/restore process but that never worked great because of permissions along with the fact that it wasn’t a true “sync” process, I could only restore based on the newest backup. I tired copying files directly from one server to another using file shares but that also wasn’t consistent. I looked into moving all of my blind mounts to full Docker Volumes and moving those over but that never worked.
One day, I was going down a YouTube rabbit hole and came across Christian Lempa’s video “Don’t use local Docker Volumes”. This sparked my mind to start going down the path of running my volumes on NFS Shares. His video is really good so check it out if you need more information or other ways of doing this process. Some of the stuff he went over either didn’t work for my setup or I wanted to do things a different way. The root idea is definitely there though so I thank him for his setup guide which got this ball rolling.
If you have been following along with my August Theme of moving all my containers over to a system like this, you will know I’ve done a Lot of configuration of secondary interfaces and networks and building new TrueNAS systems to get this all to work the way I want. Thank you for coming along on this journey.
This walk through is assuming you already have active containers that you want to migrate. If you are using this to setup new containers, you can obviously skip the parts about logging into the container shell and copying files.
For this guide, I am going to be migrating a container called Heimdall because it’s a pretty simple container, only needing one volume, and since it’s a dashboard there isn’t much to copy over. This process can be used and just repeated for containers with multiple volumes or containers with databases. I recommend you only do one volume at a time just so you can see where the errors are if you run into any.
Prerequisites
I will be setting this up on my system utilizing Portainer running on Ubuntu Server 24.04. This is the easiest way I have found to deploy containers and map NFS Volumes. Here are my setup guides for all the software I will be using:
- Install Ubuntu Server 24.04 LTS
- Things I do after installing Ubuntu Server
- Install and Configure Docker, Docker Compose, and Portainer on Ubuntu Server
The next thing you will need is to setup a TrueNAS system to store your persistent files. This can be any TrueNAS deployment however I will be using Scale running virtualized on the same host as my virtual servers. I wrote an article 3 weeks ago covering my install process:
Optionally – I will be setting all of this up on a secondary storage network that is dedicated to storage traffic like NFS and iSCSI. You could use the main interfaces for your servers however I just like keeping that traffic separate. Plus, my storage network is 10Gbps so it’s way faster then my main network stack which has all my VLANs on it. The last 2 weekends, I published articles on how to do this on Ubuntu Server and TrueNAS Scale:
- Adding a Secondary 10Gbps Interface to Ubuntu Server 24.04
- TrueNAS Scale – Adding Secondary Network Interface, Dataset, NFS Service and Shares
I do recommend, even if you don’t use that TrueNAS article to setup a secondary interface, that you look at that guide to enable the NFS Service.
Now that we have all that setup, lets pick a container you want to migrate and let’s begin.
Setup NFS Share in TrueNAS Scale
The best way I found to get this to work was to create a Dataset and NFS Share for each of my volumes to keep the containers isolated.
In the TrueNAS web interface, click the “Datasets” on the left menu.
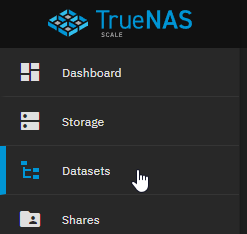
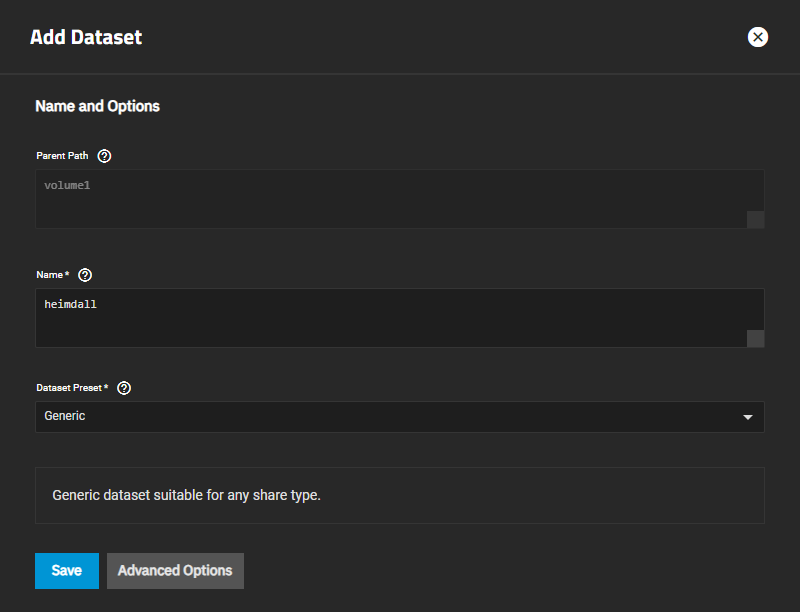
If you followed my walk through on Install TrueNAS Scale 24.04.2 Virtually on Proxmox, we already setup a storage pool called “volume1”. Make sure it’s selected and then click “Add Dataset” in the top right corner.

Enter a “Name” for this dataset that is specific to the container you are migrating. For example, since I’m moving Heimdall, I’m going to enter “heimdall” for the name. If this container had a database with it, you could do “heimdall-db” to maintain separate and unique datasets. Click “Save” at the bottom when you are ready.
Now we need to create our unique share for this dataset.
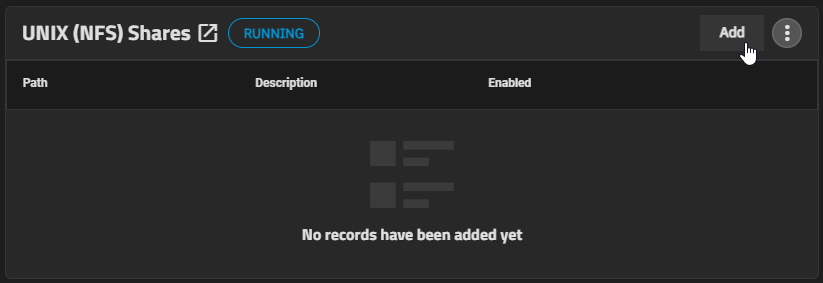
In the TrueNAS web interface, click the “Shares” on the left menu.
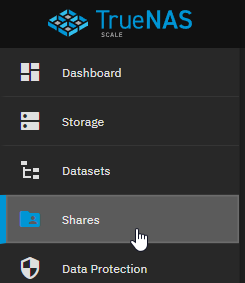
On the right side of the screen, you should see the UNIX (NFS) Service in a “Running” state. Click the “Add” button.
Under Path, select the dataset you just created.
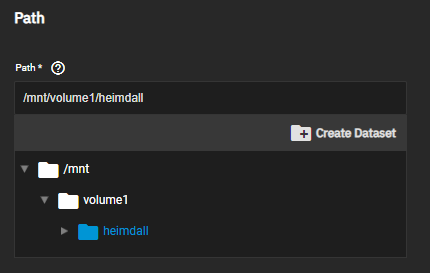
Enter a “Description” if you would like.
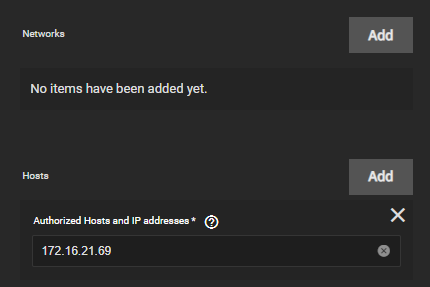
Next, we need to specify which systems can access this share. NFS doesn’t really have great permissions built in but we can lock it down to specific IP address of other systems or you can enter a whole Network if you want everything on that network to have access. I’m just going to add my test Docker server’s storage network IP address.
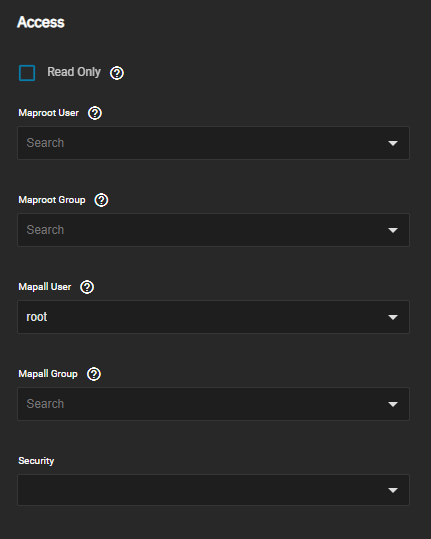
This next step, I would love some feedback from the more seasoned Linux or TrueNAS users out there. In order for me to get this to work, I had to go under “Advanced Options” and set “Mapall Users” to “root”. If you know of a better way to do this setting that doesn’t give root access, drop a comment below and I’ll try it out.
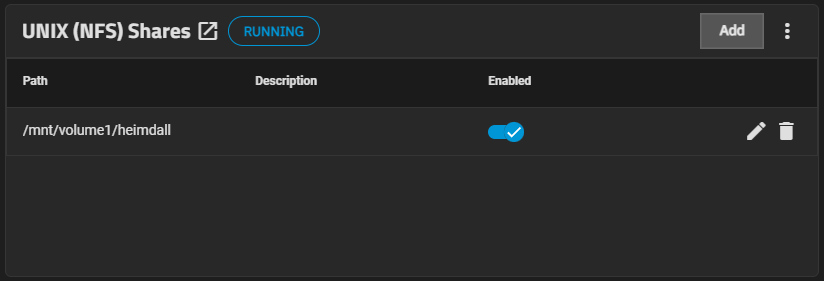
Once you have everything as you want it, click the “Save” button at the bottom. You should now see the share show up and enabled.
Now that we have our dataset and share all configured and ready to receive files, lets login to Portainer to setup the volume.
Setup Volume in Portainer and Mount in Container
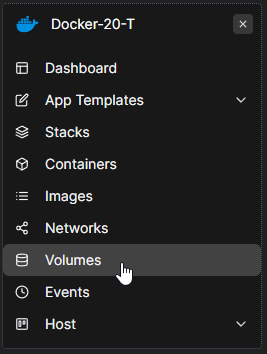
Login to your Portainer interface and navigate to “Volumes” on the left panel.
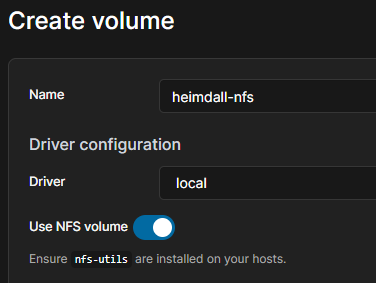
On the far right corner, click the “Add volume” button.

Enter a name for your volume. This can be anything that is unique to this volume and probably something that describes the container it is connected to. For my example, I’m going to enter “heimdall-nfs” just so we can easily see the difference in volumes when it comes to migrating later.
Check the slider next to “Use NFS volume”.
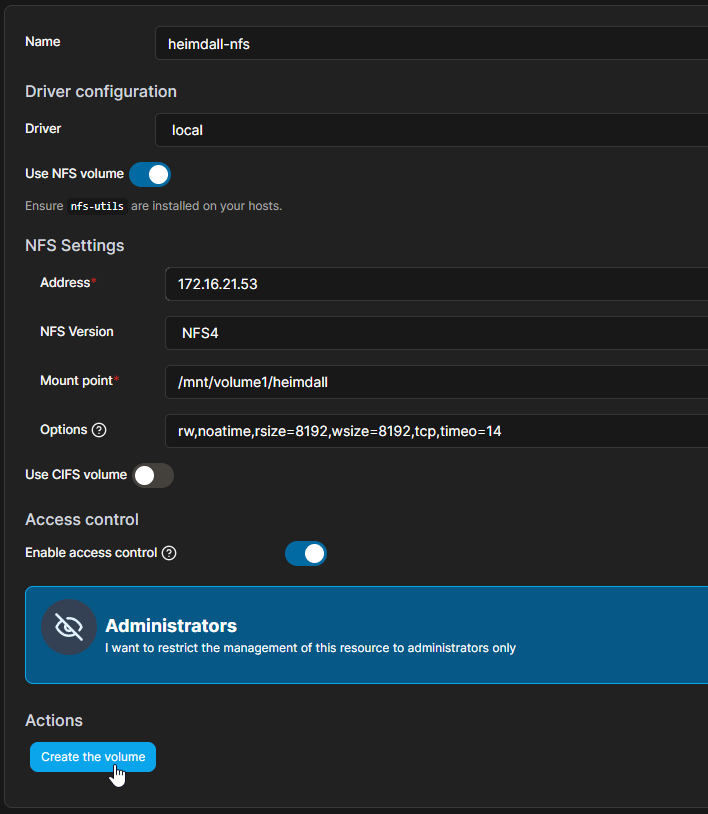
Under the NFS Settings, enter the “Address” of your TrueNAS server interface you want to use for the storage connection. Enter a “Mount point”, this is the exact and full name of the share you created (can be found on your TrueNAS system under the UNIX (NFS) Shares screen. Mine is “/mnt/volume1/heimdall”) for this volume. Leave the rest of the information with defaults unless you have a reason to change it. Click the “Create the volume” button at the bottom when you are ready.
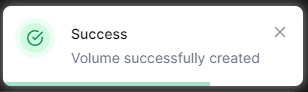
Assuming everything is configured correctly and your Portainer server is able to connect to the interface you specified on your TrueNAS server, you should get a “Success” message popup in the top right corner.
You should also see your newly created volume list with the “Unused” flag.

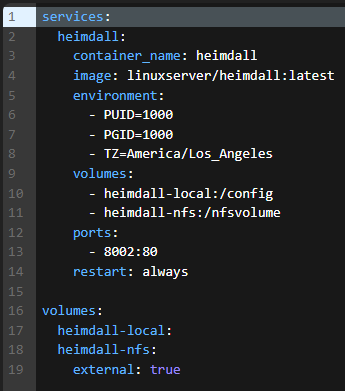
Now we need to go into our Portainer Stack and add this volume as a new, separate volume. We want to leave the existing volume alone for the first mount so we can copy all the files over. Below, I’m adding my Before stack, which is how the stack looked before I modify it, and my After stack, which is how it will look after I modify it.
Before
services:
  heimdall:
    container_name: heimdall
    image: linuxserver/heimdall:latest
    environment:
      - PUID=1000
      - PGID=1000
      - TZ=America/Los_Angeles
    volumes:
      - heimdall-local:/config
    ports:
      - 8002:80
    restart: always

volumes:
  heimdall-local:
After
services:
  heimdall:
    container_name: heimdall
    image: linuxserver/heimdall:latest
    environment:
      - PUID=1000
      - PGID=1000
      - TZ=America/Los_Angeles
    volumes:
      - heimdall-local:/config
      - heimdall-nfs:/nfsvolume
    ports:
      - 8002:80
    restart: always

volumes:
  heimdall-local:
  heimdall-nfs:
    external: true
A few things of note:
- Under volumes inside the container config, I added the name of the volume we just created with the exact name. To the right of the colon (:), I added a unique folder where this volume will be mounted inside the container (/nfsvolume).
- Under volumes at the bottom of the Stack, I added the same name of the volume we created. Then on the next line down, Tab in on your keyboard and enter “external: true”. This will specify to Docker that this isn’t a local volume on the server file system and to look for the NFS volume that already exists.
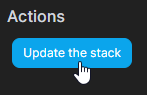
When you have your Stack configuration all set, click the “Update the stack” button at the bottom of the page.
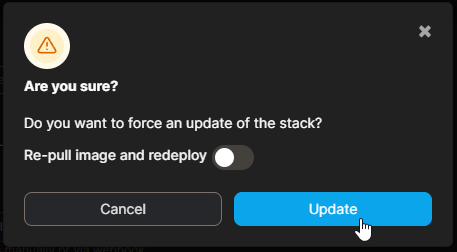
You will be prompted to confirm the update. Just click on “Update”.
Assuming you have everything configured correctly, this is when the server will reach out to your storage and mount the volume. If it’s unable to connect, it will throw an error saying it wasn’t able to start the container. If this happens, a few things to check are:
- Make sure your system is listed in the “Authorized Hosts and IP addresses” or the “Networks” section of the NFS share.
- If you have any firewalls enabled between the Docker server and the TrueNAS server, open ports between the host and your storage.
- Make sure your mount point exactly matches the share mount path.
Now that we have our new NFS volume mounted on our container, lets connect to the container and copy our files over.
Access Container Shell and Copy Files
The best way I found to transfer files and most consistent, since some use blind mounts or use Docker volumes, is to actually get into the shell of the container and copy the files to the new volume. This maintains any permissions for the container and makes sure all files get copied since you will have highest permission on the file system.
Start by SSH’ing or Console into your Docker server, however you access the command line.
Run the following command to get into the shell:
docker exec -it {container name} sh
For the “container name”, enter the exact name of the container you want to access. You can find this by looking in Portainer at the containers page or by running the “docker stats” command.

Once in, your prompt should change to something totally different. This is based now on the architecture of the container (ex. root@59d2fdd451f8 is what mine is).
Run the directory list command to view where you are at in the file system of the container.
ls

Looking at the list of folders, I can see my “nfsvolume” list and the “config” folder where the Portainer Stack specifies to save all persistent data. This is good, this means we’re in the correct folder level to copy our files. If you don’t see the folders you need, you might be lower down the folder structure and need to go up. Us the “cd ..” command to go up a level and then run the “ls” command again to see the folders and confirm.
Now that we are ready to copy, we need to run this command to copy all files from the config folder to our nfsvolume folder.
cp -a /config/. /nfsvolume/
Not all containers use config for everything, you might have to update that to something else based on your container structure.
Some containers also have multiple spots where there are files saved, for this you can mount different shares or try grouping them all together in the same share as long as there isn’t any conflicting files. You will need to play around with this and figure out what works for the container you are migrating.
When you execute this command, the container should go to the next line but not give you a prompt right away. As it is copying the files, you won’t be able to execute any other commands. Once the copy is finished, it will either give you a blank prompt or it will display an error.

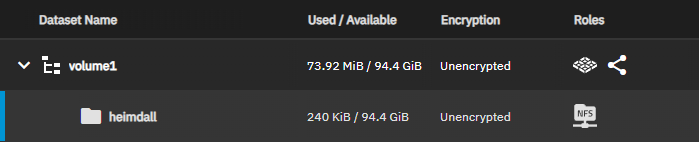
Now that everything is copied over, you can confirm it’s all there by using the “cd nfsvolume” command to go into the folder and “ls” to see the contents. You can also log back into your TrueNAS server and check out the Dataset which should now have used space taken up.
Since you copied the files, at this point you don’t want to go into the container and change a bunch of files because nothing will get copied over. We now need to switch the container from using the local volume to the NFS volume.
Stop your container/stack in Portainer.
Once it is stopped, we need to make some modifications to the Stack/Compose config so when the container starts up, it uses the new NFS volume as its primary.
Below I’ll put the Before and After configs, using pictures so you can see the changes more clearly.
Before
After
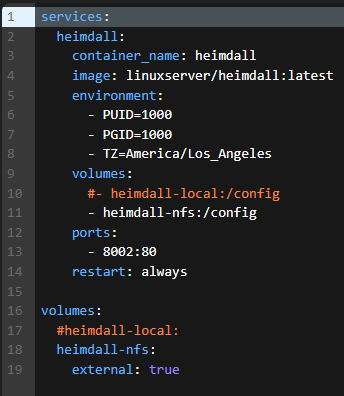
A few things of note:
- Comment out using # at the beginning of the line for the local volume under the config and the volumes section.
- Change the “nfsvolume” to the same path as the folder that you just copied the files over from. Mine is “/config”.
Once you have made the change, “Update the stack” at the bottom to deploy your container. When prompted if you are sure you want to make the change, just click “Update”.
Your container should start up as normal and start working as though nothing has changed. Go into the application you moved over and test making changes and check the logs for the container to make sure there are no errors.
You are now running your container on a NFS Share!
Don’t forget to do your cleanup. After a few days of running on the share, to the point where you are confident you aren’t having issues and all the files are actually there, you can go into your stack/compose config and remove the lines for the old volume that you commented out. Also go in and delete the old local volume or blind mount folder just to make sure you don’t get confused on what files are what in future troubleshooting.
The real power of this system shows when you need to move the container to a new host server. Whether that be life cycle management of systems or you just want to re-organize your resources. Simply stop your container on the current system, create the same volume mapping on the new system, copy over your same stack configuration and start your container. Moving hosts has never been easier.
For proof that this system works and works well, I have been running around 20 volumes, all running off the same TrueNAS instance for about 2 weeks now with no issues on any of the containers. It might be a placebo affect but I actually feel like many of my containers, including this WordPress instance and supporting Database CHNS is running on, are actually running faster then they were on local volumes.
If you switched your containers over to this system and/or found this useful, drop a comment below. I’d love to hear about other people’s experience. If you have anything you would change or comments about my setup, also leave a comment.