Those of you here for August’s theme of migrating Docker Volumes to NFS Shares, welcome and thank you for coming back. The first thing we need to do is deploy our system that we will be running our NFS service on and storing all of our data. For this, I choose to use TrueNAS Scale.
They have done a lot to improve the performance and reliability of Scale in recent months and since this project is just utilizing a main service like NFS, I feel comfortable running it on Scale.
The reason I specifically called out installing it on Proxmox is because I want this system to maintain mobility since that is the whole reason to move the Docker storage to this system. With installing it on top of Proxmox, I’ll be able to install it with redundancy (splitting the drive between different storage LVM’s) but also be able to migrate it to a different host if the hardware ever needs maintained or life cycled.
In this walk through, I’ll go over the Virtual Machine setup I am using. Then I’ll go over the installation process and some basic configuration of the TrueNAS OS. I will close this article with adding a storage pool so you can start creating shares and storing all your files.
Virtual Machine Configuration
First thing you will want to do is get your Proxmox host up and running. Here is my guide for Installing & Updating Proxmox 8.1. Then we need to create a virtual machine (VM) for the Server. Here is my guide for Creating a Virtual Machine in Proxmox. In that guide, you will need to download the ISO file to your Proxmox host. Here is a link to the TrueNAS page where you can copy the download link to download the ISO directly to your Proxmox storage.
One thing I’m going to do for my setup to increase the reliability is to store the virtual hard drives on separate LVM’s. I am fortunate enough to have acquired 2x R630’s which I populated with 8x 600GB SAS drives. I used two of the drives in a Mirror (RAID1) for installing Proxmox which gives me the extra 460GB as my first storage target, this will be “local-lvm” in my configuration screenshots. I then used the remaining six drives in a RAID5 array which gives me 2.96TB of storage for my second storage target, this will be “localsas” in my configuration screenshots.
You don’t have to do a storage setup like this, you can even combine it all onto one drive if you want. I recommend you have a strong backup system in place before you start migrating but that is up to you and your hardware capabilities.
When you are creating the machine, you will want to make sure it meets the minimum (at least) requirements listed on TrueNAS’s Documentation page. You will see when I built out my machine, I doubled the minimum requirements. After creation, this is what my Hardware looks like:
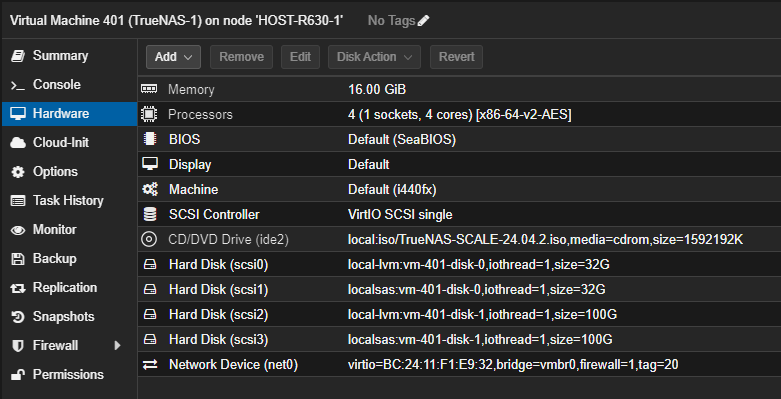
Notice I have scsi0 and scsi1 which are 32G drives on the two different LVM storage. This will be where the TrueNAS OS will be installed.
Also notice, I added 2x 100G drives and did the same thing, storing them on the two different LVMs. This will be the actually storage TrueNAS uses for file storage.
Once everything is setup, we are now ready to go through the installation process.
Installing TrueNAS Scale
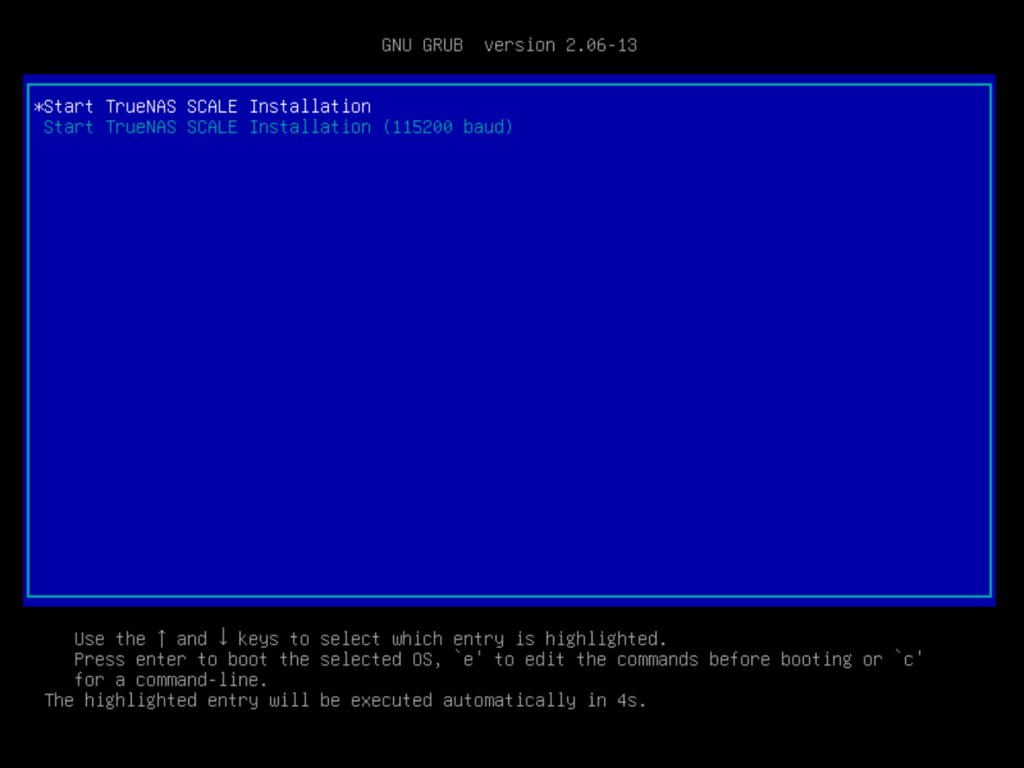
Boot the VM onto the installation media. First thing you should see is the GRUB boot menu screen. Select “Start TrueNAS SCALE Installation”.
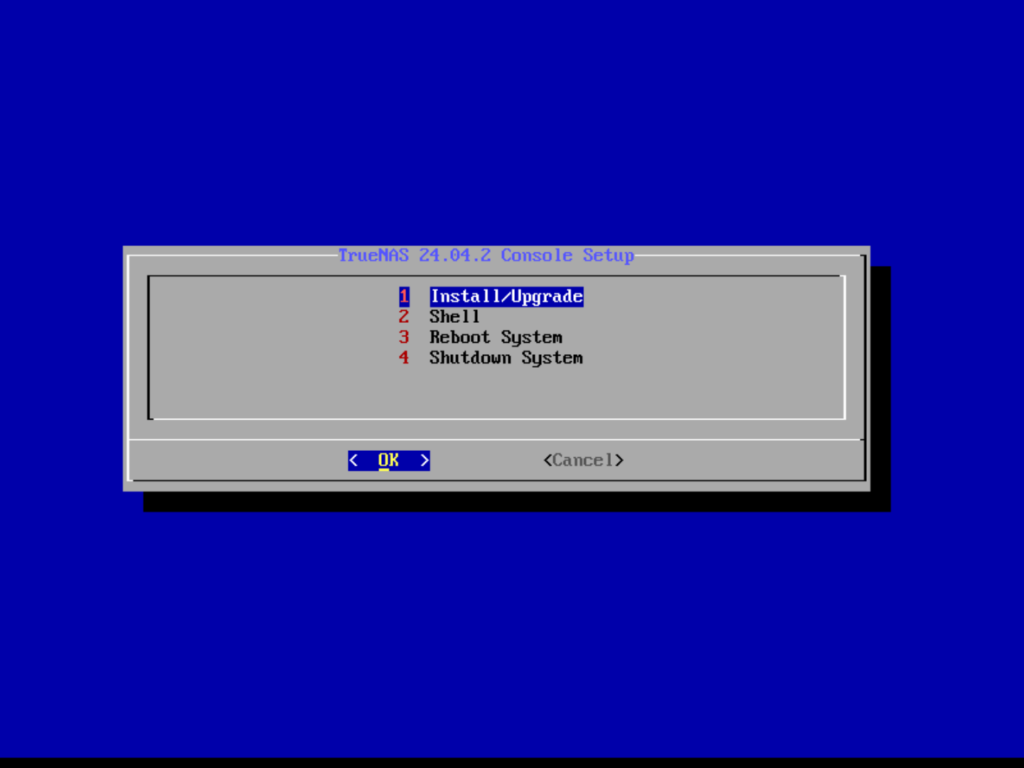
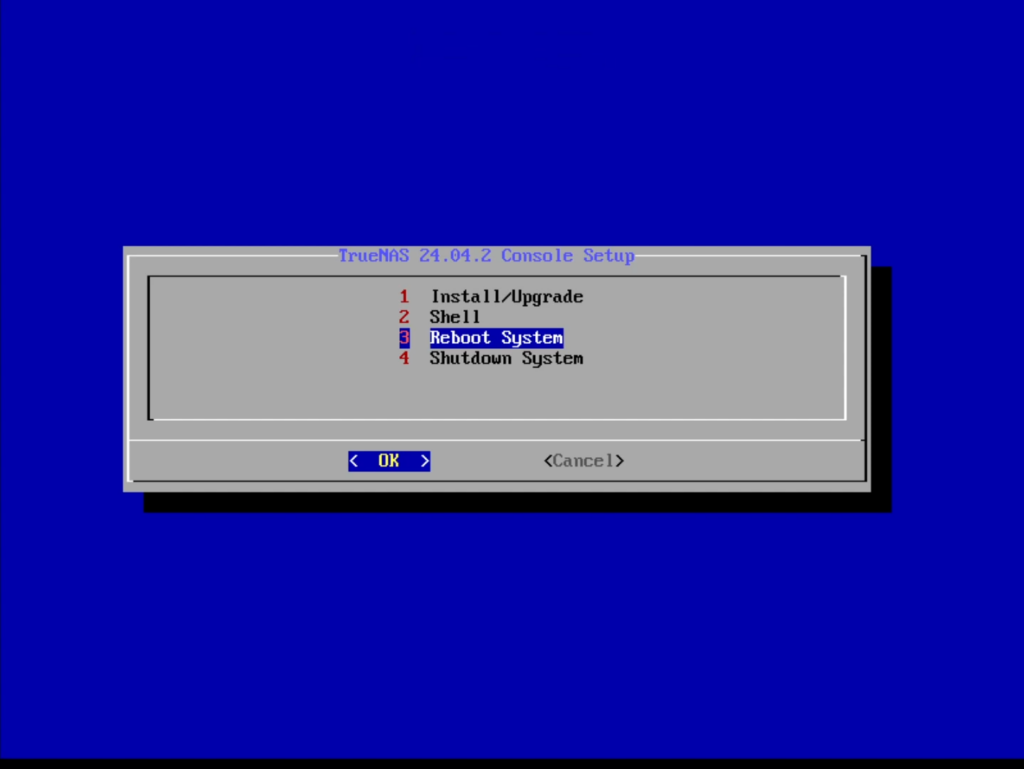
Once everything is loaded, you will be presented with the “Console Setup” screen. Select “Install/Upgrade” and press “Enter” to continue.
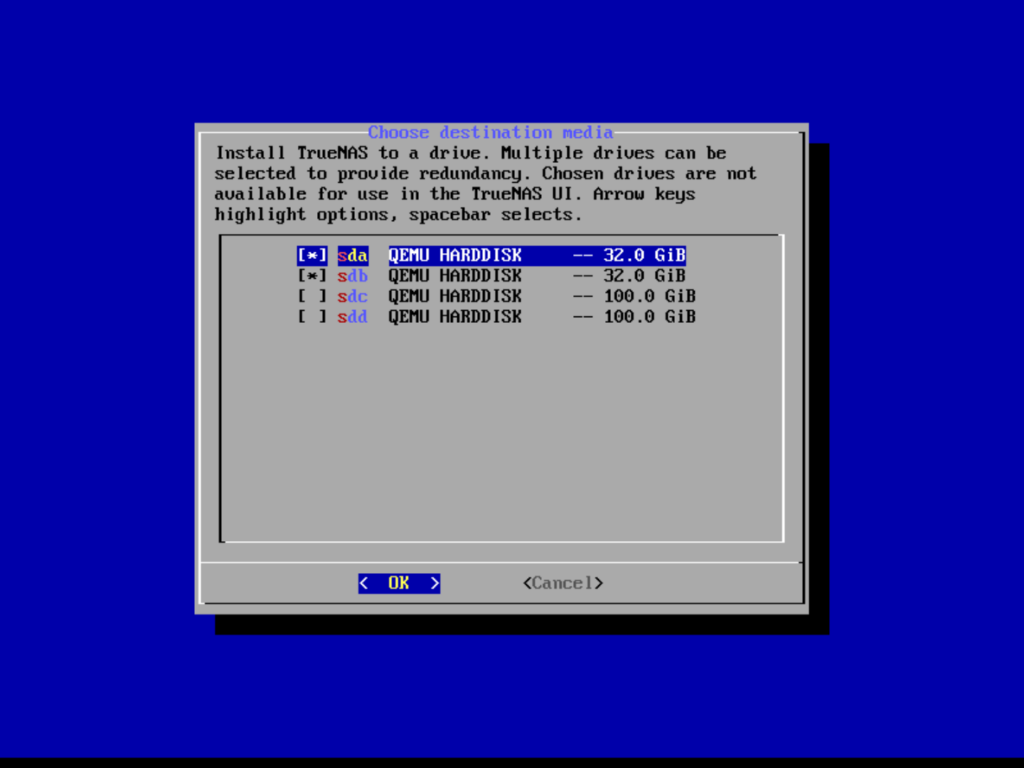
When you get to the “Choose destination media” screen, you will want to select each of the “32 GiB” drives by highlighting them and pressing spacebar. This will automatically do the installation across both drives to add the redundancy. When you are ready, press “Enter”.
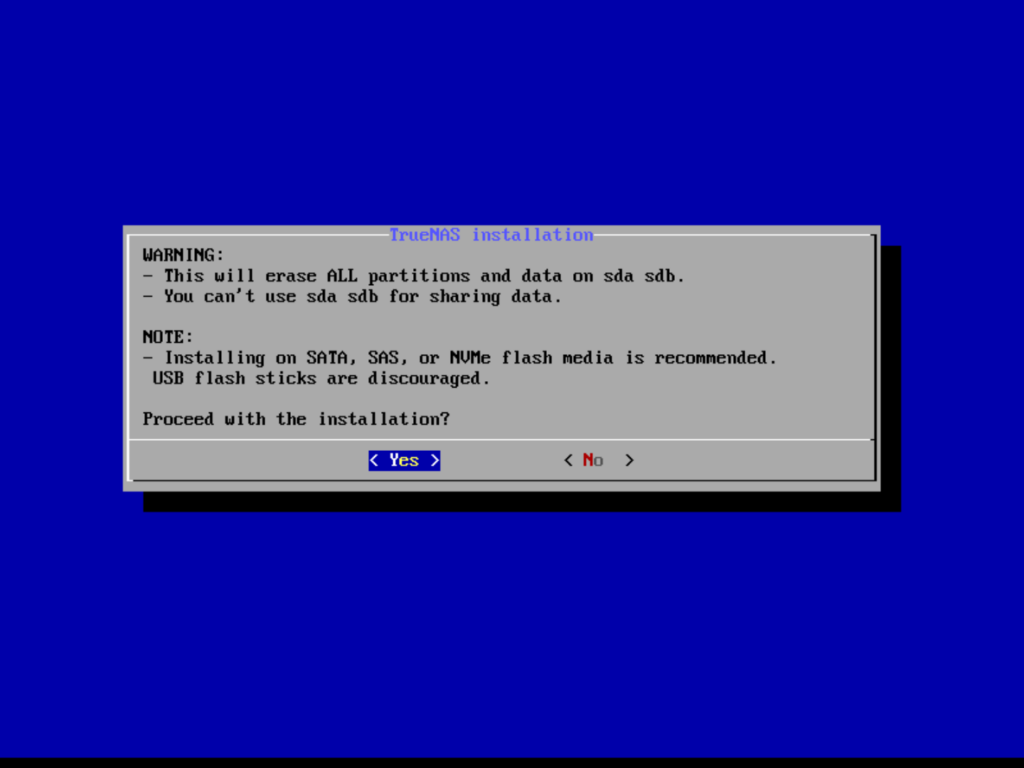
You will then get the typical “This will erase all information on your drives” message. Press “Enter” on Yes to proceed with the installation.
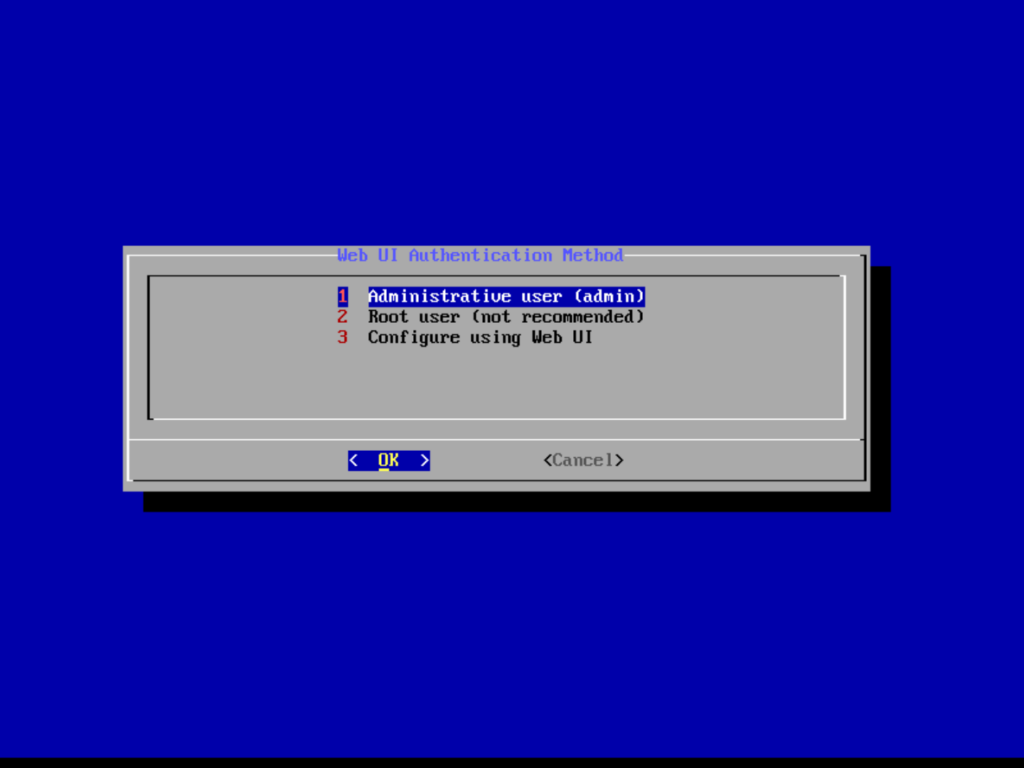
At the Web UI Authentication Method screen, I just leave this on “Administrative user (admin)” and press “Enter” to continue.
You will then be prompted to enter your “admin” user password. This will be the default administrator user you will use to access the system. Make sure the password is secure, confirm it and press “Enter” to continue.

You maybe presented with a “Legacy Boot” screen. I’m not sure if this is due to the BIOS I am using or if it’s just a standard question as part of the installation. In my testing, even if you are using a legacy BIOS and entered “No” here to disable it, it wouldn’t install. I just said “Yes” to enable it and continued.

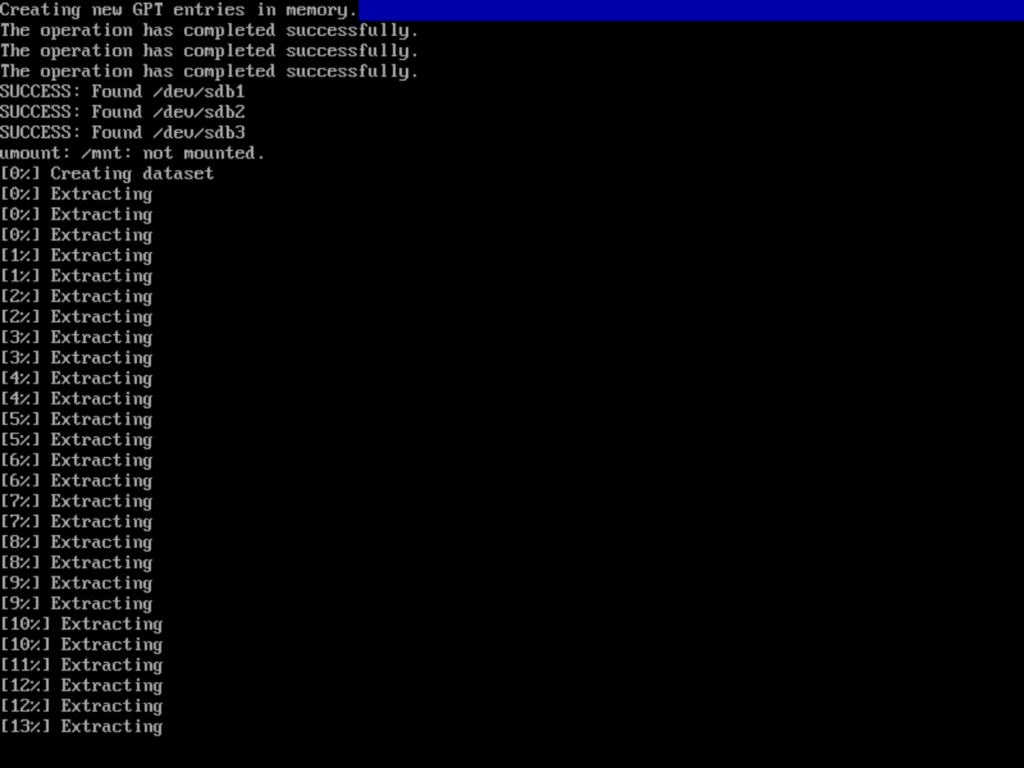
At this point, it will start extracting the files and running the installation process. Wait for it to complete.
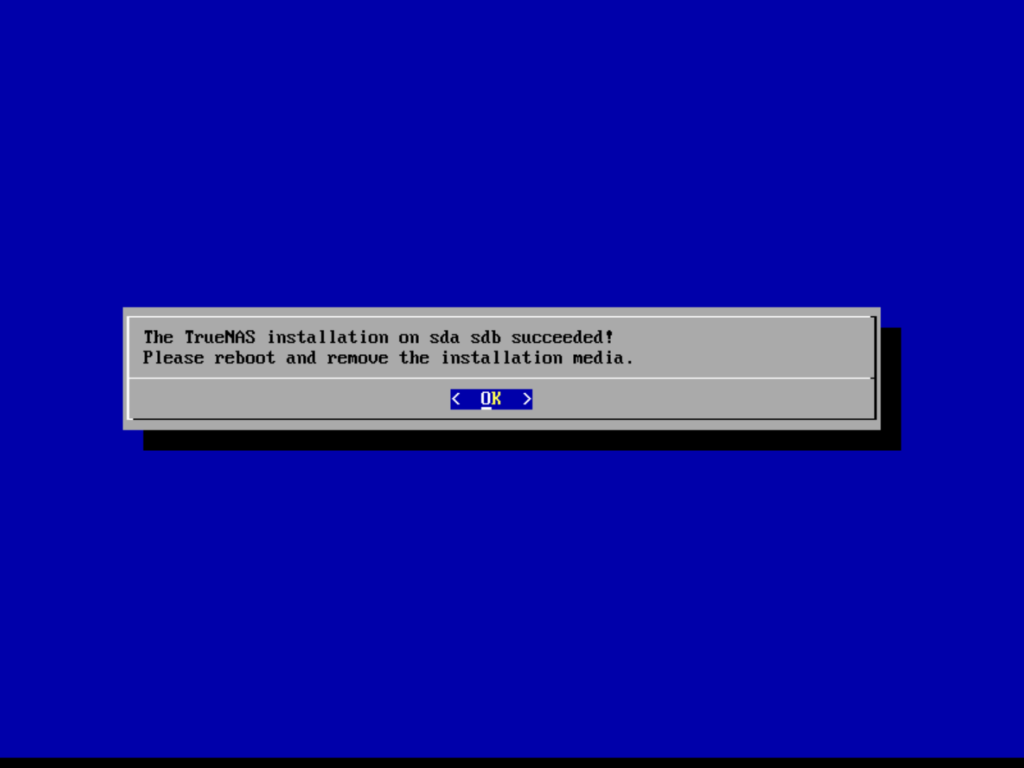
Once it is finished, it will tell you to reboot and remove the installation media. On my VM’s I just remove the whole CD/DVD Drive from the virtual machine. If I need it later, I can always re-add it and it’s one less setting to worry about causing issues.
Once you remove it, click “Enter” to continue.
Since we are on Proxmox, we will actually want to do a full Shutdown of the virtual machine so that it’s able to fully remove the CD/DVD Drive. Once it is shutdown, you can just start it right back up.
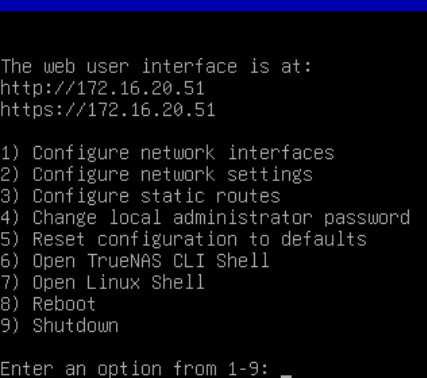
Once the server boots back up, you should see an options menu that looks like this
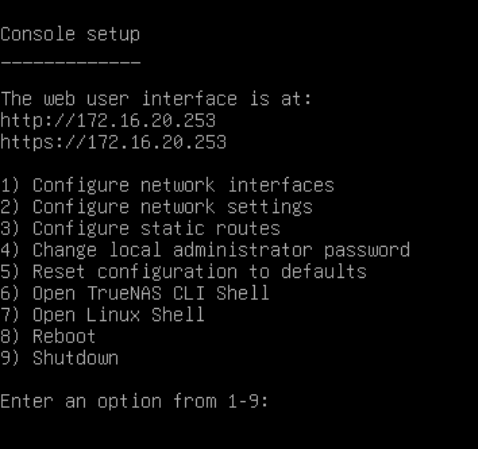
If you have DHCP enabled on your network, the server will get an IP address and you can go straight to the URL listed there on screen. If you don’t have DHCP or just want to set a static IP address, I’ll go over that next.
Setting a Static IP Address through the Console
It is recommended to set a Static IP address for servers so the address doesn’t change over time. This will definitely be the case since we are setting up other systems to depend on this storage being at a specific address. Figuring out your subnet mask and gateway is beyond the scope of this tutorial so if you need help figuring that information out, you will have to search online for other resources.
Start by enter a “1” in the console and press “Enter”. This will take us to the “Configure network interfaces” menu.

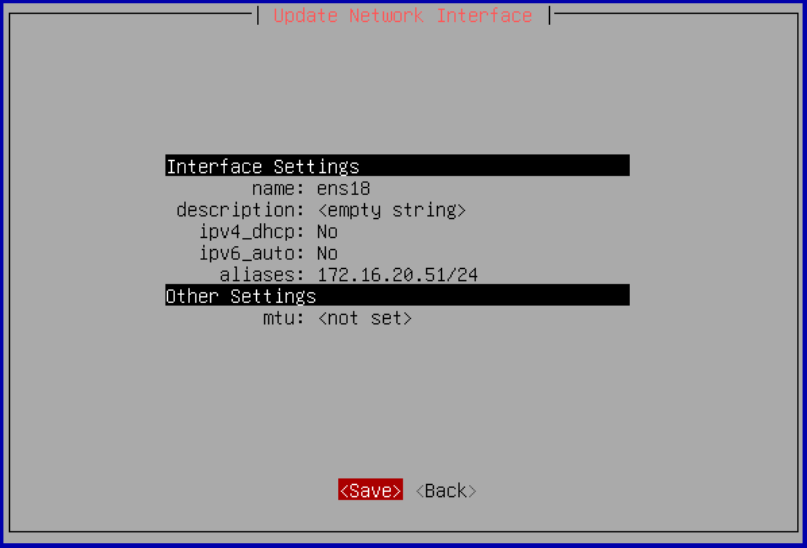
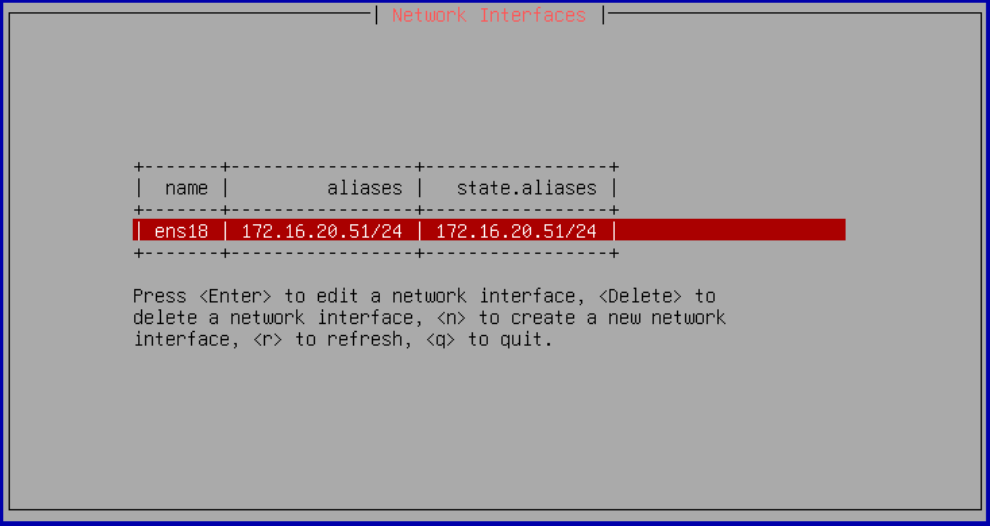
On the “Network Interfaces” screen, find your main interface (should be something like “ens18”) and press “Enter”.

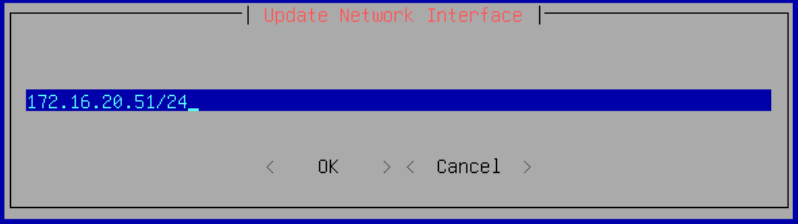
First setting you will want to change is “ipv4_dhcp”. We want to disable this by selecting it and changing it to “No”. Next you will need to go down to “aliases” and press “Enter”. Here you enter the static IP address you want the server to use. It should be the four decimal numbers separated by periods followed by a forward slash and then the subnet mask for the network (ex. 172.16.20.51/24).
Once you have your settings all entered, arrow down to “Save” and press “Enter”.
Back on the main “Network Interfaces” screen, it will prompt that you have pending network interface changes and to press “a” to apply.
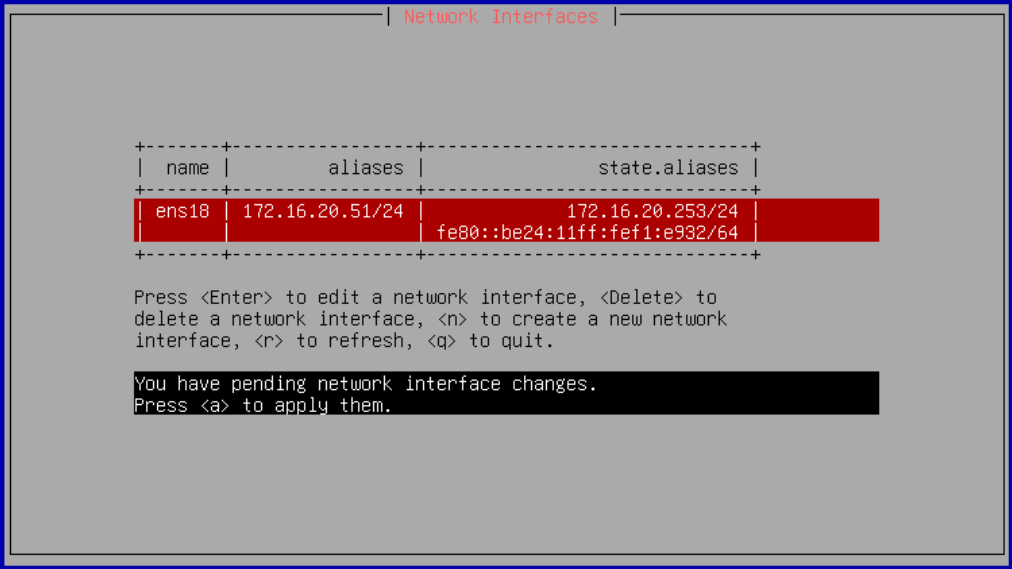
Once applied, it will prompt you to press “p” to persist the setting changes with a count down to when it will rollback the changes. This is a failsafe just incase you change it to something that doesn’t work and locks you out of the system. It will rollback the changes if you don’t hit the letter “p” so you can get back into the system.

Once you hit “p”, it will save the setting permanently and your IP is now set. Press the letter “q” to quit out of this menu.
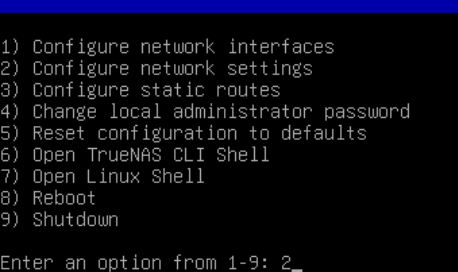
Now we need to set our hostname for the server, the default gateway to access it outside this network and the dns servers you want the system to us. This is needed for updates and external communication so it’s a good idea to set these settings. Back on the main menu, enter the number “2” and press “Enter”.
Enter the “hostname” for the name of the server, the “ipv4gateway” address for the network gateway and the “nameservers” (DNS Server) you want to use. Optionally, if you have a domain, you can enter that information under “domain”. Once the information is entered, arrow down to “Save” and press “Enter”.
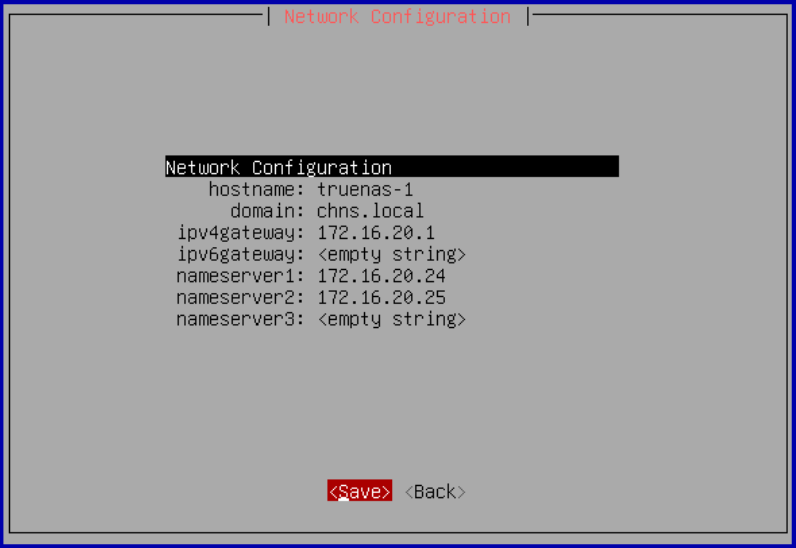
Once the settings are applied, there is no prompts on these to rollback, you should be taken back to the main menu and should now see your new IP address listed for the web user interface.
That should be all the settings you need to do in the console. One note, if you screw any of the settings up and want to start over, you can enter the number “5” to Reset configuration to defaults. You can now close the console and I’ll move on to accessing the system through the web interface.
Web Interface & Common Settings
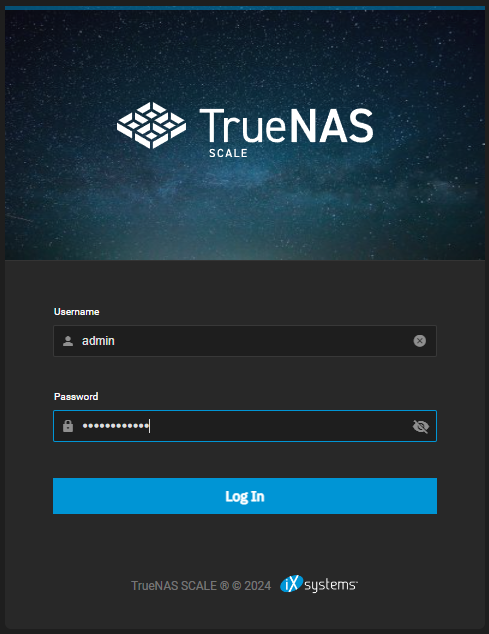
Open your web browser of choice and go to the “https” interface listed on your console. When presented with the certificate error, click Advanced and Processed. Since this is an internal connection and it’s on a server we know and trust, I’m not going to worry about a certificate error.
You will then be taken to the main TrueNAS login page. Enter “admin” for the username if you followed these instructions and selected “Administrative user (admin)” during installation. Then enter the password you set for the admin user during installation.
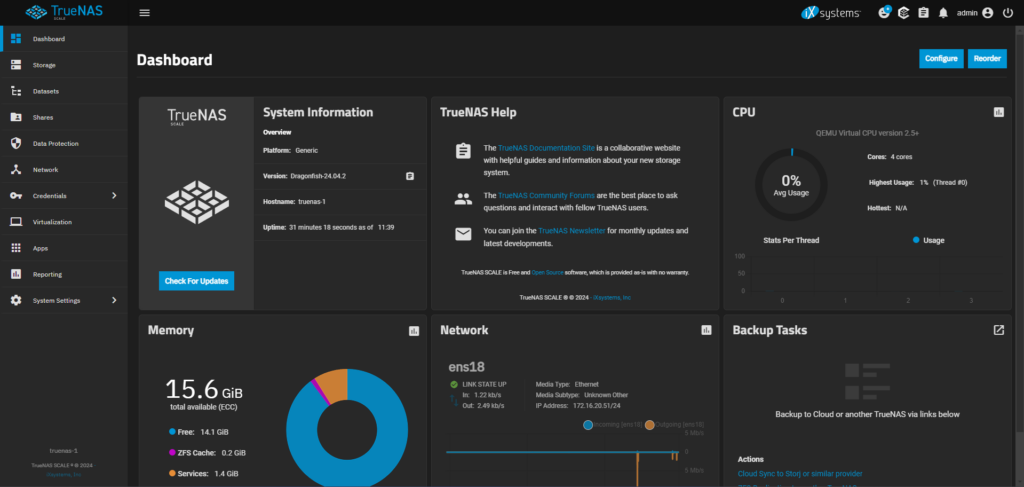
Welcome to the TrueNAS Dashboard. From here you can see general health for your system. You can “Reorder” these widgets in any arrangement that makes sense to you by click in the top right corner.
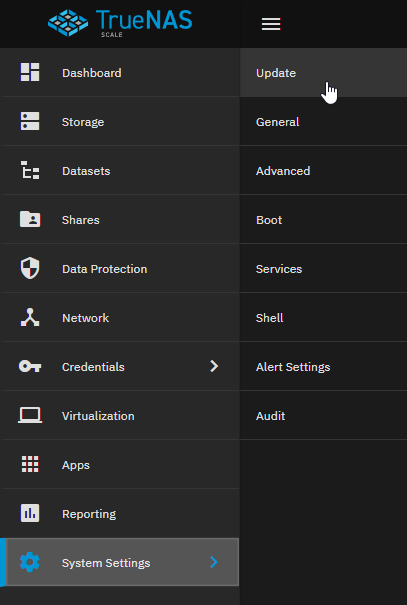
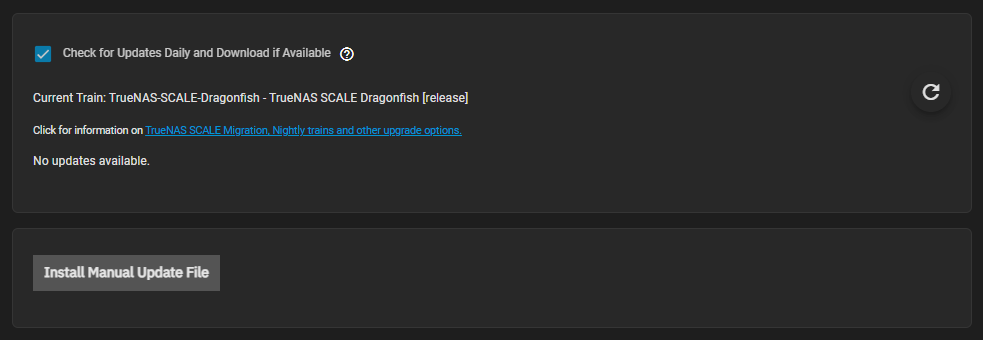
First thing I do after a new installation is go to “System Settings” on the left menu and then going to “Update”.
Confirm that the Update settings are enabled to check daily for new updates and make sure there aren’t any updates available. Install if there are any. If you just downloaded the ISO from their site, there shouldn’t be any available.
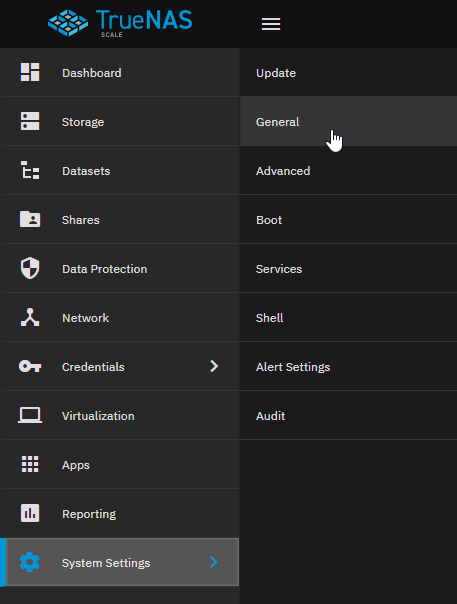
Next we want to go to “System Settings” again on the left menu and select “General”.
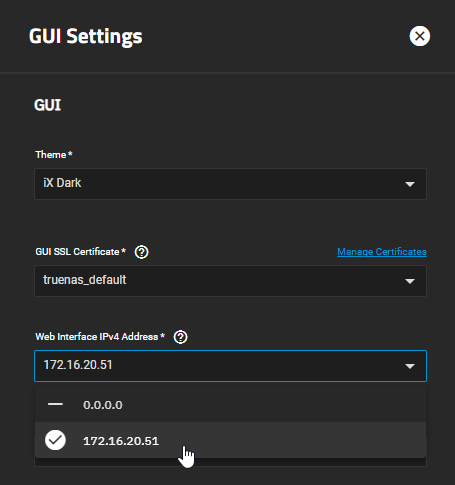
On this page, you can change all the different system settings for your server. What I do first thing is go into the “GUI” settings and hard set the “Web Interface IPv4 Address” to the IP address I am currently using and will use in the future for management. This is technically an optional step for most. I am going to be setting up a second interface for actual share communication on a 10Gbps link in the future so I just want to make sure the web interface is only accessible on the main management IP I’m expecting.
Scroll down and click “Save” once your setting is set. This will then prompt you that it’s going to “Restart Web Service” and ask you to confirm you want this to happen. Check the box to confirm and then click on “Continue”.
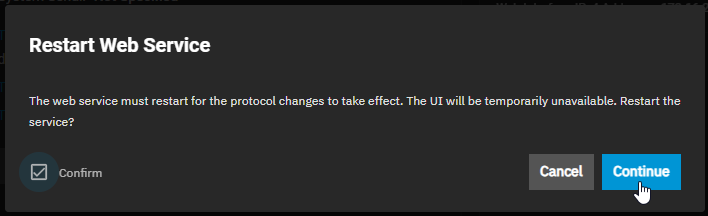
Once the service restarts, it should take you back to the main general system settings screen and you should be good to go for common settings.
Next thing we need to do is create a storage pool utilizing those other two 100Gb drives we added to the virtual machine.
Create Storage Pool
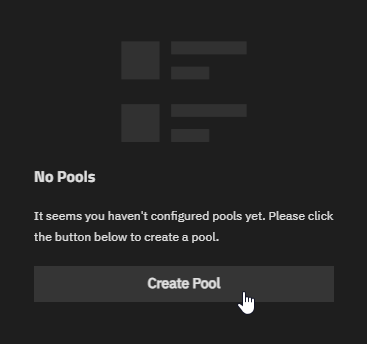
On the left menu, click on “Storage”. This will take you to the Storage Dashboard.

On the Storage Dashboard, you should see that you have “No Pools” and a button to “Create Pool”. Click that button.
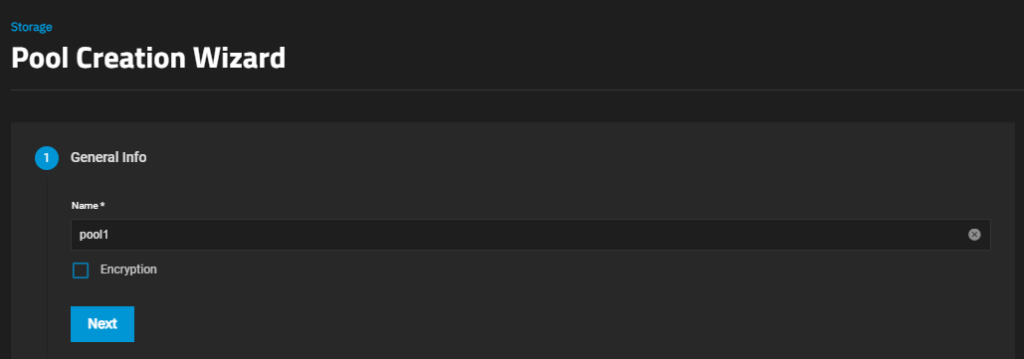
First screen, we want to name the pool. I usually go with something generic here to describe the the drives themselves and not a service or a share (ex. pool1). Note – Most Linux systems are case sensitive so I like to make everything lower case just so I don’t have to guess in the future what I called something.
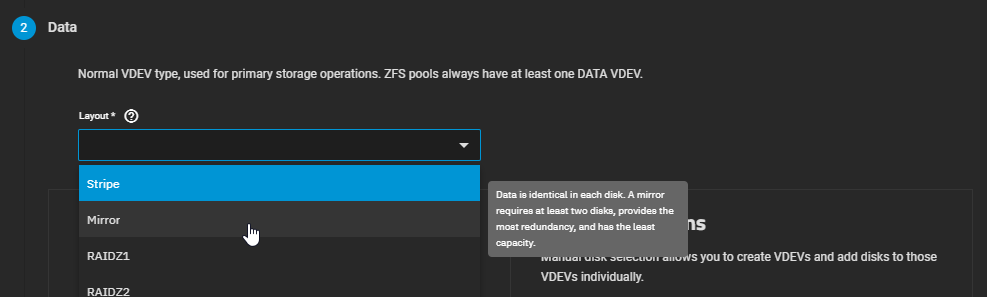
On the Data screen, click the dropdown and select “Mirror” for your Layout. If you want to use one of the other options, they are outside the scope of this article so you will need to research what they are and mean.
The server should now automatically size the pool to the available disks which should be the two 100Gb drives, giving you a total of “100 GiB (HDD)” with a Width of “2” and a Number of VDEVs of “1”.
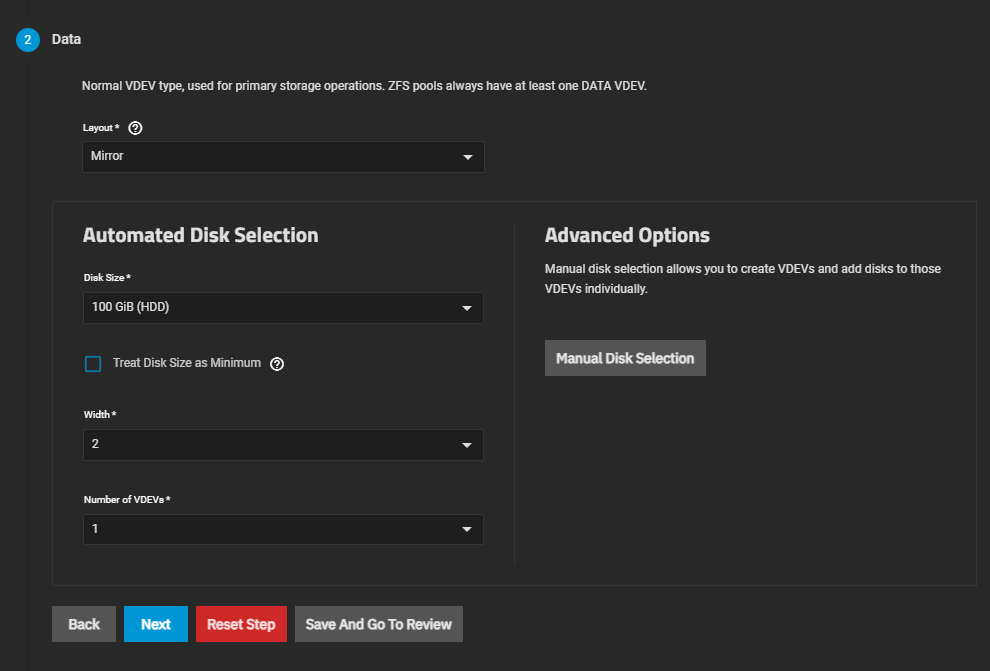
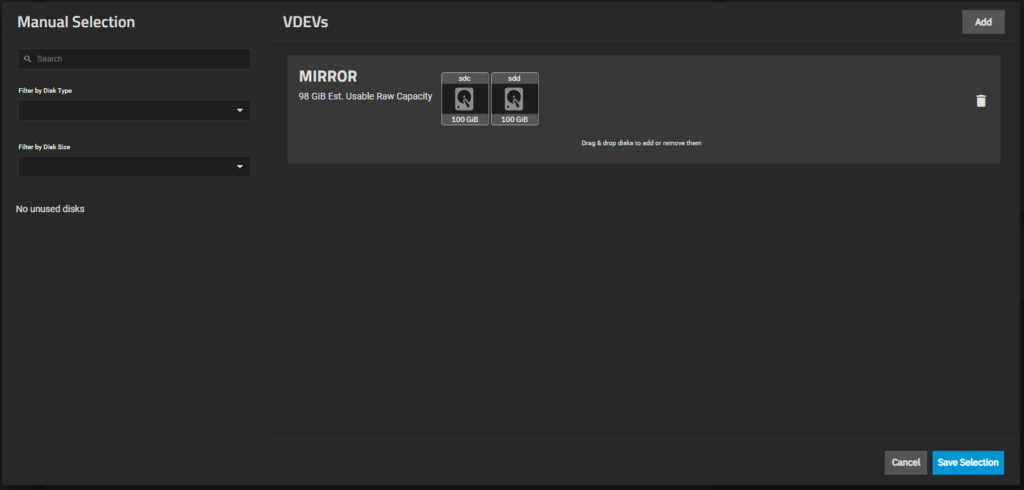
If you want to see the drives actually selected or make any changes to the pool, you can click the “Manual Disk Selection” button which will show you the VDEVs setup.
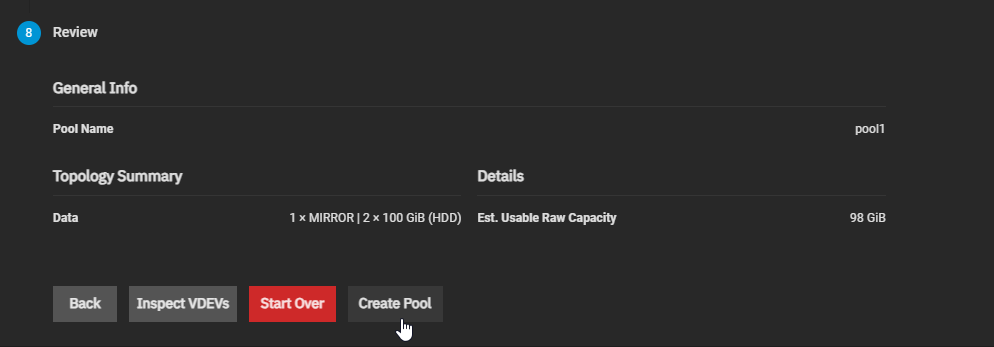
The rest of the options for the pool are all “Optional” so we’ll just click the button to “Save And Go To Review”.

Review the pool and click “Create Pool” when you are ready.
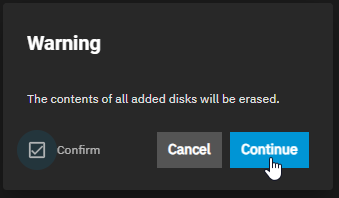
It will then pop up the generic warning that all content will be erased from the drives. Check the box to confirm and the click “Continue”.
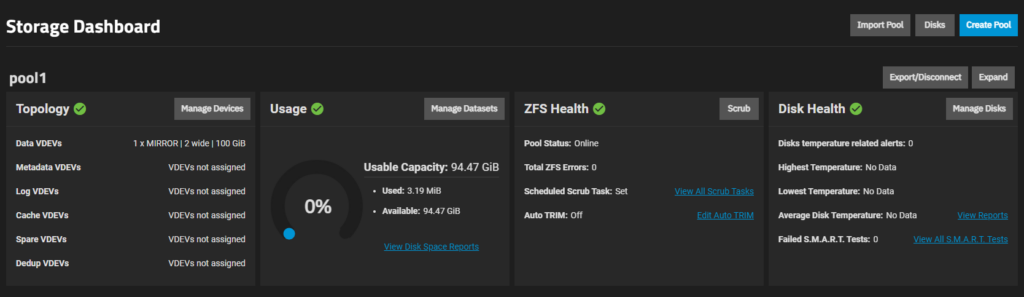
Wait for the pool to be create. Once it is finished, it will take you back to the Storage Dashboard and you should see all the statistics on your newly created pool.
That’s all there is to it! You can now go and create Datasets and Shares to store all your files.
I’m going to be covering how to do more with this server, like adding a secondary 10Gbps interface and setting up SMB/NFS shares, in up coming articles so stay tuned for those. Like I said in the opening, this server will be the foundation for moving all my docker persistent storage so come along with me on this journey.
If this helped you with your deployment of TrueNAS Scale or you have anything you would change/comment, drop a message below.