In my quest to replace all of the Google Services with self hosted applications, I have been looking for a note taking application to replace Google Keep for a very long time. Surprisingly, a simple note taking application is hard to make perfect. Google Keep definitely makes it easy to simply take notes and that’s it and a lot of the application alternatives I found try to do too much in my opinion.
I came across Trilium in this Marius Hosting article, bookmarked it and moved on because I had a hard time understanding the hierarchical setup at first. I looked at other applications, like Obsidian Notes, but none of them really worked the way I wanted. I then decided to try deploying Trilium and actually get it setup and understand it and now I think it’s great! In my opinion, one of the best replacements to Keep I have come across. Once you clear out the Demo information and do some basic customization, it works really well and is actually fairly easy to understand and use.
In this article, I’ll go over my deployment in a docker container. Then I’ll go over the basic setup of the application container. I’ll end with some clean up and customization of the application to get your system setup the way I found easiest to use.
Prerequisites
I will be setting this up on Portainer utilizing Docker Containers running on Ubuntu 24.04. Here are my setup guides for all of those pieces of software:
- Install Ubuntu Server 24.04 LTS
- Things to do after installing Ubuntu Server
- Install and Configure Docker, Docker Compose, and Portainer on Ubuntu Server
Deployment
Copy this code to a new Stack on your Portainer. Update the information you can change for your deployment and deploy the Stack.
services:
    app:
        container_name: trilium
        image: elestio/trilium:latest
        environment:
            - TRILIUM_DATA_DIR=/home/node/trilium-data
        ports:
            - {port number}:8080
        volumes:
            - data:/home/node/trilium-data
        restart: always

volumes:
  data:
Stuff to change for your deployment:
- Image – You can do “latest” and it will pull the current version. I prefer to look up the actual tag for the current version. This adds a little more management to updating however pinning it to a specific version adds reliability. Here is a link to the Trilium Tag page.
- Ports – You will want to update this to a port that works well inside your environment. It will be the port that you connect to the web interface of the container.
- Volumes – I switched to using Docker Volumes a little while ago in hopes of using it for a change I’m making to my infrastructure and how I’m storing and backing up data. You don’t have to use volumes if you don’t want to, just add a blind mount to the left of the “:”.
- Restart – You will want to set this to the way you want docker to handle the restarting of the container. Here is a link to the Restart Policies to choose from. I prefer “always” so if it crashes or the server restarts, it will automatically restart the container.
Configuration and Setup
Now that your Trilium container is deployed, lets connect to the web interface and start using it.
Open your web browser and navigate to “http://{server name or IP}:{port you configured in the stack}”.
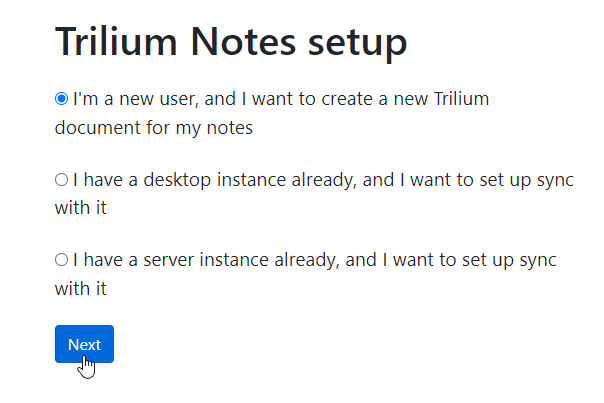
You should see a “setup” screen. Since this is the first time we are deploying the container, select “I’m a new user, and I want to create a new Trilium document for my notes” and click “Next” to continue.
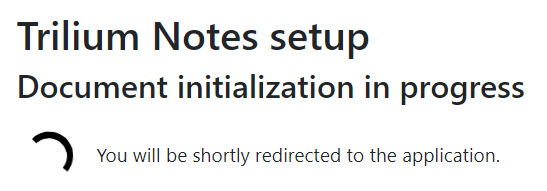
The container will start building your new instance. Let it process and then it will redirect you after its finished.
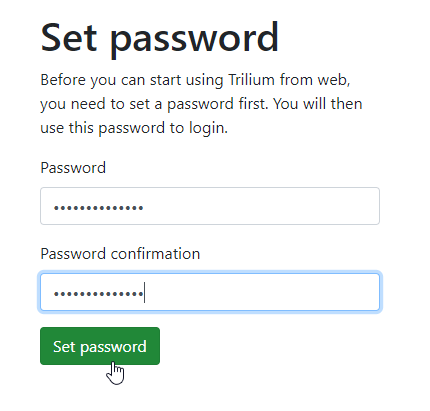
The application will then prompt you to enter and confirm a password. This system isn’t a “shared” application so there is only one “user” to access the whole application. If you need to collaborate or set this up for other users, you might want to look at one of the other note taking applications. This is basic and simple. Enter a password and click “Set password” to continue.
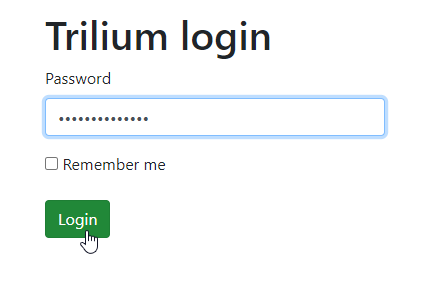
It will then redirect you to the main login page for the application. You can bookmark this page to come back or link to this page from a dashboard application or however you are going to access it. Enter the password you just set to continue.
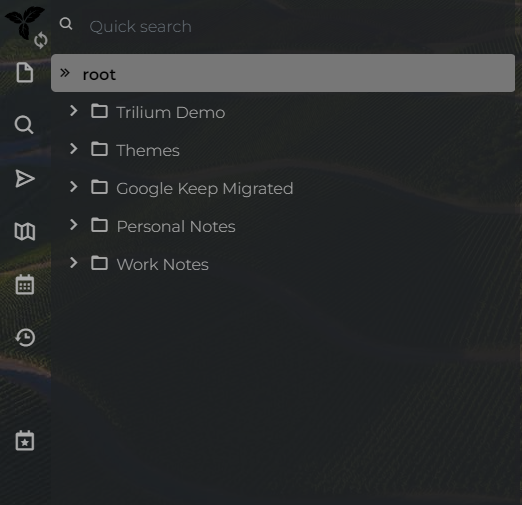
Since this is a new instance, you will be presented with the “Demo” notes. This is awesome for giving you an overview of how to do pretty much everything in Trilium. I suggest you take the time to read through these notes to get familiar with the application and the hierarchical structure.
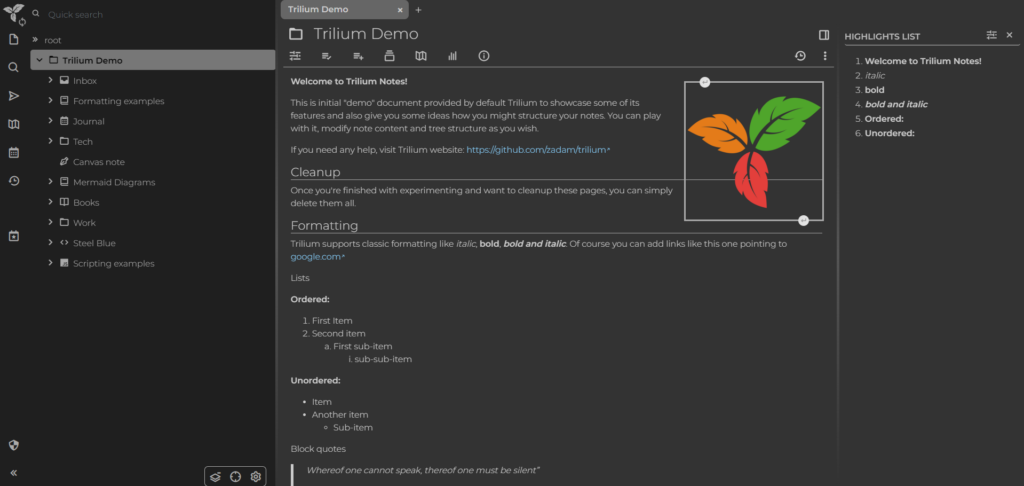
(Note: I suggest you try modifying this “Trilium Demo” structure and figure out how to use it before you copy any existing notes you care about. Worst case, you can just delete it and start clean. You can also remove your docker volume and re-deploy if you delete something or break the system too much during the figuring it out phase. I had to do this several times until I figured it all out.)
Themes
First thing I suggest you do is separate your Themes from the rest of your structure. Since everything with the application is based on what you put into the “notes”, the code for custom themes is right next to the notes you care about.
Start by creating a “new child note” under the root level note.

Rename this note to “Themes”

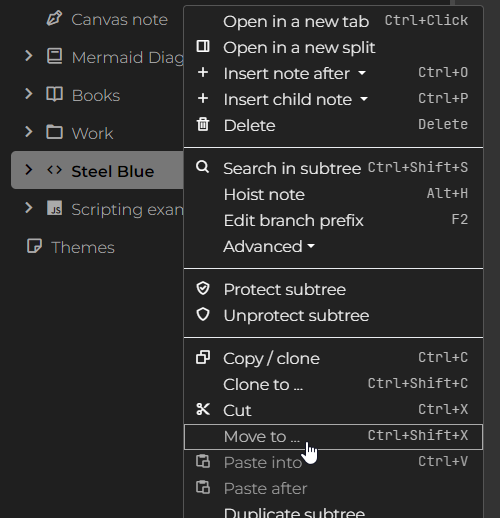
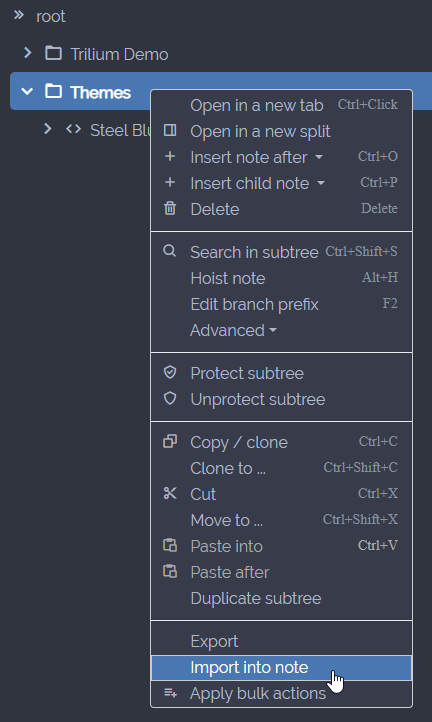
First theme we will load is actually a move from the Demo notes. Look for a note called “Steel Blue”. If you click on this note, it will tell you that this is a demo on how to create custom themes for Trilium. Right click on this note and click “Move to…”.
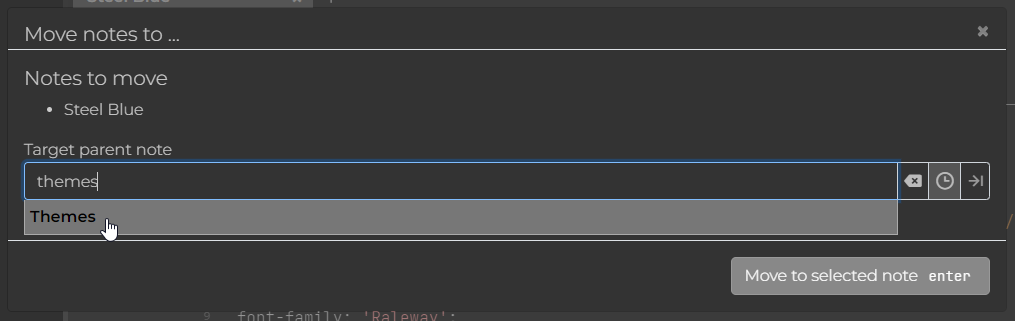
Type in “theme” and select your Themes note we just created. Then click “Move to selected note”.
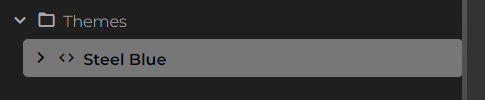
Now you will notice that your Themes note changed into a “folder” and Steel Blue is under it.
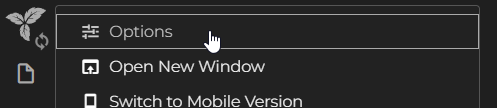
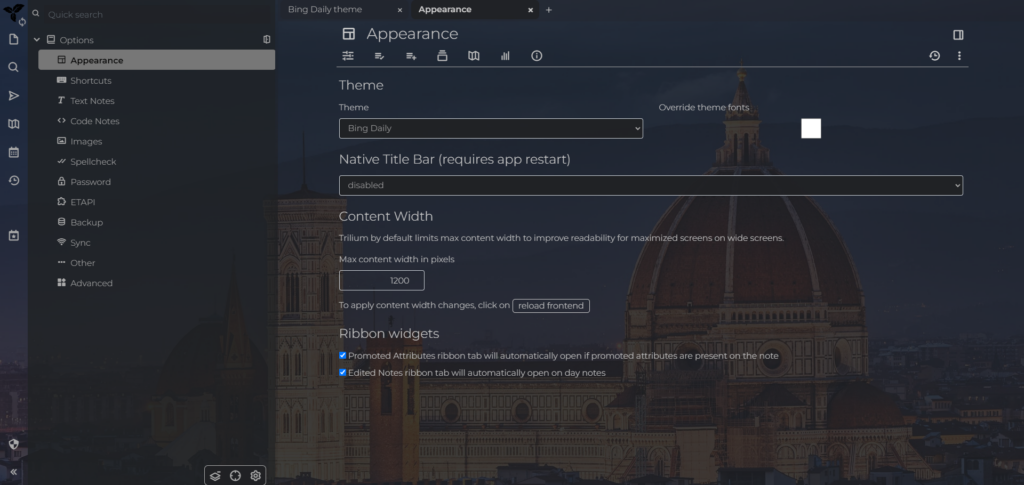
To change to this custom theme, click the “Trilium Icon” in the top left corner and then click “Options”.
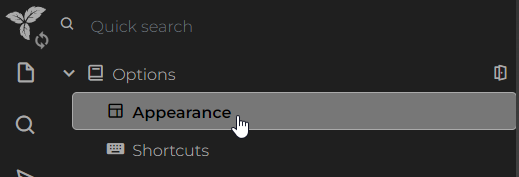
Then click on “Appearance” under Options.
Then change the Theme to “Steel Blue”.
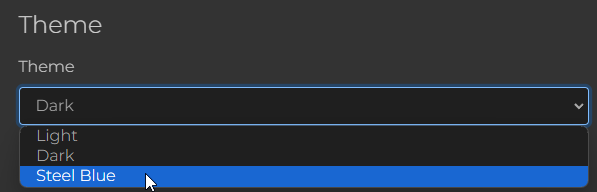
As soon as you select it, it should update the interface and change to the new theme. Click the “X” next to the tab at the top to close the options screen.

HERE is a link to a whole list of community created themes that you can download and import.
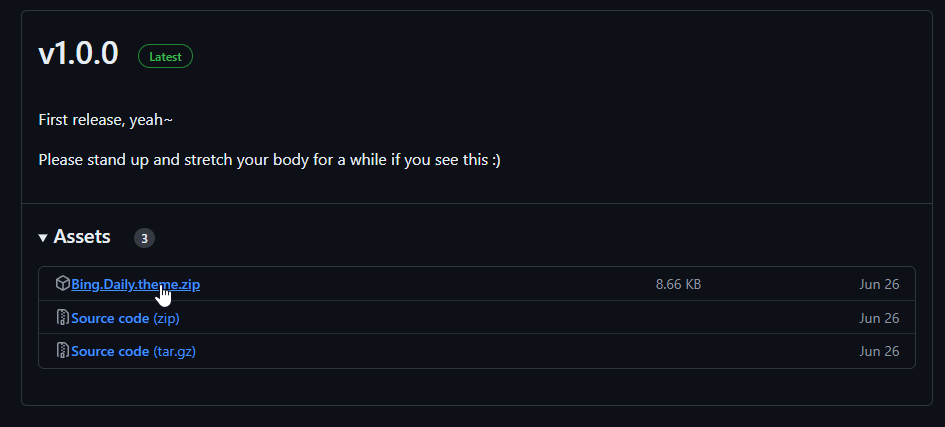
HERE is the link to the theme that I like the most and use on my main system. Its called Bing Daily Theme. Basically it sets the theme to a “dark mode” look and then for the background, it pulls the current background that Bing uses for its rotating background.
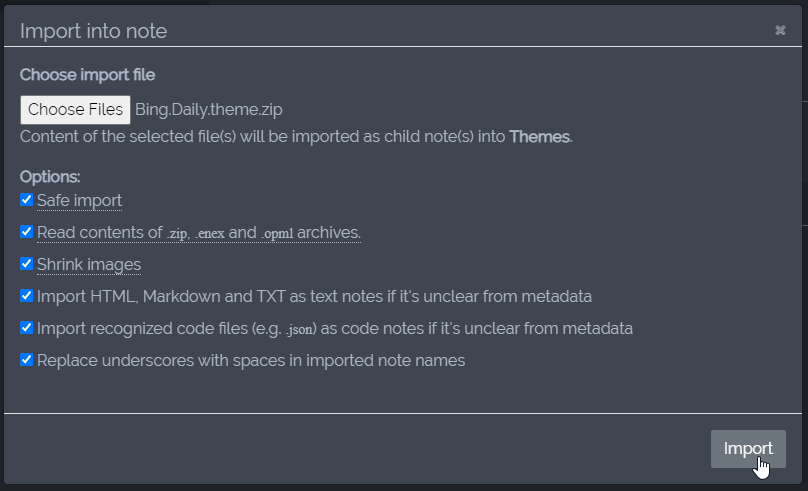
Follow the links to download the zip file we will need to import.
Once it’s downloaded onto your local machine, go back into your Themes folder, right click on the folder and click “Import into note”.
Click the “Choose Files” then find and select the zip file you just downloaded. Leave the options check boxes all checked and just click “Import” to import into that folder.
Now just go back into the Options under Appearance and select the Bing Daily as your Theme. It should update with an image for the background.
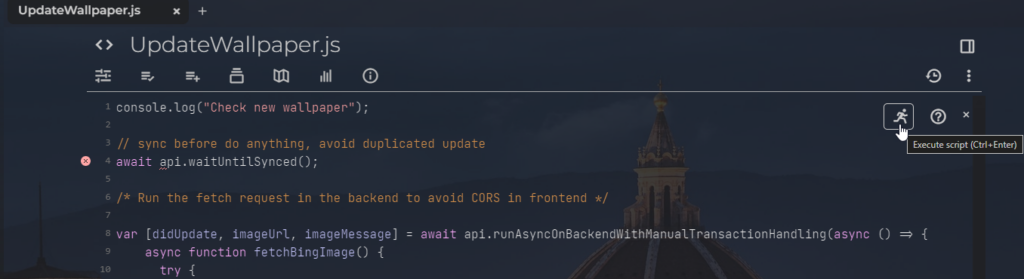
By default, this won’t update each day. I haven’t figured out how to set it up to automatically update the image each day. If you know how to do this, comment below and share the knowledge.
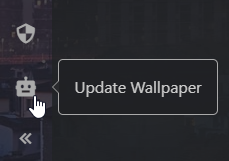
To update it, you can simple go into the theme, find the “UpdateWallpaper.js” script and execute the script each day by clicking the running man in the top right corner.
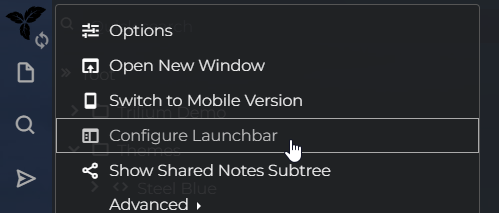
The better way I found to do it is to add a shortcut to the launch bar on the left.
Click the “Trilium Icon” in the top left corner and then click on “Configure Launchbar”.
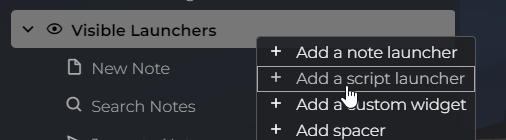
Right click on “Visible Launchers” and then click “Add a script launcher”.
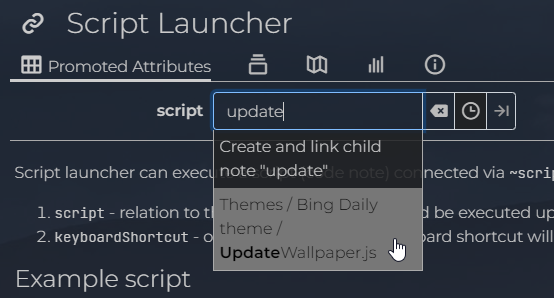
In the “script” field, enter “update” and select the “UpdateWallpaper.js” script.
Update the name to something like “Update Wallpaper” and set the icon to something you like.
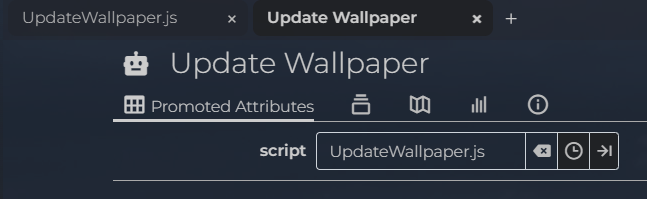
Now in the bottom left corner of the interface, you should see the icon. You can now click that to update your wallpaper as needed.
Now just play around with your folder structure and how you want to manage your notes. If you don’t want the Demo notes, feel free to just delete the top level note (Trilium Demo, not root) and it will clear it from your deployment.
There is a ton of expansion and customizations you can do with Trilium. HERE is a GitHub with a bunch of community creations to modify the application and make it useful for how you want to use it. I’ve only begun to dig into this application myself and by no means an expert on it. If you have ideas and customizations that you like to use, drop them in a comment below and we can all benefit form sharing.
If this article helped you with your self hosting journey or would like to leave feedback on this article, drop a comment below.