Lidarr is a music collection manager for Usenet and BitTorrent users. It can monitor multiple RSS feeds for new albums from your favorite artists and will interface with clients and indexers to grab, sort, and rename them. It can also be configured to automatically upgrade the quality of existing files in the library when a better quality format becomes available.
This walk through will cover the deployment and some simple configuration to get it up and running.
Prerequisites
I will be setting this up on Portainer utilizing Docker Containers running on Ubuntu 24.04. Here are my setup guides for all of those pieces of software:
- Install Ubuntu Server 24.04 LTS
- Things to do after installing Ubuntu Server
- Install and Configure Docker, Docker Compose, and Portainer on Ubuntu Server
Next, you will need to mount your folder shares onto the base servers so the container will be able to access them. You will need the main folder where your Music is stored and if you use a server to download content, you will need access to the folder where the downloader stores the finished files. Here is a guide for mounting the shared folders:
(Optional) You will need to setup a indexing server and a download client server to link to the Lidarr server. Here are my walk throughs for setting up Jackett and Transmission:
- Jackett – Indexer for Tracker Sites
- Transmission over Private Internet Access (PIA) – Bittorrent Client over VPN
Deployment
---
version: "3.9"
services:
  lidarr:
    image: linuxserver/lidarr:latest
    container_name: lidarr
    environment:
      - PUID=0
      - PGID=0
      - TZ=America/Los_Angeles
    volumes:
      - /home/{username}/docker/lidarr/config:/config
      - /mnt/plex/music:/music #music directory
      - /mnt/torrent:/downloads #downloads directory
    ports:
      - {port number}:8686
    restart: always
Stuff to change for your deployment:
- Version – This is be determined by the version of Docker you are running on your server. You can find this by entering the command “docker -v”. Here is a link to the Compatibility Matrix.
- Image – You can do “latest” and it will pull the current version. I prefer to look up the actual tag for the current version. This adds a little more management to updating however pinning it to a specific version adds reliability. Here is a link to the Lidarr Tag page.
- PUID and PGID – These numbers are specific to the user account you are running the container under. The Root user is “0” for both. You can find this for your user by logging into your server and running the “id” command.
- TZ – Update this to be your Time Zone. Here is a link to a list of all Time Zones.
- Volumes – The first mapping you need for sure, this is where all the persistant configuration files for the Lidarr container will be stored. Update the information with your username or change the location before the “:” to a location of your choosing. The next mapping is the location of your media library. You will want this mapped to the root location of all your movie folders. The final mapping will be to your download directory if you choose to do automatic downloading.
- Ports – You will want to update this to a port that works well inside your environment. It will be the port that you connect to the web interface of the container.
- Restart – You will want to set this to the way you want docker to handle the restarting of the container. Here is a link to the Restart Policies to choose from. I prefer “always” so if it crashes or the server restarts, it will automatically restart the container.
Configure Lidarr
Now that your Lidarr container is deployed, lets connect to the web interface and setup the system.
Open your web browser and navigate to “http://{server name or IP}:{port you configured in the stack}”.
First thing you will be presented with a form that is forcing you to set up authentication for the system to prevent unauthenticated access. Fill out the information with what you want to use, I recommend using the “Forms (Login Page)” setting.

Once you Save your authentication information, you should be taken to the main Library page with no information.

Media Profiles
We will need to setup our media profiles so the system knows what content we want in the library. We will use these profiles later in the configuration so it’s best to do this first.
On the left menu, click on “Settings” and then on “Profiles”.

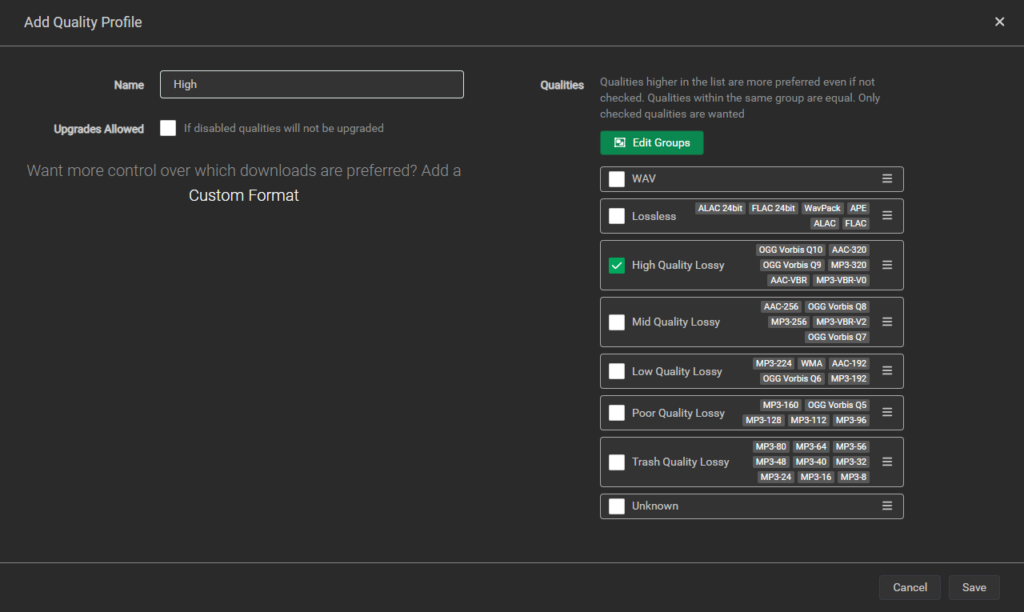
First up, Quality Profiles. Since deploying this system and actually caring about what is in my library, I only like to get a specific level of audio, usually this is MP3 320kbps. This falls under the “High Quality Lossy” group. I start by removing all existing profiles and create my own custom one called “High” and check the box for “High Quality Lossy” only.

Next is the Metadata Profiles. The default “Standard” profile they have for this is pretty restricted in my opinion so I create 2 new ones to use, one I call “Album’s & EP’s”. This one is what I use for the majority of my artists that I want to just capture their main works. Here are the settings I use for it:


The second Profile I create is called “Everything”. This is what I use for my favorite artists that I want to capture everything they create. Here are the settings I use for it:


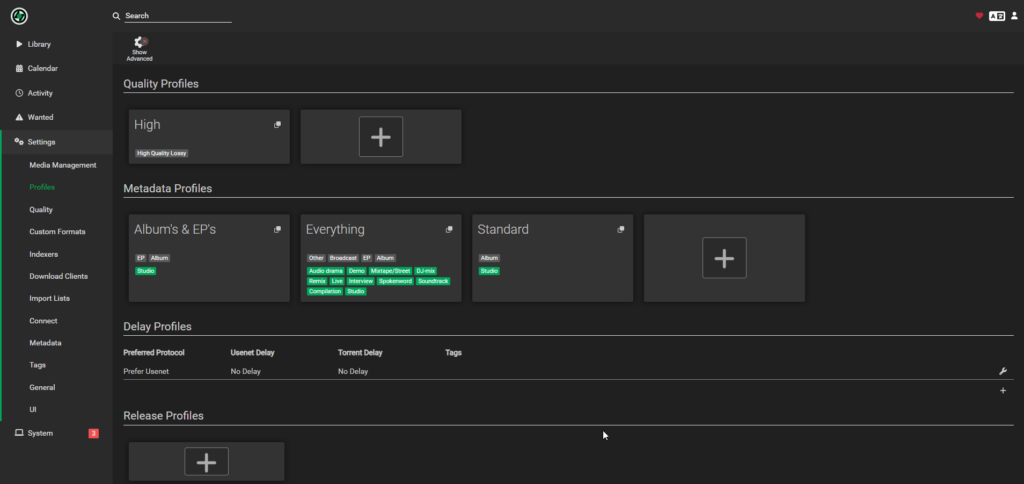
Once you have those setup, your system should look something like this:

Import Your Media
If you followed my instructions to mount your media library onto the server, we will now point Lidarr at the mounted folder paths for our Library.
On the left menu, click on “Settings” and then on “Media Management”.

Before we add our Library, lets configure some settings. I recommend checking the box to “Rename Tracks”, this will automatically rename the media folders and files to a standard format.

After you check it, new fields will appear for “Standard Track Format” and “Multi Disk Track Format”.
These are the variables I use that work best for my Library, feel free to tweak these settings to your setup.
Standard Track Format:
({Release Year}) {Album Title}/{track:00} {Track Title}Multi Disk Track Format:
({Release Year}) {Album Title}/{Medium Format} {medium:00}/{track:00} {Track Title}
Now, click the big “+” under Root Folders.

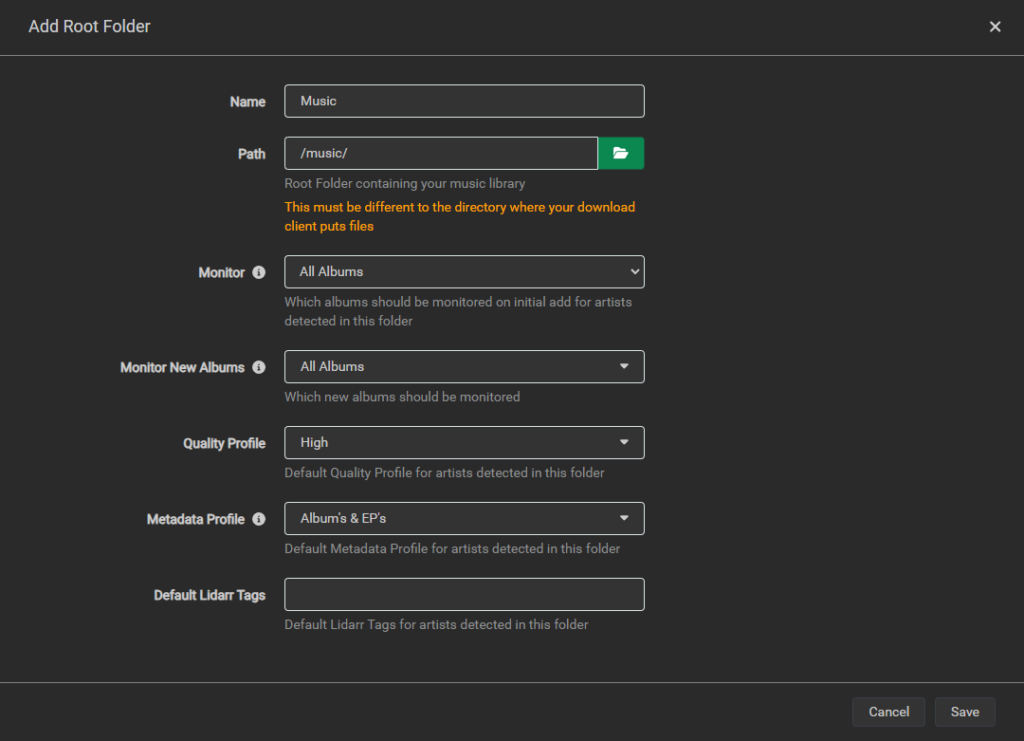
Fill out the information for your Library. For “Path”, since this is on the inside of the container, we need to point it at the folder you had in your stack to the right of the “:” in the volume configuration. For my setup, I just monitor “All Albums” for both Monitor and Monitor New Albums. This ensures you get everything the artist creates. For the Quality Profile, I select my “High” profile we just created. For Metadata Profile, I select my “Album’s & EP’s” profile since that is the default I want to use for all artists.

Click “Save” in the bottom right corner. As soon as you do and assuming it has access to your library, it will start scanning all of your music into its library. You can see the status by looking in the bottom left corner of the user interface.

This could take some time to finish so just wait or move on to the next part of this walk through and setup and Indexer. These next steps are optional, if you don’t want to download new content, you are good to go.
Configure Indexer
If you are wanting to use this to automatically download new albums and followed my instructions on deploying Jackett as an Indexer server, we will now connect Lidarr to Jackett. If you setup multiple sites to pull information from, you will need to setup each one as its own Indexer even if they are on the same Jackett server.
On the left menu, click on “Settings” and then on “Indexers”.

Then click the big “+” under Indexers.

For Jackett, we are going to select “Torznab”.

Enter the “Name” to describe the indexer. (ex. The Pirate Bay (Jackett))
For the “URL”, we need to go over to our Jackett server and click “Copy Torznab Feed” next to the Indexer you setup.

For the “API Key”, this is located in the top right corner of the Jackett page.
For the Categories, you will need to figure this out for each site as they are all different in how they categorize their content.
Once you have everything set, click the “Test” button at the bottom. Assuming all information is correct, you should get a green checkmark in return. Click “Save” to continue.

Add all of your sites you have in your Jackett system until you have a full list of options for the system to use.

Configure Download Client
If you are wanting to use this to automatically download new albums as soon as they are released and followed my instruction on deploying Transmission as a Download Client, we will now connect Lidarr to Transmission.
On the left menu, click on “Settings” and then on “Download Clients”.

Then click the big “+” under Download Clients.

Scroll down and click on “Transmission”.

Enter the “Name” to describe the client. (ex. Transmission over PIA)
Enter the “Host” address of the server running the Transmission container. I use IP address instead of FQDN to make sure I don’t have any issues.
Enter the “Port” which will be the web UI port number.
Enter the Username and Password you configured for the web UI.
This is optional but I learned to set a Category if you have multiple systems using the same download client. This way it separates the folder structure and also the different systems can only see the downloads they send to the client. This helps eliminate issues between systems. I just enter the systems name, “Lidarr” as the category.
Change “Recent Priority” and “Older Priority” to “First”. This will make any new shows aired the highest priority. This works well if you are using this server to download older albums that are harder to get seeded.


At the bottom of the page, click the “Test” button. As long as you get a green check mark, you are good to click the “Save” bottom to continue. If you get a Red “!”, scroll up to see what the error is.

There is one other thing we need to set for the Download Client to work. We need to add a “Remote Path Mapping” at the bottom of the Download Client page. This will insure that the folder structure that Lidarr sees is the same folder structure that Transmission uses. Here is what I add to my setup to get everything to work:

Remote Path is the folder where your Download Client saves the downloads. The Local Path is the folder on the inside of the container that Lidarr can access to the downloaded files.
If you set a Category on your client, you might have to also map the sub folder where it is saved, in my case it’s “Lidarr”:

Once you are done with these settings, your client page should look something like this:

After you get to this point, the only thing left to do is start an indexer search for the files to download and add to your library. On the left menu, click on “Wanted” and then on “Missing”:

Assuming the system had time to process all of your existing artists, you should now see a list of missing albums. Click the “Search All” button at the top menu:

If you have a Lot of missing albums, Lidarr will warn you that this will take a while and can’t be cancelled. As long as you are ready, click the “Search” button to start:

Adding New Artist
It’s also very easy to add new Artists to monitor for new content.
On the left menu, click “Library” and then click on “Add New”:

Search for the artist you want to add and click on the person/group.
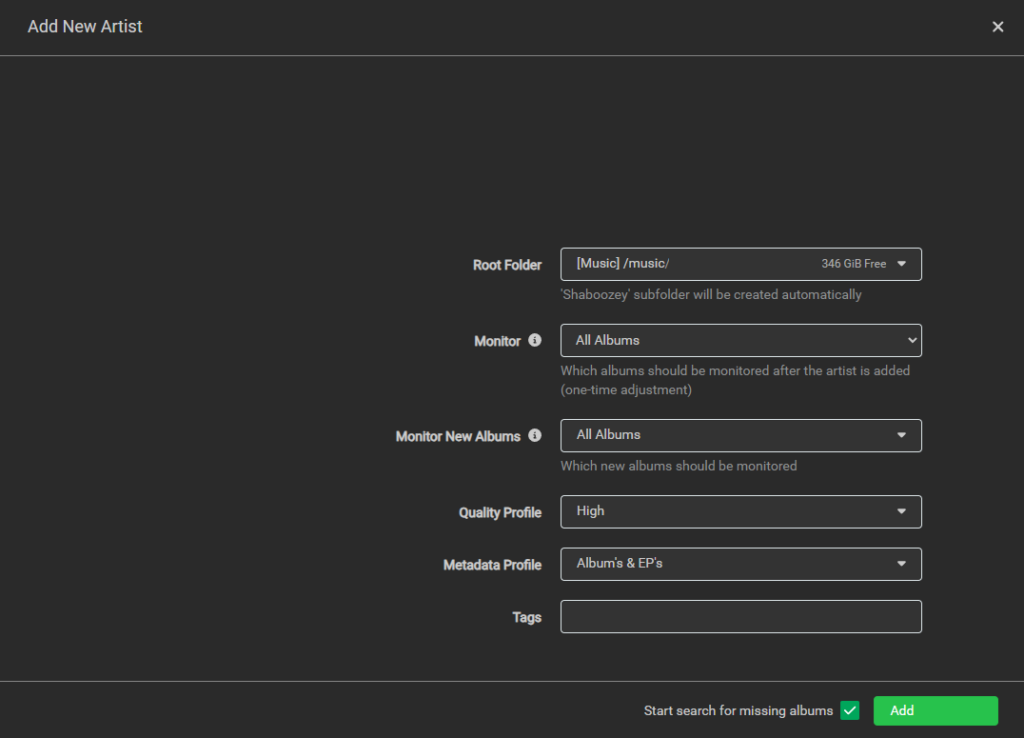
This will pop up a form for you to set the profiles you want to use for all of this artists work. Most of the time, the defaults are correct, but you can tweak these settings based on the profiles and settings we configured earlier.

Once you are done, check the box next to “Start search for missing albums” and then click “Add {artist name}”. The system will index the artist and then do a search and download of any missing albums.
I hope this helps everyone who read it to get Lidarr up and running on their own system and get you though some of the “gotcha’s” that I ran into and had to figure out.
If you run into any other issues deploying this container, let us know in the comments below and start a conversation or just drop a comment letting me know you were here.


