As I have written in previous articles, I love the Ubiquiti products specifically the Unifi line. They fit a really nice spot with enterprise level features but still affordable for home labs. Being able to build a cohesive network from the ISP connected device all the way down to the end point connection and have it all work together is great for beginners in the networking world.
I have been using the Unifi system in my home lab for 10+ years and one thing that was very hard for me to wrap my head around, what I see online that most people have a problem with, is the Firewall rules and Access Control List. Took me years of messing around with mine and looking at other people’s setup online to finally get to a place I feel like my setup is in a good place.
In this article, I’m going to go over the general settings I have enabled to help lock down my system. I will also go over some of the quarks of the Unifi Firewall and how I have made mine work the way I want. Finally, I’ll go over the different Firewall rules I use and how to setup a secure network.
Note – Ubiquiti has made great improvements in the Unifi Network Application v8 but it still has a long way to go. I will be showing all settings and screenshots from the newest stable version at this time (v8.1.127). If you need a guide on how to setup a container for the Unifi Network Application and how to migrate your system to it, HERE is a guide I wrote that steps you through the process.
Backup!!!
Before you do anything with the firewall, you will want to take a full backup of your Unifi Network Application and save that off the device. Do this just in case you mess something up and lock yourself out of the management interface. You won’t want to have to start over with a clean controller.
General Settings
I will start assuming nothing and walk you through navigating to the Firewall settings.
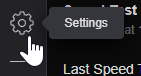
From the Unifi Dashboard, click the “Settings” gear icon at the bottom of the left menu bar.
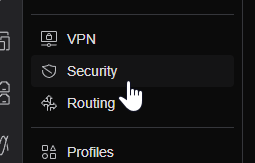
Next, click the “Security” page on the left menu.
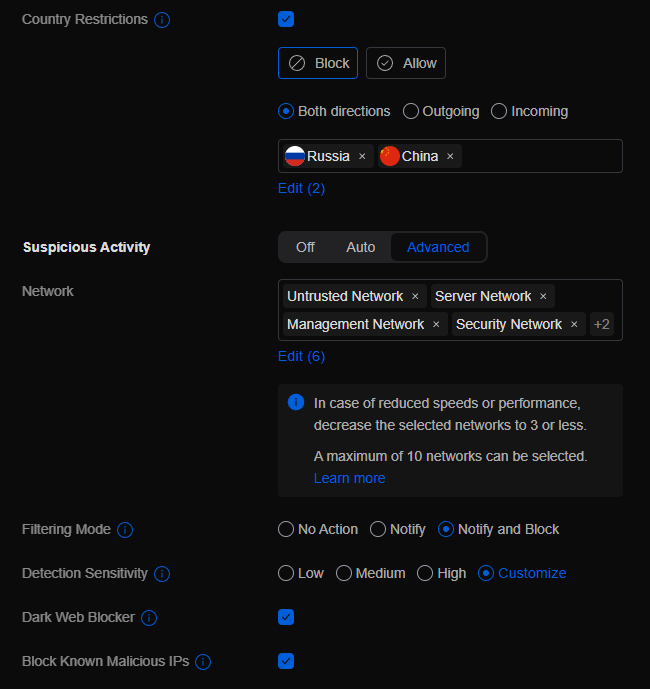
On the “General” tab, this is where you will set all the settings for how you want the firewall to process traffic, mostly from the outside coming into your network, but there is some inter network traffic settings. Here is a screenshot of my settings:
A few setting to be aware of:
- Country Restrictions – I recently configured these settings just in case based on the current Geopolitical climate. You by no means have to do this filtering. With these settings, i’m basically blocking traffic in both directions from Russia and China.
- Suspicious Activity – This section is Unifi’s version of a Intrusion Detection System and Intrusion Prevention System (IDS/IPS). Be cautious with enabling these settings as it can cause performance issues on your Firewall. Currently, I have it monitoring all of my networks and does a full “Notify and Block” on suspicious activity. I will probably remove networks from this monitoring once I take steps to limit more outside access to my systems.
- Detection Sensitivity – Even though it says “Customize” for this setting, it’s really set to “High” where it monitors all options. I just don’t monitor “P2P” which is why its set to customize and that is unchecked.
The rest of the settings not shown are just the default. I don’t have any Traffic Restrictions other then the default.
Port Forwarding
This tab allows you to configure you port forwarding rules. Port Forwarding is the ability to map traffic hitting your external facing IP address on specific network ports and redirect it to the internal system that has the information the system needs. If you run any sort of internally hosted game server or website that has external users, you will need to understand how these rules work.
Here is an example of a rule you could create:
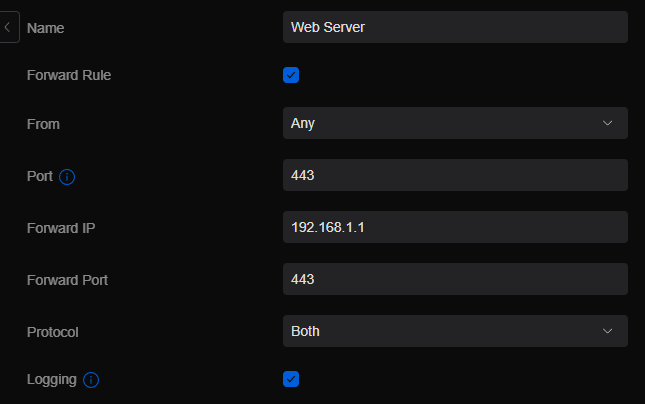
Settings to know:
- Name – Name your rule something that you will understand as this will show up later in your actual firewall rules.
- Forward Rule – This is basically “is the rule enabled?”. Check this box to turn it on.
- From – If this rule passes traffic to people that you don’t know where they will be coming from, leave it “Any”. If its going to be coming from a specific address like if the other person has a stack address, you can change it to “Limited” and enter their public IP address.
- Port – This will be the port the traffic is hitting the public side of the firewall on. Most cases this will be the same as the internal port but if you need the firewall to change it for some reason, like you have two system internally that do the same thing but you want different connections externally.
- Forward IP – This is the IP address for the server on the internal network you want the traffic to be forwarded to.
- Forward Port – This is the Port information for accessing information on the internal system it’s forwarding to.
- Protocol – This can be TCP or UDP or Both. If you don’t know what the traffic is, leave it on Both.
- Logging – Check this box if you want the Unifi Network Application to log the traffic coming across this rule.
At the bottom of the screen, click “Add Entry” to add the rule to your firewall.
Firewall Rules
Ok! Now lets get into the real meat and potatos of the system, the Firewall Rules.
Clicking on the “Firewall Rules” tab, you will be presented with the “All” view of your firewall’s Access Control List (ACL). This can be very confusing for people new to the system so I’m going to break it down into easier to under and visualize segments:
First, lets look at the types of traffic:
- Internet (also known as WAN) – This is all rules governing traffic from outside your network coming into the network (the internet accessing stuff internal).
- LAN – This is all the rules governing traffic internal on your network. Example of this is devices on your “Trusted Network” to talk to devices on your “IOT Network”. Non of the communication goes out to the internet but still passes through the firewall.
- Guest – If you setup a network with the “Guest Network” check box, these rules will apply and traffic on that internal network won’t be considered “LAN” traffic. (I will probably cover this more indepth when I write my “Guest Network Setup” guide, coming soon so stay tuned.)
Each of these categories has a IPv6 variation. If you are using IPv6 on your network, you will need to configure the rules based on this. I don’t use IPv6 so I’ll be skipping these settings.
Next, we need to understand the traffic flow tags:
- Internet (WAN) In – This is all traffic coming from external (Internet) into your networks. Default settings for this is to Drop all traffic.
- Internet (WAN) Local – This is all traffic coming from external (Internet) and is designated for the firewall itself. Example of this is if you have a VPN setup on your Unifi Firewall, the traffic needs to get to the interface on the router. Default settings for this is to Drop all traffic.
- Internet (WAN) Out – This is all traffic that has made it through your firewall and is heading out onto the internet. I don’t use any rules with “Out” rules. Default settings for this is to Allow all traffic.
- LAN In – This is all traffic that enters the firewall from an internal network and is destined for another internal network. Default settings for this to Allow all traffic, meaning all networks can talk to each other by default. This is one setting I don’t like and is inforced so I will show you what I do to get around it and create a segregated network.
- LAN Local – This is all traffic from an internal network and is destined for the firewall itself. Default settings for this is Allow all traffic. I don’t have any rules for this and I’m still able to manage the firewall from an internal Unifi Network Application running on a server so not sure it’s needed.
- LAN Out – This is all traffic that has gone through the firewall and is coming out onto an internal network. Example of this is if you want to block all traffic from all other networks to a secure network but don’t want to do a specific rule for each network. Default settings for this is to Allow all traffic. I don’t use any rules with “Out” rules.
Guest In, Local and Out are the same as LAN but they are seperated so you can apply different rules based on the over all traffic type of guest.
Now that we understand the traffic flow, lets start creating some rules.
First thing we want to do is go to the “Internet” tab to view only the traffic rules managing traffic coming from the internet to the internal networks.
If you are just starting, you see a couple rules here, all with the “Lock” icon (meaning they are configured somewhere else in the system like Port Forwarding rules we covered earlier or they are inforced rules form the Unifi Network Application).
One of the first rules I created, even though it’s set to drop all traffic by default, I prefer to explicitly drop all traffic by creating rules for Internet In and Local. To do this, I created two rules that look like this changing the “Type” for each:
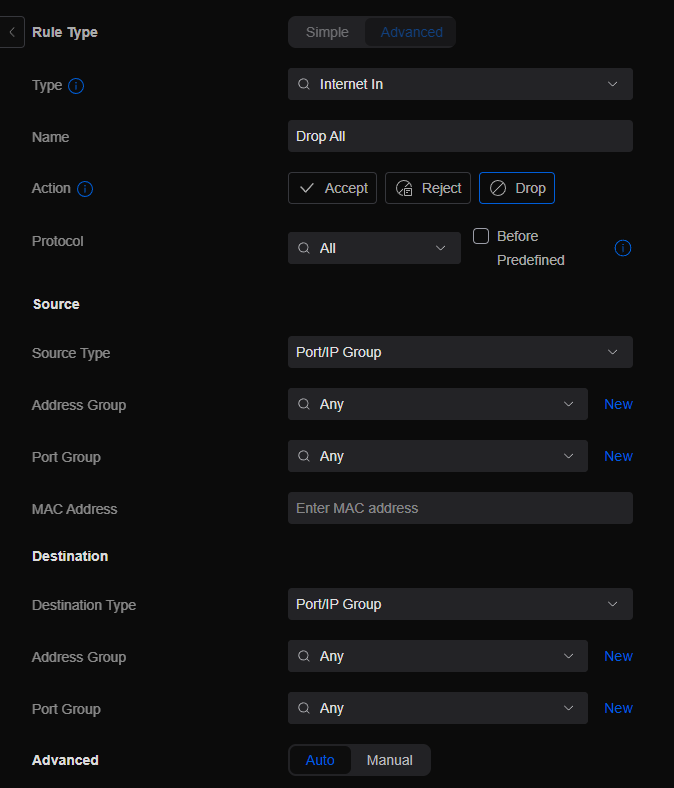
Make sure you uncheck the box for “Before Predefined” rules. If you don’t uncheck this box, non of your Port Forwards will work because it will put the block at the top of the list.
One note here for all newly created rules – the system will automatically put these rules at the bottom of the ACL. This is to safeguard you from locking yourself out of the configuration tools or breaking other rules. You will want to move these newly created rules up in the list so it works but doesn’t cause holes in your setup. For example, if you create a block all rule, you will need to move an allow rule above it in the list for it work since it processes the rules in order down the list. For the “Block All” rule, we want this to be at the bottom of the list so if traffic comes in and doesn’t match any rule above, it blocks it.
After you add the drop rules and maybe some port forwarding rules, you should have an Internet page that looks something like this:
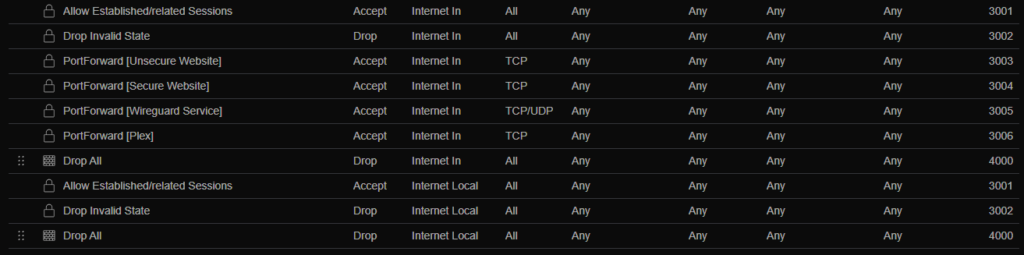
Two rules to call out and give some detail on are the “Allow Established/related Sessions” and “Drop Invalid State”. The first allows any return traffic coming back into your network after an internal system establishes the communication making sure the connection flows smoothly. We will copy this rule for our LAN rules next. The second drops all traffic that isn’t explicity designated and do not match any of the other states. This is just a good security practice.
Next, lets switch over to the LAN tab and start setting up or VLAN traffic.
First thing you will notice is all the predefined rules that “Allow Network xxx.xxx.xxx.xxx/xx Traffic” for each network you have. This is one of the quarks with the Unifi system that I wish they would let us edit. Basically what this does is make all traffic from each network allowed to go through the firewall and talk to every other network. If you are trying to do network segmentation, the whole point of having VLANs, this is what you don’t want. I understand why they do this, so new users aren’t blocking themselves from their system but it would be nice if we can edit these rules once we get our firewalls configured. To get around this and enable network segmentation, I’ll show you later the rules I have created to block all traffic. First we need to create our rules to make sure we don’t lock ourselves out.
Lets create the “Allow Established/related Sessions” rule. Scroll down and click “Create Entry”.
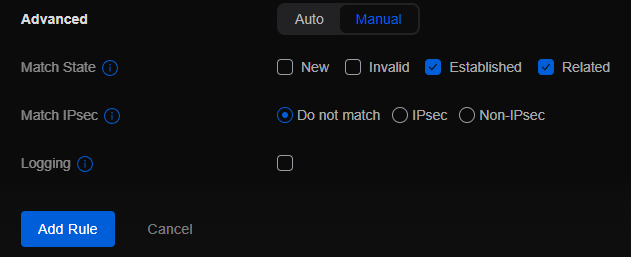
Name the rule accordingly and leave the rest defaults. Scroll down to the bottom and change the “Advanced” from “Auto” to “Manual”. Check the boxes next to “Established” and “Related”. Click “Add Rule” at the bottom of the page to add the rule to the ACL.
Once created, it should be at the top of the list since we left the check box to put it “Before Predefined” rules
With adding rules, there are essentially three ways we can designate Source/Destination information:
- Port/IP Group – These are predefined profiles where you can create a group of IP addresses or a group of Ports for the rules. One caution on this – If you use a IP Group for a rule, you have to use a Port Group and vice versa. You might need traffic that needs access over multiple ports but only going to one IP address, you still need to create a IP Group with that single IP address. Same if you have a rule where maybe 443 traffic for web needs to go to multiple servers, you still need to create a Port Group with the single port in it for this rule.
- Network – This allows you to select from the list of already setup Networks on your LAN and this rule will apply to any traffic for any clients on that network.
- IP Address – This allows you to enter a specific IP address and specific Port for the rule. Since I like to control the exact traffic traversing my network, I use this in my rules a lot and just have a large ACL with a lot of rules. It’s more management however I know exactly what has access to what.
Next we want to add a rule to allow us to continue to manage the Unifi Network Application after we put in a block rule.
Create a new Entry, name it accordingly and change the “Protocol” to “TCP”.
Next, you will need to decide who is going to have access to the management interface based on the Source Type I listed above. I recommend you start wide and then narrow down once you figure out how everything works. Start with the whole network you have your PC on and then maybe try a IP Group that includes just your PC’s and then if you really want to limit it, make it a specific IP address.
Then we just need to enter the “IP address” of the server where you Unifi Network Application lives and operates from and the port it’s on in the Destination field (in most cases 8443, but you can confirm by looking at your URL and seeing the number after the “:”).
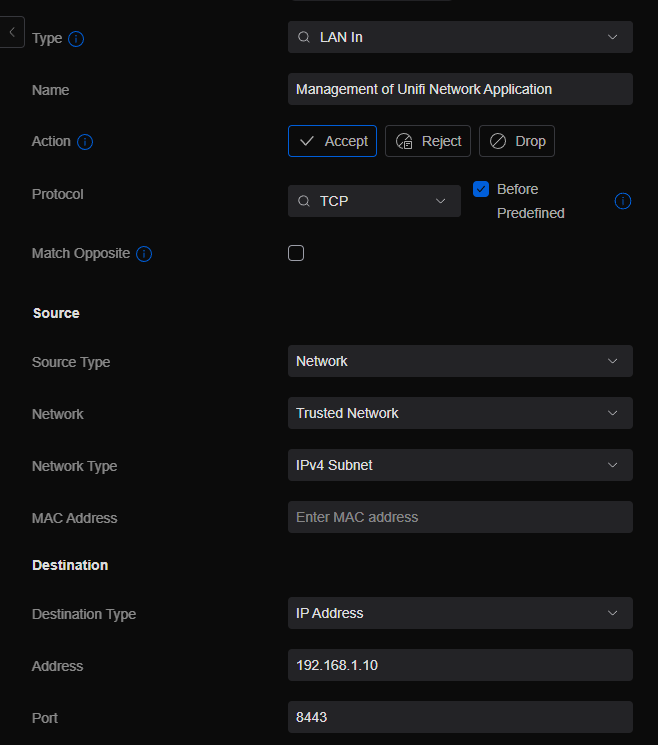
Click “Add Rule” to add it to the ACL. Your new rule should show up second in the list since it’s “Before Predefined” rules but after the existing rule we created.
Lastly, we need to create the “Block All” rule to enable true network segmentation.
Create a new entry, name it something like “Block All” and change the “Action” to “Drop”.
For Source, we want to leave it with the default “Any” so it blocks for all traffic on the LAN.
For Destination, we are going to use the Port/IP Group and create a new IP Group. Click the “New” button next to the “Address Group” list.

Enter a “Name” for the Profile, something like “All Internal Networks”. You will need to figure out what the overall subnet for your network is and enter it in the “IPv4 Address / Subnet” field and click “Add”. Here is a list of what your network could be:
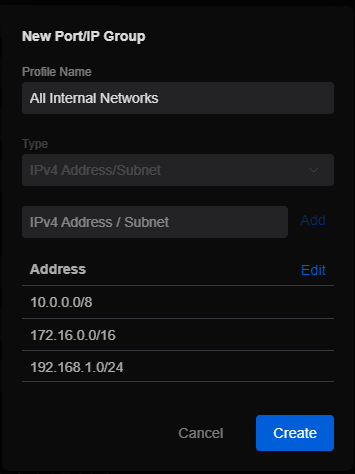
You might have to do some research on this since everyone’s network is different, I can’t tell you what your subnet value should be. If you are following this more advanced walk through, I hope you are able to figure this out on your own or I would stop and research that so you know what you are doing and don’t lock yourself out.
Once your subnet is entered and you click “Add” to add it to the list, click “Create” at the bottom to create the IP Group Profile.
Now just click “Add Rule” at the bottom. If you did everything correct and in the correct order, once the setting is pushed to your firewall, all traffic between networks should now be blocked but you can still access the management interface of the Unifi Network Application. If you all of a sudden get locked out from accessing it, you might have messed up the ACL and are now locked out. You will need to rebuild your Application server and restore from Backup.
Assuming everything is still working for you, you can now start creating your rules based on what you have learned here for the traffic you want to traverse your network.
Some rule suggestions:
- If you have an isolated Server VLAN – setup rules to allow DNS/DHCP/ICMP for ping from all your other networks.
- If you have Chromecasts/Apple TV’s on your network – create IP Groups/Port Groups for these devices and allow your other networks to control/cast to them.
- If you have Printers on a segregated IoT network, create a rule using 9100/tcp for other networks to continue to print.
- Create a tempory rule that you can pause/resume right above the “Block All” rule that you can use to troubleshoot new services to see if the firewall is causing a block to a new system (ex. “Allow all from PC to Server Network”).
Build out your ACL and soon you will have a secure network while still being able to access all your services. My current ACL is around 60 custom rules and is growing every day.
Now that I understand how the Unifi Firewall works and understand why they inforce the things they do, I do like it even if it took years to understand.
Hopefully this article helps you whether you are just starting in the Unifi or using the system for years not knowing your networks aren’t segregated by default. Let me know in the comments below if this helped you or if you would change anything with how I set things up.