I have been running a WireGuard VPN Server inside a Docker Container for about 2 years now. I never did an article on it because it was only supposed to be a temporary thing until I could setup a more stable solution directly on my Unifi Networking System. For the longest time, I only did direct connections for my laptop and phone, just a simple way to access internal systems from external networks. Wasn’t meant to be anything fancy, just something I could use when I’m away from home to restart services if one of my systems crashed.
Fast forward to about 2 months ago. Unifi released built-in support for WireGuard on their Firewalls. I thought “Ok, now is the time to get serious about my VPN solution and come up with a setup for all my devices. I went to setup the WireGuard service and…there was nothing there. After doing some looking online, Unifi only supports WireGuard VPN on the “Next Gen Firewalls” (ex. Dream Machine) and I am running a first gen USG (Unifi Security Gateway). I didn’t want to upgrade my USG because its been bullet proof since I installed it, haven’t hand any issues with it and I like having the fiber uplink. Since running a native service wasn’t an option, I thought it was about time to re-work my WireGuard Container setup and make it work as best I could. Not to mention, make some improvements for Traveling (hint, hint…come back next week for my new Travel Router Setup).
In this walk through, I’ll show you what I did to get my network all setup for external connections. Then, I’ll go over the deployment stack that I am using on Portainer. Finally, I’ll go over how to use the system to display your “peer configurations” (each clients config) and how to add them to the WireGuard clients.
Prerequisites
I will be setting this up on Portainer utilizing Docker containers running on Ubuntu 22.04. Here are my setup guide for all of those pieces of software:
- Installing Ubuntu Server 22.04 LTS
- Things to do after installing Ubuntu Server
- Install and Configure Docker, Docker Compose, and Portainer on Ubuntu Server
Next, you will need to setup Port Forwarding on your router to make the container accessible from the internet. Due to the sheer number of different Make and Models of routers out there, I won’t go over how to do this. You should be able to figure out farely easy by Googling “{insert router make and model} Port Forward” and follow one of the walk throughs. One note, the default port for Wireguard is “51820/udp” so use that number when setting it up. You could use a different port since we are using a Docker Container however I recommend you just use the default.
(Optional) I setup a seperate “DMZ” network for any systems that are accessible from the internet. This network is completely isolated from the rest of my network, only the system and ports I specifically allow can communicate with internal systems.
Deployment
Copy this code to a new Stack on your Portainer. Update the information you can change for your deployment and deploy the Stack.
---
version: "3.8"
services:
  wireguard:
    image: linuxserver/wireguard:latest
    container_name: wireguard-gateway
    cap_add:
      - NET_ADMIN
      - SYS_MODULE
    environment:
      - PUID=1000
      - PGID=1000
      - TZ=America/Los_Angeles
      - SERVERURL={external IP address}
      - SERVERPORT=51820
      - PEERS={peer identifiers}
      - PEERDNS={dns servers}
      - INTERNAL_SUBNET={wireguard container IP subnet}
    volumes:
      - /home/{username}/docker/wireguard/config:/config
      - /lib/modules:/lib/modules
    ports:
      - {port number}:51820/udp
    sysctls:
      - net.ipv4.conf.all.src_valid_mark=1
    restart: always
Stuff to change for your deployment:
- Version – This is be determined by the version of Docker you are running on your server. You can find this by entering the command “docker -v”. Here is a link to the Compatibility Matrix.
- Image – You can do “latest” and it will pull the current version. I prefer to look up the actual tag for the current version. This adds a little more management to updating however pinning it to a specific version adds reliability. Here is a link to the Wireguard Tag page.
- PUID and PGID – These numbers are specific to the user account you are running the container under. You can find this for your user by logging into your server and running the “id” command.
- TZ – Update this to be your Time Zone. Here is a link to a list of all Time Zones.
- External IP Address – This will be the IP address that is publicly accessible on the internet. Wireguard will use this address when creating your peer configurations so make sure you find the correct address. You can find your address by going to Google and searching “What is my IP address”.
- Peer Identifiers – This can be anything that you want to use to identifies the individual clients that connect to the server. For example, you can use “laptop”, “phone” or even just simple numbers. Seperate each one with a comma (ex. laptop,phone).
- DNS Servers – This will be the IP addresses of the DNS Servers you want your client devices to use. This can be on your internal network as long as your docker server has access to communicate with them. You can also use public DNS Servers like Google (8.8.8.8) or Cloudflare (1.1.1.1).
- Wireguard Container IP Subnet – This will be subnet that the Wireguard server will use for communication between the clients and the server. It’s not accessible outside the container so don’t worry about overlap. I did use a seperate IP subnet from anything else on my network just to be safe from any kind of routing issues.
- Volumes – The first volume listed is the location where all the persistant files for your container will be saved. We will access this later to look at our peer configurations. Leave the second volume alone.
- Ports – You will want to update this to a port that works well inside your environment. It will be the port that the client will connect to so I recommend leaving it with the default 51820.
- Restart – You will want to set this to the way you want docker to handle the restarting of the container. Here is a link to the Restart Policies to choose from. I prefer “always” so if it crashes or the server restarts, it will automatically restart the container.
Display Peer Config
Once you deploy your stack on portainer, the next step is to find the configuration files you will use to connect your client device to the container and establish an encrypted tunnel.
First you will need to either SSH into your Docker server or use the console if its a virtual server. Login with the user account that you used for the PUID and PGID in your stack.
“cd” (change directory) into all the way into your “config” folder that you entered in the stack.
Once you get into the folder, you should see a folder for each of the “peers” you entered into the stack.
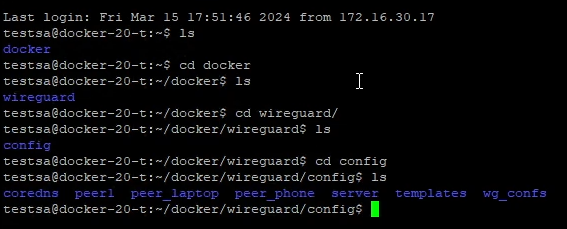
Pick the peer you want to configure and cd into that folder. If you run “ls”, you will see all the configuration files for that peer.

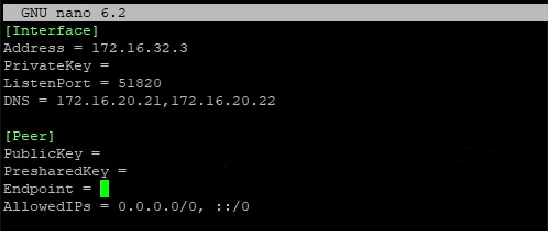
The file we care about for this section is the “.conf” file. Run the following command for your peer.
nano peer_{peer name}.conf
You should see all the configurations needed for your client to connect. Copy all the content of this .conf file to a notepad or somewhere you can access on the device you want to setup. If you do copy this to your computer and this is the device you want to use, save the file as a “.conf” file. We will have the client open this file to load the config.
Setup Client and Load Configuration
You will need to install the WireGuard Client on the device you want to connect. HERE is a link to the Client download page on WireGuards website. Find your client OS, download the client install files and install it or execute the commands. I will be using Windows for this deployment but all the other setups should be simular.
Once you launch the client, you should see something like this.
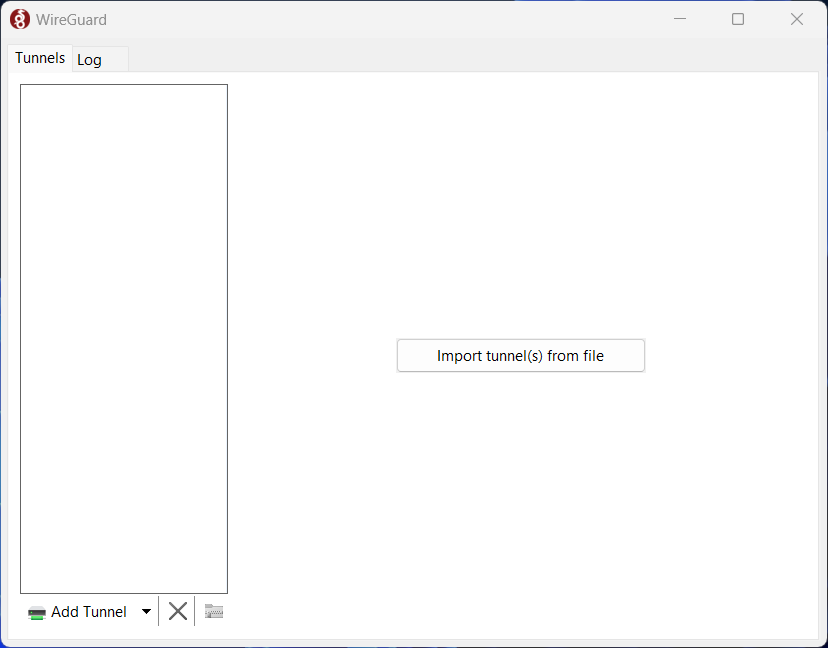
Click the “Import tunnel(s) from file”. Navigate to your “.conf” file you created in the last section, select and open it.
It should now load all the settings needed for the tunnel.
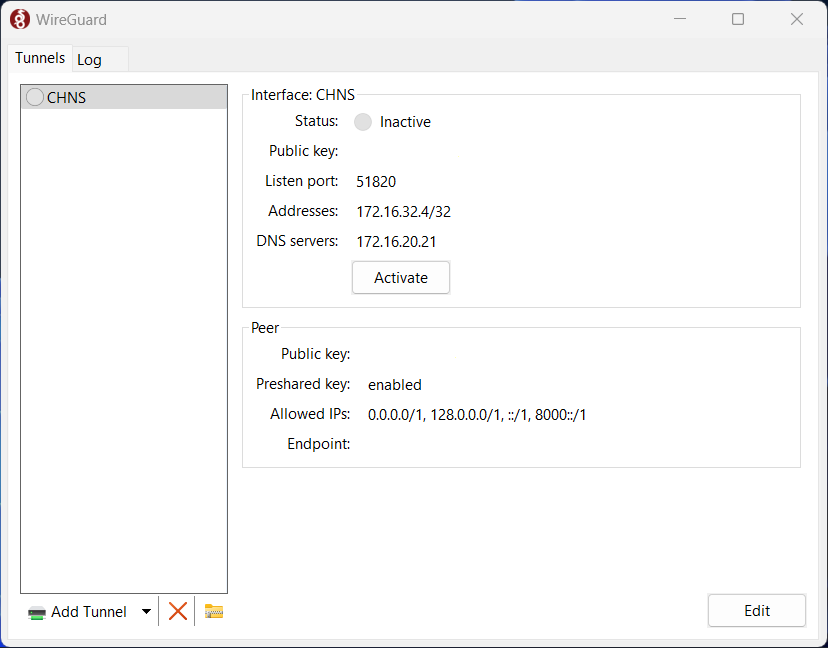
If you set everything up correctly, clicking on the “Activate” button will start the connection and establish the tunnel. If everything works and it makes connection, the Status at the top should turn to “Active” with a green icon.

You should now be able to access anything on your local network through the tunnel on any internet connection.
Use QR code to setup Phone/Tablet
One really nice feature WireGuard has is the ability to load configuration files using the camera on your device to capture a QR code.
Use the App Store on the device you want to setup to install the “WireGuard” application. Approve any of the security settings when launching to get into the app.
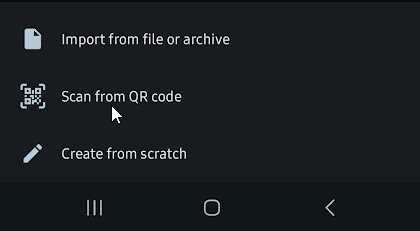
In the bottom right corner of the app, there is a “+” icon. Push it and select “Scan from QR code”.
Leave your phone at that point and switch back over to a SSH session to your Docker server.
Execute this command and you system should display a QR code.
docker exec -it {docker container name} /app/show-peer {peer name}
The “docker container name” is the exact name you entered into the stack and the “peer name” is the client configuration you want to use for this device.

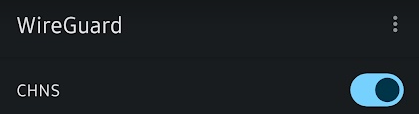
Now grab your phone or tablet and scan the code. It should load in your configuration without you having to type it in. Same with the PC client, enabling the toggle should connect you to your server and allow you to access your internal network from anywhere even on a mobile network.
Hopefully this walk through helps you with your VPN needs. I plan on using this container setup either until Unifi builds in support to the old UAGs or I upgrade to one of the supported models. I did have some issues with the Windows client staying connected over long periods of time. I couldn’t figure out why it would randomly stop but eventually deployed a travel router setup which stays connected constantly. I will have an article on that device and setup next week so come back for that. Leave a comment at the bottom if this helped or let me know if you changed anything about your setup.