This will be a basic configuration tutorial on the steps I take after doing a clean install of Ubuntu Server. This could be on a physical PC, virtual machine or Raspberry Pi. Feel free to cut this up and use only parts or add to your configuration if you don’t like the way I do something. This is almost more of a guide for myself so I don’t forget any of my steps.
If you have other things you like to do or changes, feel free to leave a comment at the bottom and I’ll look at adding it to this walk through.
If you followed one of my other tutorials on installing Ubuntu Server, this walk through picks up right where I left off. Just SSH into your server and get ready to configure. If you follow these steps in order, I will include things like server restarts at specific times to group tasks together to limit the amount of restarts.
Change SSH Port
First thing we will want to do is change the default SSH port away from “22”. Since I use password authentication because I don’t expose SSH to external, I still like to have a little more easy security from internal compromises by changing it. Enter the following command to edit the “sshd_config” file:
sudo nano -w /etc/ssh/sshd_config
If this is the first time running a sudo command during this session, you will be prompted for your password. You should then see a Nano Text Editor screen that looks like this:
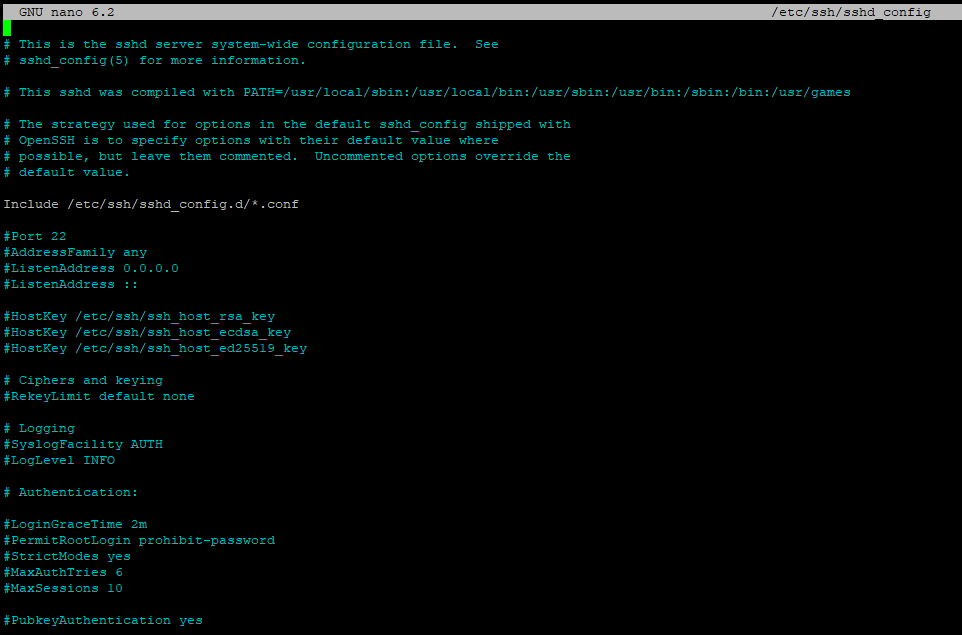
Using your arrow keys on your keyboard, arrow down to the line that says “#Port 22”. We want to uncomment this line (del the #) and change the port number to something other than “22”. This can be anything you like, just try not to use a port that is commonly used for other services.
Next, we will want arrow down to the line that says “#PermitRootLogin prohibit-password”. You will want to uncomment this line and change the “prohibit-password” to “no”. This will restrict SSH logins and not allow the Root user to login. You will still be able to login as Root from a physical console but not over SSH.
Press “CTRL + X” on your keyboard to exit the Nano screen.
When prompted, press “y” to save the file and then press “Enter” to save it to the same location.
Enable UFW Firewall
The UFW Firewall (or Uncomplicated Firewall) is built into Ubuntu server and just needs to be turned on. This is a simple to configure local firewall I use for basic port blocking to restrict access to my servers. Enter the following commands to enable it:
First, to make sure we don’t get locked out of our SSH session, we will want to add the newly changed port number to the UFW configuration:
sudo ufw allow in {ssh port number}
Next, we will want to set the default actions taken for incoming and outgoing traffic:
sudo ufw default deny incoming
sudo ufw default allow outgoing
Finally, we will want to turn on the UFW Firewall:
sudo ufw enable
As long as you entered your SSH port information to allow that traffic in, press “y” to proceed. If you skipped that step, you will probably lose your SSH session and not be able to reconnect.
Update Server
Before we restart the server and have all these settings take affect, we will want to do an upgrade on the system to install any new packages after the inicial install. If you did this as part of the OS install, feel free to skip this step and just restart the server. Enter the following command to inialize the full update process and reboot the server:
sudo apt update && sudo apt upgrade -y && sudo reboot now
Once your server restarts, the SSH port that you changed will now be the active port configured to listen for SSH sessions. Update your SSH client to reflect the new port and reconnect to your server.
Unattended Updates
In an effort to eliminate some of the management of my servers, if this server isn’t going to be a mission critical server where I have to schedule outages, I like to configure Unattended Updates to happen automatically in the backgound. There is a lot of settings you can change as part of this so feel free to figure out your own, this is a simple default list of settings I set.
First, we want to make sure Unattended Upgrades is installed on your system:
sudo apt install unattended-upgrades -y
Next, we will want to configure the system to automatically download and install all stable updates:
sudo dpkg-reconfigure --priority=low unattended-upgrades
You should see a screen that looks like this:
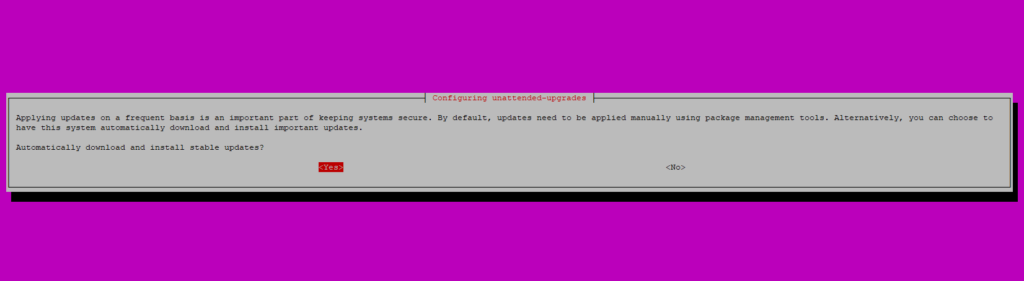
Press “Enter” to continue.
Next, we will configure out settings. Enter the following command to open the Nano Text Editor for the “50unattended-upgrades” file:
sudo nano "/etc/apt/apt.conf.d/50unattended-upgrades"
The settings I like to change are as followed: (When I say “Uncomment”, I mean deleting the “//” in front of it so it becomes active.)
- Uncomment “"${distro_id}:${distro_codename}-updates”;"
- Uncomment “"${distro_id}:${distro_codename}-backports”;"
- Uncomment “Unattended-Upgrade::Remove-Unused-Kernel-Packages “true”;”
- Uncomment “Unattended-Upgrade::Remove-New-Unused-Dependencies “true”;”
- Uncomment and change “Unattended-Upgrade::Remove-Unused-Dependencies “false”;” to “true”
- Uncomment and change “Unattended-Upgrade::Automatic-Reboot “false”;” to “true”
- Uncomment “Unattended-Upgrade::Automatic-Reboot-Time “02:00”;”
For that last setting, feel free to change the time to whatever works best for your environment and the services you will be running on this server. If I am using this server in conjunction with a secondary server, I will change this time on the secondary server so they don’t both go offline at the same time.
Press “CTRL + X” on your keyboard to exit the Nano screen.
When prompted, press “y” to save the file and then press “Enter” to save it to the same location.
Remove Old Linux Kernals
With the upgrade process, I like to configure the system to automatically remove any old kernal versions that are no longer being used to make sure the hard drive doesn’t fill up. I use a utility called Autoremove to do this. Enter these 3 commands to install and configure it to happen automatically on a monthly basis:
sudo apt autoremove -y
sudo sh -c 'echo "sudo apt autoremove -y" >> /etc/cron.monthly/autoremove'
sudo chmod +x /etc/cron.monthly/autoremove
Now that we have all of our updates configured and out of the way, lets finish with doing a bunch of random tasks you should do to keep a good standing server.
Change Root Password
Enter the following command to change the Root user’s Password:
sudo passwd root
You will be prompted to enter the new password and then confirm it by entering it a second time.
Configure Time Zone
Enter the following command to change the Time Zone of the server to the correct location:
sudo dpkg-reconfigure tzdata
You should see a screen popup asking for your Geographic area and Time zone. I select “America” and “Los Angeles” as all of my servers run out of the Pacific Northwest. You should see the current time back on the main screen. Make sure it matches what you are expecting.
Install and Configure NTP
I also like to install and setup NTP so my servers time is kept in sync. Run the following command to install NTP:
sudo apt install ntp -y
You can use the following commands to make sure the NTP service is now running and check the time/date that its reporting:
service ntp status
sudo date
Install Cockpit (optional)
If you would like GUI web interface for management and monitoring of your server, my personal preferance is Cockpit. All you need to do is install it and it takes care of all the configuration on the backend to pull system information. Run the following commands to install it on your server and then since we setup UFW, we will need to open the port it uses (9090) for access.
sudo apt install cockpit -y
sudo ufw allow in 9090
Now, you should be able to use your web browser to navigate to “https://{server IP address}:9090” and see a login screen like this:

Login with preferably your user account. If you need to, you can use the Root user however its not recommended.
Thats it for basic configurations on a new Ubuntu Server. You are now ready to start deploying services onto this clean linux server.
Like I said before, if you have other things you like to do on your setups or things to change, leave a comment and I’ll look to keep this up to date.