Duplicati is a backup client that securely stores encrypted, incremental, compressed remote backups of local files on cloud storage services and remote file servers. I deploy this container on all my Docker servers to do nightly backups of all my persistant files and upload them to my backup server using FTP.
This walk through will step you though deploying the container through a stack on Portainer, configure a backup schedule and set it up to upload to a FTP server.
Deployment
---
version: "3.8"
services:
  duplicati:
    image: linuxserver/duplicati:latest
    container_name: duplicati
    environment:
      - PUID=0
      - PGID=0
      - TZ=America/Los_Angeles
    volumes:
      - /home/{username}/config/duplicati:/config #Config Files
      - /home/{username}/config:/ConfigBackup #What to Backup
      - /home/{username}/database:/DatabaseBackup #What to Backup
    ports:
      - {port number}:8200
    restart: unless-stopped
Stuff to change for your deployment:
- Version – This is be determined by the version of Docker you are running on your server. You can find this by entering the command “docker -v”. Here is a link to the Compatibility Matrix.
- Image – You can do “latest” and it will pull the current version. I prefer to look up the actual tag for the current version. This adds a little more management to updating however pinning it to a specific version adds reliability. Here is a link to the Duplicati Tag page.
- PUID and PGID – These numbers are specific to the user account you are running the container under. The Root user is “0” for both. You can find this for your user by logging into your server and running the “id” command.
- TZ – Update this to be your Time Zone. Here is a link to a list of all Time Zones.
- Volumes – The first mapping you need for sure, this is where all the persistant configuration files for the Duplicati container will be stored. Update the information with your username or change the location before the “:” to a location of your choosing. The next two mappings are optional, these are the files that you want to backup. I store all my configuration files for my containers in the “config” folder and all the files for any databases in the “database” folder. These mappings will come into play later when we start configuring the backups.
- Ports – You will want to update this to a port that works well inside your environment. It will be the port that you connect to the web interface of the container.
- Restart – You will want to set this to the way you want docker to handle the restarting of the container. Here is a link to the Restart Policies to choose from. I prefer “unless-stopped” so if it crashes or the server restarts, it will automatically restart the container but if you stop the container manually, it won’t try to start it on the next server restart.
Configure Duplicati
Now that your Duplicati container has been deployed, lets connect to it and start setting it up.
Open your web browser and navigate to “http://{server name or IP}:{port you configured in the stack}”.
You should be presented with the “First run setup” popup:

I would always suggest clicking “Yes” and setting a password but if you are the only one that has access, totally ok to not have a password, its up to you. If you do set a password, you will be kicked out to a login screen and asked to enter the newly set password.
Once you get to the “Home” page, click on “Add backup”

Make sure “Configure a new backup” is marked and click “Next”
On the “General” screen, you want to fill in the Name, Description and set a Passphrase. This will be the password prompted for when you go to do a file restore. Then click “Next”.

On the “Destination” screen, under “Storage Type” you will want to select whatever backup storage you want to use. You can select “Local folder or drive” and pick a folder on the server itself, you can do what I do and send it to a FTP server on my local network (example settings below), or you can select from one of the many cloud storage providers that Duplicati is compatible with (Dropbox, Google Drive, OneDrive, etc). Make sure you test the connection before moving forward to make sure you have access and everything is working as expected. Then click “Next”.

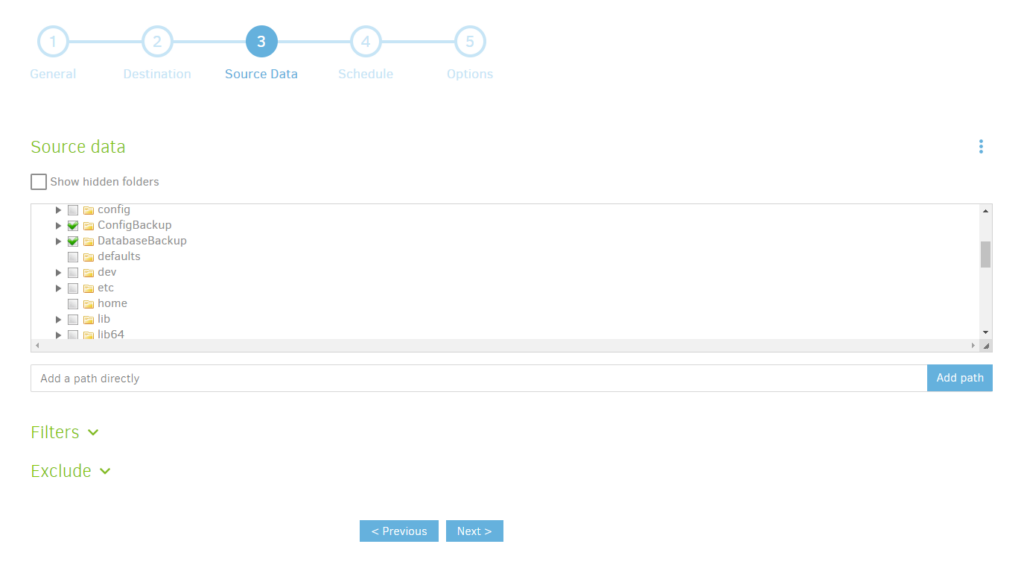
On the “Source Data” screen, you will need to find the folders that you mapped as part of the “Volumes” in the stack. If you expand “Computer”, you should see them and be able to expand them to see the files and folders you want to backup. The name will be everything to the right of the “:/” in your volume configuration. Check the box next to the folders you want to backup. Then click “Next”.

On the “Schedule” screen, set the schedual for when you want this job to run. Then click “Next”.

On the “Options” screen, you will want to set the “Backup retention” time or by default, all backups will be saved and your backup storage will get filled up. I set mine to “Keep a specific number of backups” and set it for 14 days. Then click “Save”.

Duplicati will then save your job and send you to the “Home” screen where you should see your job listed. I would click the “Run now” button and manually kick off your first backup to see if there are any errors which will show up at the bottom of the screen.
Thats it! You are now backing up your docker server.
I have posted a seperate walk through for Restoring Files.


