Tandoor is powerful container that allows you to take control of your cooking. The main purpose for the application is to manage recipes but you can also do stuff like meal planning, shopping lists and create your own “Cookbooks”. If you make your server publicly accessible, you can even share recipes directly from the application to anyone.
I mostly use it for managing and tracking my recipes. It works great on a tablet or my phone right next to me while I’m cooking. It has added features like being able to on the fly modify recipes or just leave comments attached to each recipe for different things to try or tweaks that work but you don’t want to totally modify the original.
Another great feature is the ability to directly import from other online recipe websites directly into your container. Simply copy and paste the URL into the system, make sure it imports correctly and done. This is great for people that like to save recipes on Pinterest or other sites like that. Just copy them into your system and edit to be whatever you want.
In this article, I’ll go over the Deployment through a Portainer Stack. Then I’ll go over the basic’s of how to use the web interface and some of the customizations I have setup.
Prerequisites
I will be setting this up on Portainer utilizing Docker containers running on Ubuntu 22.04.4. Here are my setup guide for all of those pieces of software:
- Installing Ubuntu Server 22.04 LTS
- Things to do after installing Ubuntu Server
- Install and Configure Docker, Docker Compose, and Portainer on Ubuntu Server
I don’t have my test server upgraded to Ubuntu 24.04 which just released (find a guide on installing that HERE), however this walk through should work on that system as well.
Deployment
Copy this code to a new Stack on your Portainer. You can also copy this directly into a Docker Compose yaml file. Update the information for your deployment and deploy the Stack.
---
version: "3.9"
services:
  database:
    image: postgres:16.3
    volumes:
      - database:/var/lib/postgresql/data
    environment:
      - POSTGRES_DB=postgres
      - POSTGRES_USER=postgres
      - POSTGRES_PASSWORD={database password}
    restart: always
  app:
    image: vabene1111/recipes:latest
    ports:
      - {port number}:8080
    volumes:
      - app:/opt/recipes/staticfiles
      - app:/opt/recipes/mediafiles
    environment:
      - SECRET_KEY={secret key}
      - DB_ENGINE=django.db.backends.postgresql
      - POSTGRES_HOST=database
      - POSTGRES_PORT=5432
      - POSTGRES_DB=postgres
      - POSTGRES_USER=postgres
      - POSTGRES_PASSWORD={database password}
      - DEBUG=0
      - GUNICORN_MEDIA=0
      - TZ=America/Los_Angeles
    restart: always
    depends_on:
      - database
volumes:
  database:
  app:
Stuff to change for your deployment:
- Version – This is be determined by the version of Docker you are running on your server. You can find this by entering the command “docker -v”. Here is a link to the Compatibility Matrix.
- Postgres Version – At the time of writing this, 16.3 is the current latest version of Postgres. I would suggest going with the newest release from the start, at a minimum version 16.0 just to make sure you don’t have upgrade issues.
- Database Volume – This is where all the persistent configuration files for the database container will be stored. I’m choosing to go with a Docker Volume managed through Portainer here however you can just as easy do a blind mount to somewhere on the host file system (ex. /home/user/docker/tandoor/database). If you do change it, remember to only change the area to the left of the “:”. If you change it to the blind mount, don’t forget to also remove it in the “volumes:” section at the bottom.
- Postgres Password – Update this to a random password, I suggest you make it something very long using letters, numbers and symbols as you won’t need to type this anywhere else. Also update the same field in the environmental variables down in the main app section to match.
- Restart – I usually set this to “Always”. If you want to change it to something else, just keep in mind if the container has an error, it might not start up again correctly. Here is a link to the Restart Policies to choose from. Make sure you change this for both containers.
- App Version – You can do “latest” and it will pull the current version. I prefer to look up the actual tag for the current version. This adds a little more management to updating however pinning it to a specific version adds reliability. Here is a link to the Recipes Tag page.
- Ports – You will want to update this to a port that works well inside your environment. It will be the port that you connect to the web interface of the container.
- App Volume – Just like the Database Volume, I choose to use Docker Volumes managed by Portainer. Update this to fit your deployment style the same as the database volume.
- Secret_Key – Like the database password, this is a long password the system will use when building the app container. Make it something long using letters, numbers and symbols.
- TZ – Update this to be your Time Zone. Here is a link to a list of all Time Zones.
Configuration
Now that we have the docker stack deployed on our server, lets access the web interface and start customizing it.
Open your web browser and navigate to “http://{server name or IP}:{port you configured in the stack}”.
You should see a Setup screen that looks like this:
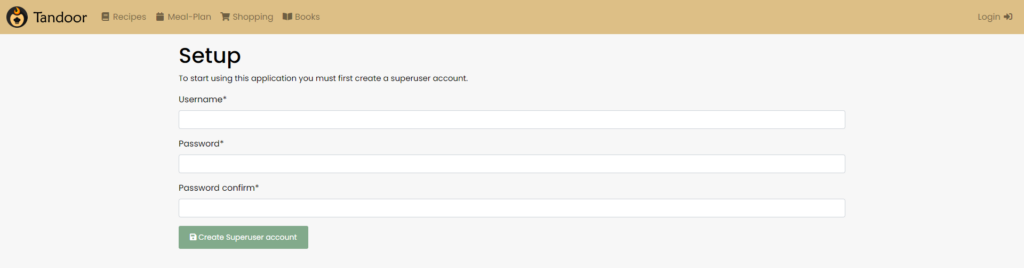
Enter a Username and Password for your main Superuser account. There isn’t a main “Admin” account, you basically build accounts for each user and then create “Spaces” for each user. If you have multiple users, each user can invite other users to join their space.

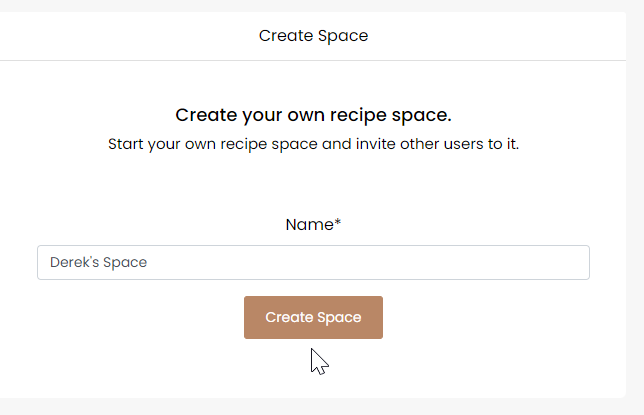
Once your account is created, login with it.

Next we need to create a space. Enter in a name for your space and click “Create Space”.
Create Recipe
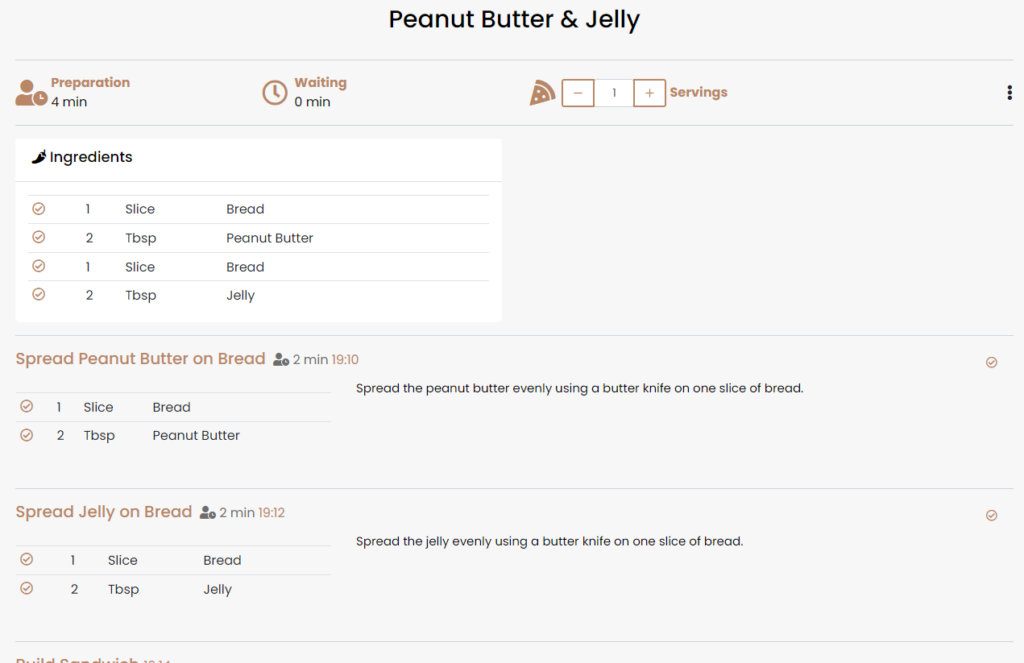
Now that we have a “Space” created, lets make our first recipe.
Click the “Create” button.

Enter a name for the recipe and click “Save”.

Enter a description of the recipe and the general properties for the recipe.
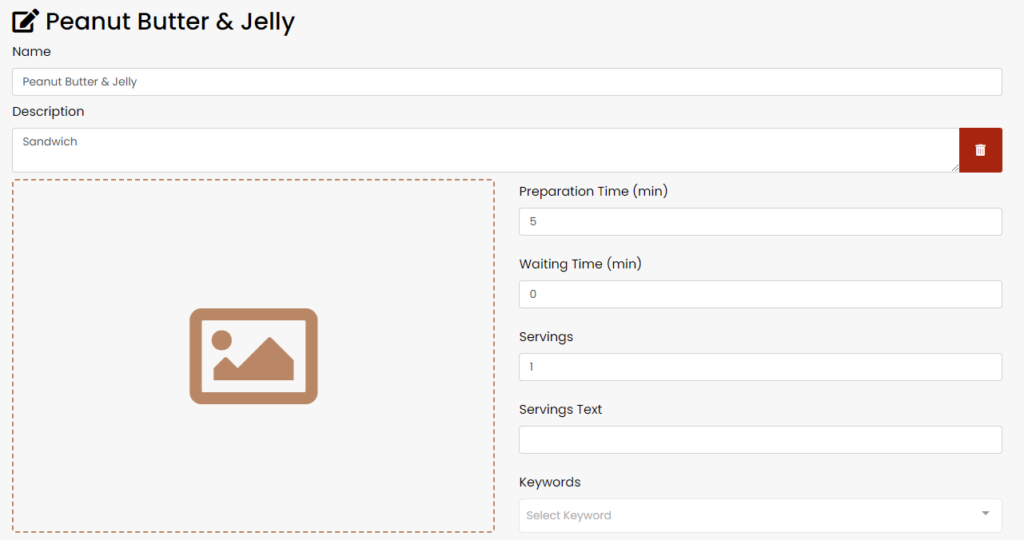
Under the “Properties per servings” section, you can enter general amounts for each serving however it’s usually better to build in the amounts into the steps and let the system consolidate everything.

Build out your steps, adding the amount of time it takes, ingredients and instructions.
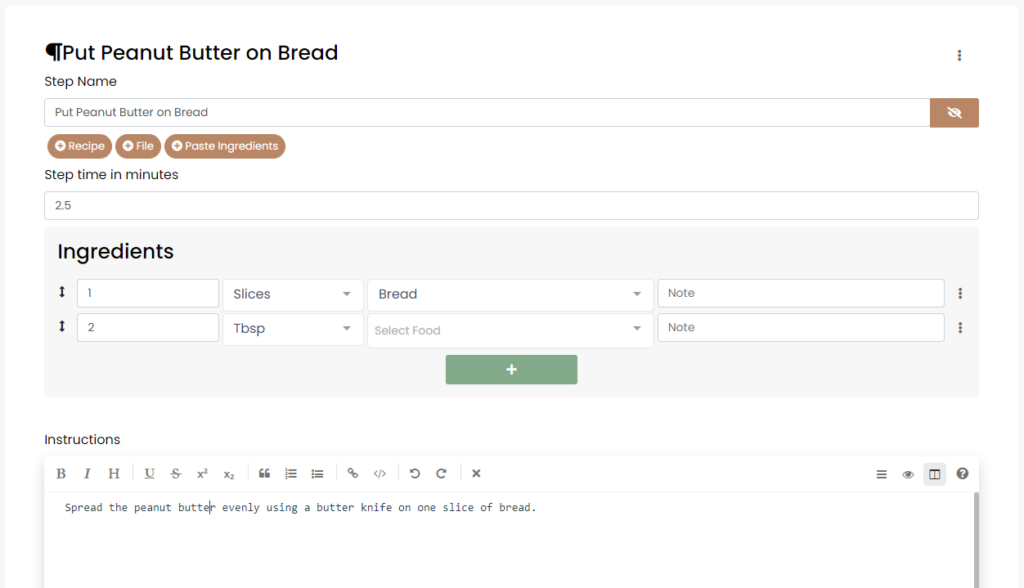
Once you have finished entering all the steps, click “Save & View”.

You will be taken to the main recipe overview. Now use this when cooking to get the proper amounts based on how many servings and when the meal will be finished based on step time.
Import Recipes
Next, lets import a recipe from one of the common recipe sites so we can edit it and make it our own.
Start by clicking the “+” in the top right corner. Then click “Import Recipe”.

Copy the URL from the recipe site and paste it in the search field. As soon as you paste it, it will go out to that URL and pull in all the information it can find on the recipe.
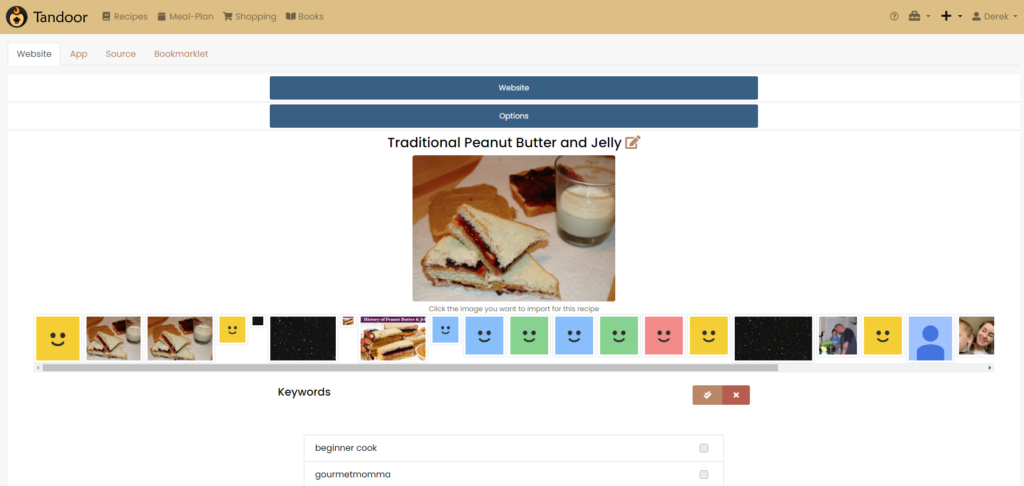
Select an image to be imported (although I haven’t been able to get images to work on my system). Then select any “Keywords” to tag the recipe for easy searching. Then modify the steps so they fit your style and have all the correct information you need. Once finished, click the “Import” button at the bottom.

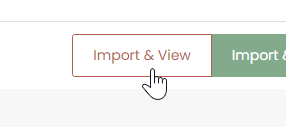
Click “Import & View” to see what it looks like after importing.
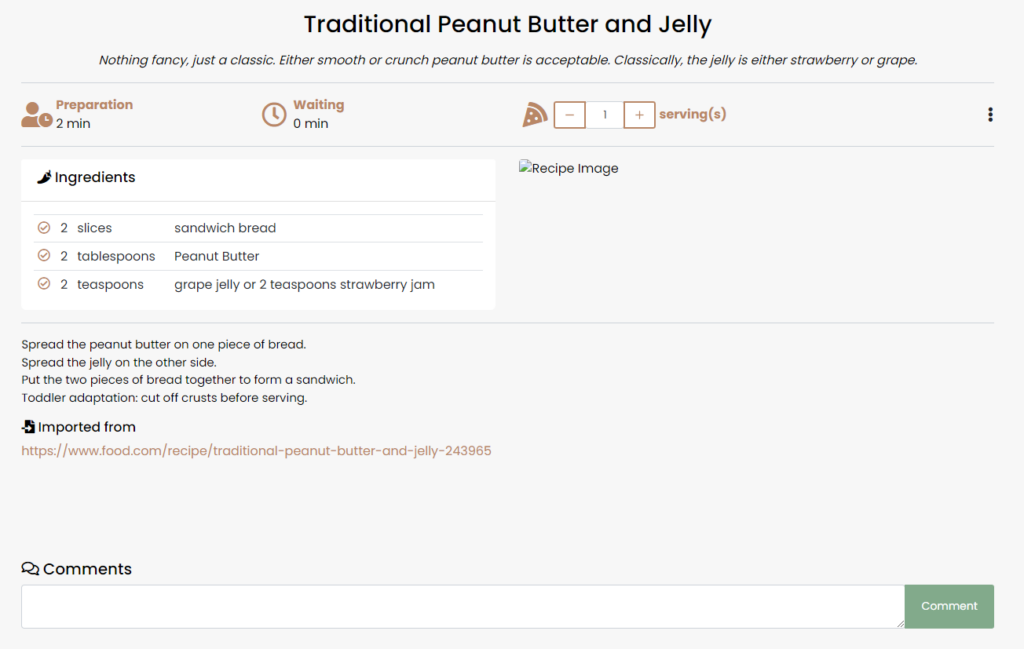
Once imported, you can now edit the recipe to be any steps or ingredients you want. Notice it also saves the URL that you imported it from so if you find any issues with the recipe, you can go back to the source and adjust it to be correct.
Share Recipes
Once you have your recipes created and your container is publicly accessible, one really cool feature of this container is the ability to share recipes with anyone and everyone. All they need is the share link and they can view it, no login required.
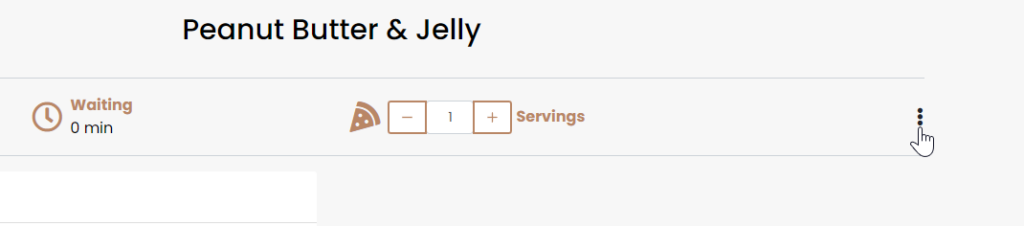
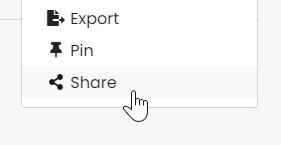
To do this, go the the recipe you want to share and click the 3 stacked dots in the right corner.
Then click the “Share” button at the bottom of the menu.
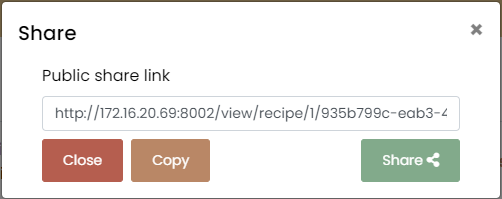
Click the “Share” button to share it through text message if you are on your phone or email it directly to someone. Alternatively, you can click “Copy” to copy the URL to your clipboard and paste it wherever you need.
Invite Others to Your Space
One really nice feature of this application is the ability for multiple people on the same container to have their own spaces and you can invite them to yours, giving them the ability to just view your recipes or even edit and add more to your space.
There is two ways to do this. If you choose to setup an email server on your container, you can enter the users email and the container will automatically send them an invite to your Space. The other and easier way I do it, when you invite someone to your space, it generates a unique token for them which you can manually send to them and they can paste under their user account and get connected.
I’ll walk you through how to do that now:
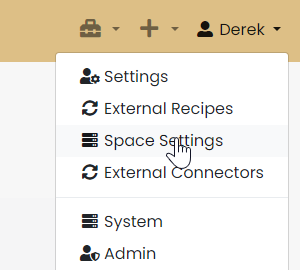
First, click on your username in the top right corner and then click “Space Settings”.
Then under the “Invite” section, click on “Create”.

A popup box will appear asking for information of the user you want to add. Click the “Group” dropdown and select how much permission the user will have access to do. Admin – They have full control of the space, User – They can create and edit recipes however they can’t manage the space, or Guest – can only view the space and the recipes in it. Enter an Email for the user to associate with their account. Even if you don’t have email server settings setup, you still need to do this for the user. Then click “Save” at the bottom.

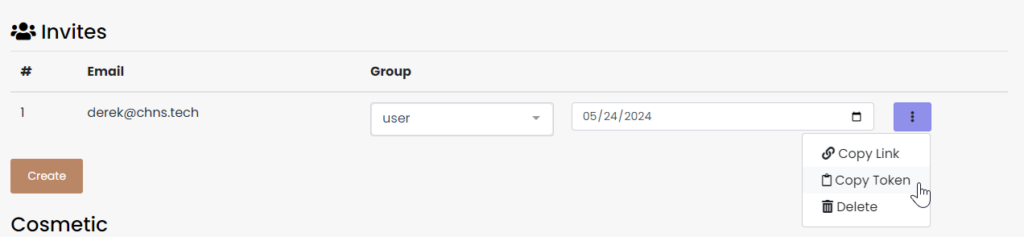
Once the invite has been created, you can click the dropdown next to the invite and click “Copy Link”. You can send this to the user and they can use it to setup an account. Alternatively, if the user already created an account on your container, you can just “Copy Token” and send that to them and they can paste it in their “Space Overview” area.
When the user clicks the link, they will be taken to the “Create an Account” screen where as long as they use the same email account, they will get access to your Space.
This is just scratching the surface of this container, you can do full meal plans, shopping lists and cook books that I didn’t cover. Recipes is what I primary use this container for and its worked great for that.
Comment below if this helped you deploy the container and share your favorite recipe URL so we can all share.